Star Battle · EN
Star Battle for Beginners: Find Your First Forced Stars
Start Star Battle by excluding impossible cells until a row, column or region has only one possible position for its star. On GooferThings' one-star board, every confirmed star then clears the rest of its row, column and region, plus every touching neighbor.
Make a map of the constraints
Before placing anything, identify the six rows, six columns and six outlined regions. Trace narrow branches and corners of each region. A shape that appears to be two separate pieces at first glance may connect through a small neck. You need the actual region membership of every cell when you count its remaining positions.
Your opening goal is to find a forced statement, not the most attractive location. A small region may be useful because it offers few alternatives, but there is no rule saying its star goes in its center. Write down exclusions only when a quota or the no-touch rule proves them. Unmarked cells remain undecided.
First deduction: finish a group with one position
A group is a row, column or outlined region. If it still needs its star and every cell except one is excluded, the remaining cell must hold the star. Count the whole group, including any disconnected-looking extension of a region. This last-position technique is the most direct place to begin a scan.
Immediately explain the placement to yourself: this group needs one star, these alternatives are impossible, therefore this cell is forced. That short sentence distinguishes a deduction from a hunch. If several positions remain, keep all of them available; a region with two candidates has provided useful information even before either candidate is chosen.
Second deduction: clear a completed group
After placing a star, exclude every other cell in its row, column and region. Do this before looking for a new star. A placement often creates a last position far across the board because its column exclusion cuts through another region. Following all three groups makes these chains much easier to see.
Then clear every touching cell, including diagonals across region borders. In the one-star version, some neighboring cells are already excluded by the completed row or column. Diagonal neighbors may add new information. Mark the union of these consequences without counting the same exclusion as several independent reasons to place another star.
Third deduction: use an unresolved star's shared reach
Sometimes a region's remaining candidates are close together. A nearby cell that would touch a star at every one of those positions is impossible. To test this, compare the nearby cell with each candidate in turn. You may exclude it only if none of the region's alternatives permits it to contain a star.
This shared-neighbor deduction can begin a solve even before the first star is placed. It requires care: the combined area touched by at least one candidate is too broad. You need the intersection of their forbidden neighborhoods, meaning cells forbidden under every alternative. Candidates that do not all affect a cell give you no conclusion about it yet.
Fourth deduction: compare a confined region with its line
If all remaining positions for a region's star lie in one row, that row's star must belong to the region. Exclude cells in that row outside the region. The same reasoning works for a column. You have located the star's group without selecting its exact cell, which often removes a competing region's last alternative.
The converse also works: if every remaining position in a row lies inside one region, the region cannot use a star outside that row. Check the one-star quota before doing this. The inference uses the fact that the row and region each need exactly one star, and that their shared candidate cells must satisfy both requirements.
Start with this easy puzzle
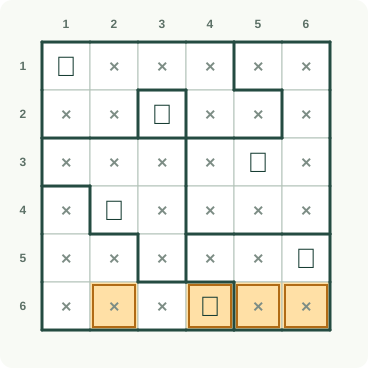
A star is a placement; a cross is a confirmed empty cell. Thick lines mark regions and orange outlines identify the latest decisions. Tinted squares remain undecided.
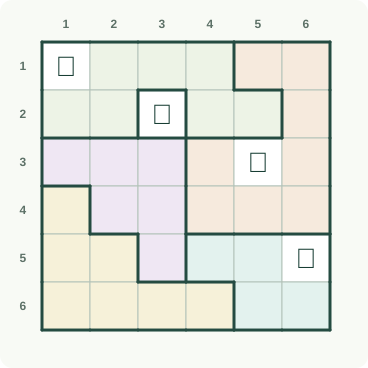
Step 1: Clear a completed row
The first row already contains its star. Every other cell in that row must be empty; an empty mark is a deduction, not a placed star. Mark R1C2, R1C3, R1C4 and R1C5 as empty.
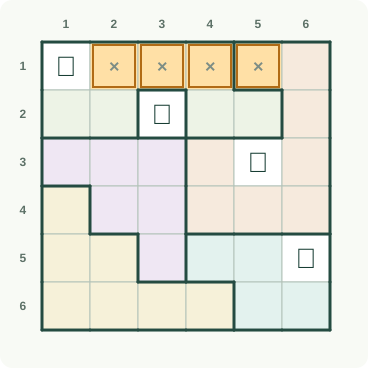
Step 2: Clear its crossing column
Finish clearing the first row, then clear the first column around its established star. Each line permits exactly one star, regardless of region boundaries. Mark R1C6, R2C1, R3C1 and R4C1 as empty.
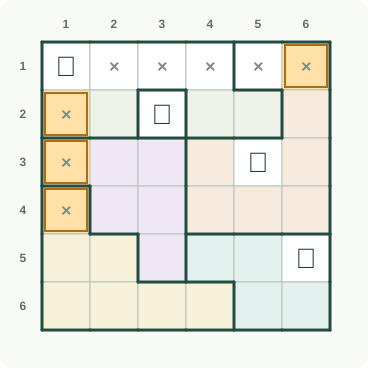
Step 3: Use the outlined-region quota
Complete the first column’s empty marks. The outlined region containing its star also has its quota, so eliminate its remaining highlighted cells. Mark R5C1, R6C1, R2C2 and R2C4 as empty.
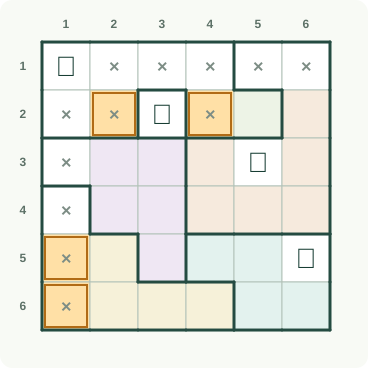
Step 4: Carry the exclusions into rows
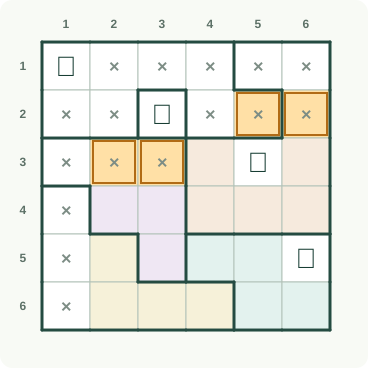
Carry the region exclusions into the second row, then clear cells in the third row around its established star. These marks reduce later region choices. Mark R2C5, R2C6, R3C2 and R3C3 as empty.
Step 5: Clear the third row and column
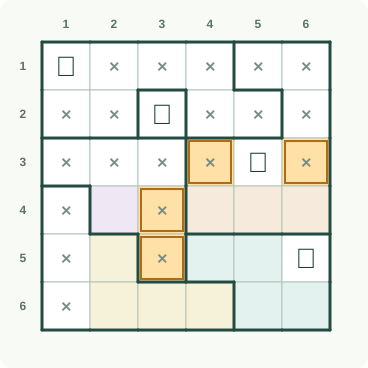
The third row and third column already contain their required stars. Mark their other highlighted cells empty before searching for another placement. Mark R3C4, R3C6, R4C3 and R5C3 as empty.
Step 6: Complete a large region’s exclusions
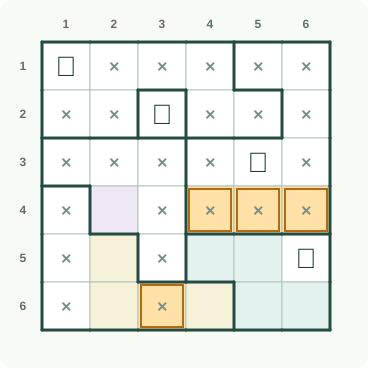
Complete the third column’s exclusions. The large outlined region already contains its star, so remove the remaining highlighted cells in that region. Mark R6C3, R4C4, R4C5 and R4C6 as empty.
Step 7: Place the next forced star
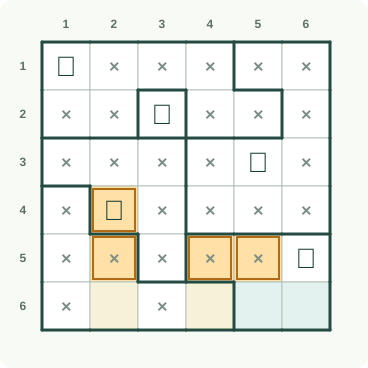
The fourth row has just one remaining star position. Place it, then clear the other highlighted cells in the fifth row around its existing star. Mark R4C2 as a star; Mark R5C2, R5C4 and R5C5 as empty.
Step 8: Finish the final column quotas
Use the remaining column quotas and outlined-region quota. They remove the last alternatives, leaving the final star in the bottom row. Mark R6C5, R6C6 and R6C2 as empty; Mark R6C4 as a star.
Recover from a stall without guessing
If no star is immediately forced, stop scanning only for stars and scan for exclusions. Ask whether a region is confined to one line or whether its remaining positions share a forbidden neighbor. A single new exclusion can be enough to unlock a last-position deduction somewhere else. Review both orientations; columns are easy to neglect after reading left to right.
If a group has no candidates, audit your most recent exclusion. In particular, check that you did not clear an entire region around an unconfirmed candidate or omit a possible cell at a border. For practice, aim to complete the puzzle with a reason for each placement. Speed follows from recognizing constraints, not from committing earlier.
Sources and background
Worked example: follow each deduction
Read rows from top to bottom and columns from left to right, starting at 1. Read each instruction, then compare the orange changes with the previous picture. Keep undecided cells or segments open until the explanation settles them. This small Star Battle uses one star per row, column and outlined region.
★ star; × empty; ? = undecided
Follow these changes in order; the picture below includes all of them.
Mark row 1, column 2 empty (×). row 1 must contain exactly one star. The existing stars and empty marks leave only the stated choice here; do not add a second star or leave the unit without one.
Mark row 1, column 3 empty (×). row 1 must contain exactly one star. The existing stars and empty marks leave only the stated choice here; do not add a second star or leave the unit without one.
Mark row 1, column 4 empty (×). row 1 must contain exactly one star. The existing stars and empty marks leave only the stated choice here; do not add a second star or leave the unit without one.
Mark row 1, column 5 empty (×). row 1 must contain exactly one star. The existing stars and empty marks leave only the stated choice here; do not add a second star or leave the unit without one.
Step 1: the orange outlines mark the changes explained above. Follow these changes in order; the picture below includes all of them.
Mark row 1, column 6 empty (×). row 1 must contain exactly one star. The existing stars and empty marks leave only the stated choice here; do not add a second star or leave the unit without one.
Mark row 2, column 1 empty (×). column 1 must contain exactly one star. The existing stars and empty marks leave only the stated choice here; do not add a second star or leave the unit without one.
Mark row 3, column 1 empty (×). column 1 must contain exactly one star. The existing stars and empty marks leave only the stated choice here; do not add a second star or leave the unit without one.
Mark row 4, column 1 empty (×). column 1 must contain exactly one star. The existing stars and empty marks leave only the stated choice here; do not add a second star or leave the unit without one.
Step 2: the orange outlines mark the changes explained above. Follow these changes in order; the picture below includes all of them.
Mark row 5, column 1 empty (×). column 1 must contain exactly one star. The existing stars and empty marks leave only the stated choice here; do not add a second star or leave the unit without one.
Mark row 6, column 1 empty (×). column 1 must contain exactly one star. The existing stars and empty marks leave only the stated choice here; do not add a second star or leave the unit without one.
Mark row 2, column 2 empty (×). the outlined region containing row 1, column 1 must contain exactly one star. The existing stars and empty marks leave only the stated choice here; do not add a second star or leave the unit without one.
Mark row 2, column 4 empty (×). the outlined region containing row 1, column 1 must contain exactly one star. The existing stars and empty marks leave only the stated choice here; do not add a second star or leave the unit without one.
Step 3: the orange outlines mark the changes explained above. Follow these changes in order; the picture below includes all of them.
Mark row 2, column 5 empty (×). the outlined region containing row 1, column 1 must contain exactly one star. The existing stars and empty marks leave only the stated choice here; do not add a second star or leave the unit without one.
Mark row 2, column 6 empty (×). row 2 must contain exactly one star. The existing stars and empty marks leave only the stated choice here; do not add a second star or leave the unit without one.
Mark row 3, column 2 empty (×). row 3 must contain exactly one star. The existing stars and empty marks leave only the stated choice here; do not add a second star or leave the unit without one.
Mark row 3, column 3 empty (×). row 3 must contain exactly one star. The existing stars and empty marks leave only the stated choice here; do not add a second star or leave the unit without one.
Step 4: the orange outlines mark the changes explained above. Follow these changes in order; the picture below includes all of them.
Mark row 3, column 4 empty (×). row 3 must contain exactly one star. The existing stars and empty marks leave only the stated choice here; do not add a second star or leave the unit without one.
Mark row 3, column 6 empty (×). row 3 must contain exactly one star. The existing stars and empty marks leave only the stated choice here; do not add a second star or leave the unit without one.
Mark row 4, column 3 empty (×). column 3 must contain exactly one star. The existing stars and empty marks leave only the stated choice here; do not add a second star or leave the unit without one.
Mark row 5, column 3 empty (×). column 3 must contain exactly one star. The existing stars and empty marks leave only the stated choice here; do not add a second star or leave the unit without one.
Step 5: the orange outlines mark the changes explained above. Follow these changes in order; the picture below includes all of them.
Mark row 6, column 3 empty (×). column 3 must contain exactly one star. The existing stars and empty marks leave only the stated choice here; do not add a second star or leave the unit without one.
Mark row 4, column 4 empty (×). the outlined region containing row 1, column 5 must contain exactly one star. The existing stars and empty marks leave only the stated choice here; do not add a second star or leave the unit without one.
Mark row 4, column 5 empty (×). the outlined region containing row 1, column 5 must contain exactly one star. The existing stars and empty marks leave only the stated choice here; do not add a second star or leave the unit without one.
Mark row 4, column 6 empty (×). the outlined region containing row 1, column 5 must contain exactly one star. The existing stars and empty marks leave only the stated choice here; do not add a second star or leave the unit without one.
Step 6: the orange outlines mark the changes explained above. Follow these changes in order; the picture below includes all of them.
Place a star at row 4, column 2. row 4 must contain exactly one star. The existing stars and empty marks leave only the stated choice here; do not add a second star or leave the unit without one.
Mark row 5, column 2 empty (×). row 5 must contain exactly one star. The existing stars and empty marks leave only the stated choice here; do not add a second star or leave the unit without one.
Mark row 5, column 4 empty (×). row 5 must contain exactly one star. The existing stars and empty marks leave only the stated choice here; do not add a second star or leave the unit without one.
Mark row 5, column 5 empty (×). row 5 must contain exactly one star. The existing stars and empty marks leave only the stated choice here; do not add a second star or leave the unit without one.
Step 7: the orange outlines mark the changes explained above. Follow these changes in order; the picture below includes all of them.
Mark row 6, column 5 empty (×). column 5 must contain exactly one star. The existing stars and empty marks leave only the stated choice here; do not add a second star or leave the unit without one.
Mark row 6, column 6 empty (×). the outlined region containing row 5, column 4 must contain exactly one star. The existing stars and empty marks leave only the stated choice here; do not add a second star or leave the unit without one.
Mark row 6, column 2 empty (×). column 2 must contain exactly one star. The existing stars and empty marks leave only the stated choice here; do not add a second star or leave the unit without one.
Place a star at row 6, column 4. column 4 must contain exactly one star. The existing stars and empty marks leave only the stated choice here; do not add a second star or leave the unit without one.
Step 8: the orange outlines mark the changes explained above.
Frequently asked questions
Where should a beginner start a Star Battle?
Look for the group with the fewest possible star positions. If no position is forced, compare its candidates for shared exclusions or a single shared row or column. The smallest drawn region is helpful only when its actual candidates are restrictive.
Should I mark every cell that cannot contain a star?
Keeping exclusions visible makes counting much easier. The essential distinction is between undecided cells and cells you have proved star-free. After each confirmed star, update all affected groups and diagonals so later deductions use accurate candidates.
Can I choose either cell when a region has two possibilities?
No. Two possibilities represent unresolved alternatives. Keep both and look for consequences they share. Another row, column or neighboring region may eliminate one later; choosing now would turn a deduction puzzle into an unsupported trial.