Star Battle · EN
Star Battle Solving Strategies: Quotas, Regions and Exclusions
Strong Star Battle solving combines star quotas with the cells that every possible star placement would exclude. Begin with last positions and completed groups, then use shared-neighbor exclusions, line-region locks and capacity counts to resolve positions that have no immediate single.
Keep candidate sets instead of preferred positions
For each unfinished row, column and region, maintain the complete set of cells that could still hold its star. On GooferThings every such group needs one star. A candidate set is complete only when you have retained every cell not yet ruled out. An attractive pattern or an almost-symmetrical arrangement does not justify removing an alternative.
The simplest techniques are last positions and completed-group elimination. Their value persists late in a difficult solve: an advanced exclusion often finishes with an ordinary last position. After every structural deduction, rescan the affected groups immediately. Otherwise you may keep analyzing an old candidate set after its decisive change has already occurred.
Shared-neighbor exclusion: intersect forbidden neighborhoods
Take all remaining candidates for one required star. For each candidate, consider the cells it would forbid through touching. A cell present in every forbidden neighborhood cannot hold a star. You do not know the star's location, but you know that any legal location conflicts with that outside cell. This technique is particularly useful around narrow regions.
The distinction between intersection and union matters. A cell touched by only one candidate remains possible if the star can use another candidate. Check every alternative before excluding it. You can also include row, column and region consequences when testing shared effects, provided each conclusion remains true for every candidate being considered.
Line-region locks: use two quotas for one required star
If a region's candidates all lie in a single row, that row must receive its star from that region. All other cells in the row are excluded. Apply the same argument to columns. Reverse the perspective as well: a row whose candidates all lie in one region reserves that region's star for the row and excludes the region's other cells.
This is a lock between two one-star groups. It identifies the same required star from two directions without fixing its square. Use it when a region overlaps several lines but exclusions have compressed its choices. Recheck region boundaries carefully; one overlooked candidate outside the line destroys the lock, even if that candidate looks inconvenient.
Group counting: compare several regions with several lines
Suppose a collection of distinct unfinished regions has all its candidates confined to the same number of rows, with one star still needed in each region and each row. Those regions collectively supply every star those rows require. Cells in those rows outside the collected regions can be excluded. The same counting works with columns.
The counts must describe remaining demand, not merely drawn shapes. Do not count a region whose star is already placed as still needing another one. Nor may you count overlapping candidate sets twice as separate stars. This multiple-group lock extends the single-region technique and is useful when no individual region fits inside one line.
Capacity bounds: recognize places that cannot hold enough stars
A 2×2 block holds at most one star because every pair of its cells touches. More generally, a selected area may have a maximum number of mutually non-touching stars. If several unfinished groups are forced to use that area, compare their demand with its capacity. Too little capacity proves that the assumption leading to it is impossible.
For one-star puzzles, start with exact small areas you can inspect reliably. A long strip has different spacing possibilities from a compact block, and its row and column memberships can lower the capacity further. Do not transfer a memorized two-star pattern without recalculating. State both the required count and the proven upper bound before drawing an exclusion.
Use contradictions as explicit, limited proofs
When direct counting stalls, select a candidate whose placement would have short, clear consequences. Temporarily follow its completed-group and no-touch exclusions. If these leave a required group with no legal position, the candidate is impossible. Restore the temporary consequences and retain only that proven exclusion. The contradiction must break a rule, rather than merely create an awkward-looking board.
A stronger explanation identifies the exact failure: an empty region, an unsatisfied row or two unavoidable touching stars. Keep the chain short enough to audit. If the trial simply fails to produce progress, you have proved nothing. Prefer comparing shared consequences of alternatives when that gives the same result with fewer assumptions.
A harder worked example
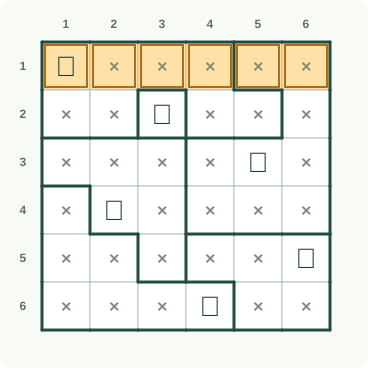
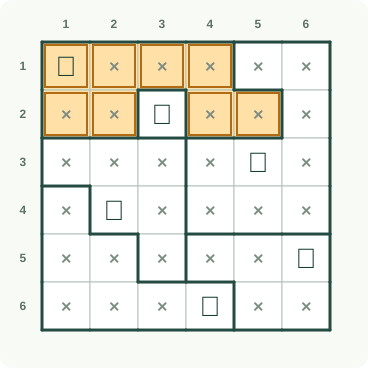
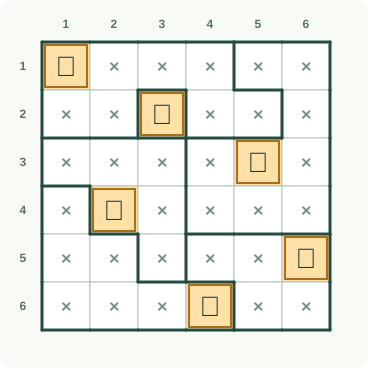
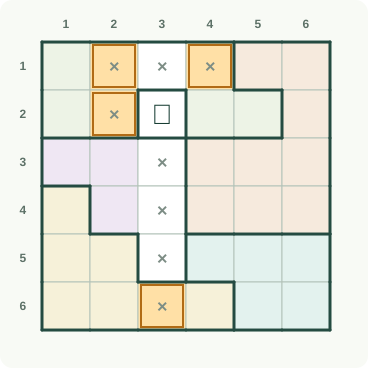
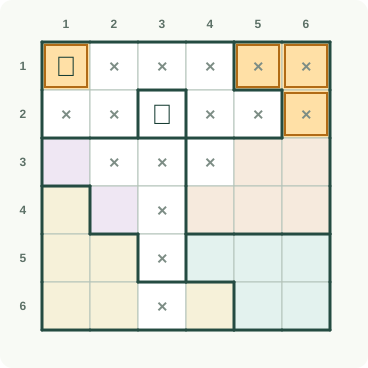
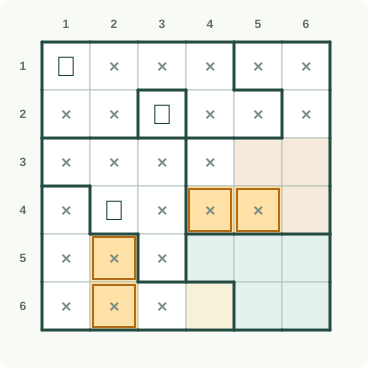
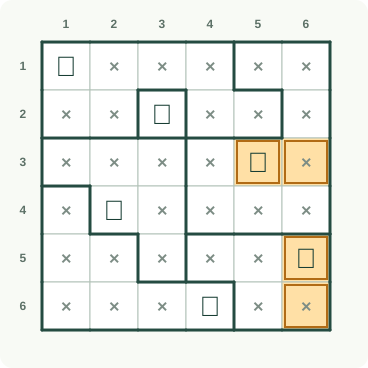
This board uses the Hard preset. Follow the four cumulative stages, revisiting each affected constraint after a deduction. A star is a placement; a cross is a confirmed empty cell. Thick lines mark regions and orange outlines identify the latest decisions. Tinted squares remain undecided.
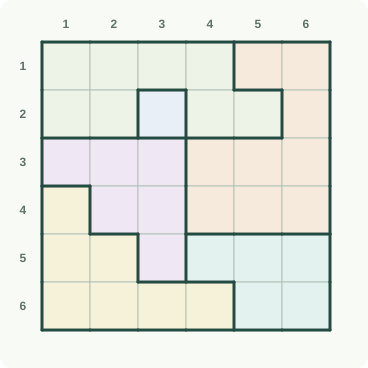
Worked stage 1
The small region has only one legal star position. Place that star, clear its column and remove every touching neighbor, including diagonal cells. These empty marks carry the region deduction into adjoining rows without placing any additional speculative star.
Worked stage 2
Finish clearing the touching neighbors around the established star. The second row and upper region then restrict the first row to its sole remaining position. Place that star and continue marking its row, column and diagonal exclusions.
Worked stage 3
Clear the first column around its star. Region boundaries now leave one position in the middle-left region. Place its star, remove touching neighbors and apply the fourth row’s quota to eliminate its remaining unused cells.
Worked stage 4
The lower region and remaining column quotas determine the final stars. Empty marks are as important as placements: they remove every competing square. Confirm one star per row, column and outlined region, with no side or diagonal contact.
Sources and background
Worked example: follow each deduction
Read rows from top to bottom and columns from left to right, starting at 1. Read each instruction, then compare the orange changes with the previous picture. Keep undecided cells or segments open until the explanation settles them. This small Star Battle uses one star per row, column and outlined region.
★ star; × empty; ? = undecided
Follow these changes in order; the picture below includes all of them.
Place a star at row 2, column 3. the outlined region containing row 2, column 3 must contain exactly one star. The existing stars and empty marks leave only the stated choice here; do not add a second star or leave the unit without one.
Mark row 1, column 3 empty (×). column 3 must contain exactly one star. The existing stars and empty marks leave only the stated choice here; do not add a second star or leave the unit without one.
Mark row 3, column 3 empty (×). column 3 must contain exactly one star. The existing stars and empty marks leave only the stated choice here; do not add a second star or leave the unit without one.
Mark row 4, column 3 empty (×). column 3 must contain exactly one star. The existing stars and empty marks leave only the stated choice here; do not add a second star or leave the unit without one.
Mark row 5, column 3 empty (×). column 3 must contain exactly one star. The existing stars and empty marks leave only the stated choice here; do not add a second star or leave the unit without one.
Mark row 6, column 3 empty (×). column 3 must contain exactly one star. The existing stars and empty marks leave only the stated choice here; do not add a second star or leave the unit without one.
Mark row 1, column 2 empty (×). A star already occupies a touching square. Stars cannot meet along an edge or a corner, so mark this square empty.
Mark row 1, column 4 empty (×). A star already occupies a touching square. Stars cannot meet along an edge or a corner, so mark this square empty.
Mark row 2, column 2 empty (×). A star already occupies a touching square. Stars cannot meet along an edge or a corner, so mark this square empty.
Step 1: the orange outlines mark the changes explained above. Follow these changes in order; the picture below includes all of them.
Mark row 2, column 4 empty (×). A star already occupies a touching square. Stars cannot meet along an edge or a corner, so mark this square empty.
Mark row 3, column 2 empty (×). A star already occupies a touching square. Stars cannot meet along an edge or a corner, so mark this square empty.
Mark row 3, column 4 empty (×). A star already occupies a touching square. Stars cannot meet along an edge or a corner, so mark this square empty.
Mark row 2, column 1 empty (×). row 2 must contain exactly one star. The existing stars and empty marks leave only the stated choice here; do not add a second star or leave the unit without one.
Mark row 2, column 5 empty (×). row 2 must contain exactly one star. The existing stars and empty marks leave only the stated choice here; do not add a second star or leave the unit without one.
Mark row 2, column 6 empty (×). row 2 must contain exactly one star. The existing stars and empty marks leave only the stated choice here; do not add a second star or leave the unit without one.
Place a star at row 1, column 1. the outlined region containing row 1, column 1 must contain exactly one star. The existing stars and empty marks leave only the stated choice here; do not add a second star or leave the unit without one.
Mark row 1, column 5 empty (×). row 1 must contain exactly one star. The existing stars and empty marks leave only the stated choice here; do not add a second star or leave the unit without one.
Mark row 1, column 6 empty (×). row 1 must contain exactly one star. The existing stars and empty marks leave only the stated choice here; do not add a second star or leave the unit without one.
Step 2: the orange outlines mark the changes explained above. Follow these changes in order; the picture below includes all of them.
Mark row 3, column 1 empty (×). column 1 must contain exactly one star. The existing stars and empty marks leave only the stated choice here; do not add a second star or leave the unit without one.
Mark row 4, column 1 empty (×). column 1 must contain exactly one star. The existing stars and empty marks leave only the stated choice here; do not add a second star or leave the unit without one.
Mark row 5, column 1 empty (×). column 1 must contain exactly one star. The existing stars and empty marks leave only the stated choice here; do not add a second star or leave the unit without one.
Mark row 6, column 1 empty (×). column 1 must contain exactly one star. The existing stars and empty marks leave only the stated choice here; do not add a second star or leave the unit without one.
Place a star at row 4, column 2. the outlined region containing row 3, column 1 must contain exactly one star. The existing stars and empty marks leave only the stated choice here; do not add a second star or leave the unit without one.
Mark row 5, column 2 empty (×). A star already occupies a touching square. Stars cannot meet along an edge or a corner, so mark this square empty.
Mark row 6, column 2 empty (×). column 2 must contain exactly one star. The existing stars and empty marks leave only the stated choice here; do not add a second star or leave the unit without one.
Mark row 4, column 4 empty (×). row 4 must contain exactly one star. The existing stars and empty marks leave only the stated choice here; do not add a second star or leave the unit without one.
Mark row 4, column 5 empty (×). row 4 must contain exactly one star. The existing stars and empty marks leave only the stated choice here; do not add a second star or leave the unit without one.
Step 3: the orange outlines mark the changes explained above. Follow these changes in order; the picture below includes all of them.
Mark row 4, column 6 empty (×). row 4 must contain exactly one star. The existing stars and empty marks leave only the stated choice here; do not add a second star or leave the unit without one.
Place a star at row 6, column 4. the outlined region containing row 4, column 1 must contain exactly one star. The existing stars and empty marks leave only the stated choice here; do not add a second star or leave the unit without one.
Mark row 5, column 4 empty (×). A star already occupies a touching square. Stars cannot meet along an edge or a corner, so mark this square empty.
Mark row 5, column 5 empty (×). A star already occupies a touching square. Stars cannot meet along an edge or a corner, so mark this square empty.
Mark row 6, column 5 empty (×). A star already occupies a touching square. Stars cannot meet along an edge or a corner, so mark this square empty.
Place a star at row 5, column 6. row 5 must contain exactly one star. The existing stars and empty marks leave only the stated choice here; do not add a second star or leave the unit without one.
Place a star at row 3, column 5. column 5 must contain exactly one star. The existing stars and empty marks leave only the stated choice here; do not add a second star or leave the unit without one.
Mark row 6, column 6 empty (×). the outlined region containing row 5, column 4 must contain exactly one star. The existing stars and empty marks leave only the stated choice here; do not add a second star or leave the unit without one.
Mark row 3, column 6 empty (×). column 6 must contain exactly one star. The existing stars and empty marks leave only the stated choice here; do not add a second star or leave the unit without one.
Step 4: the orange outlines mark the changes explained above.
Frequently asked questions
What is the most useful Star Battle strategy beyond singles?
Shared-neighbor exclusion is often productive: find a cell that would touch the required star under every remaining placement. Line-region locks are another useful next step because they exploit matching quotas without requiring an exact star location.
Can two stars fit in a 2×2 area?
No. Any two cells in a 2×2 block share an edge or corner. This upper bound remains true across region borders and can support larger capacity arguments. It does not mean the block must contain a star.
Do advanced two-star strategies work on this board?
The underlying ideas can transfer, but their counts must be recalculated. GooferThings requires one star per group. A deduction that assumes two stars in every row or region may be invalid here even when the drawing looks familiar.