Futoshiki · EN
Futoshiki for Beginners: A Reliable First Solve
Begin Futoshiki by removing numbers already used in each cell's row and column, then use the inequality signs to narrow the remaining candidates. Place a value when only one possibility survives, update its crossing line and repeat the same checks.
Set up a small, accurate candidate list
On GooferThings' 5×5 board, begin with the set 1–5. For an empty cell, remove the numbers already confirmed in its row and column. Then look at every sign attached to the cell. The resulting set contains alternatives, not several numbers to enter. You can keep such notes mentally for simple cells or record them when there are more possibilities.
Do not add Sudoku box exclusions: this puzzle has none. Start with a nearly completed row or column because it has fewer missing values to track. Before filling its last blank, check the crossing line and any comparison sign. An immediate conflict signals an earlier error rather than permission to ignore a clue.
First deduction: a single remaining value
A naked single is a cell with exactly one candidate after all relevant constraints are applied. Its reason may combine several clues: the row removes some numbers, the column removes others and a sign removes the last alternative. The value is forced only after you have considered all those possibilities, rather than whichever clue you happened to notice first.
After entering a single, remove that number from other candidates in the same row and column. Then update its inequality neighbors. This propagation is often the real source of progress: one simple placement changes several constraints and produces another single. Avoid immediately jumping to an unrelated corner of the board.
Second deduction: the only place for a number
A hidden single works from the opposite direction. Choose one missing number in a row and inspect every empty cell where it might go. If only one cell allows it, place it there, even if that cell still has other written candidates. The row must contain the chosen number somewhere, so its other candidates cannot win.
Repeat this scan down columns. A cell does not have to look nearly solved for a hidden single to exist. Inequalities can quietly eliminate the same number from several cells, leaving one position as the only home for it. Check all cells in the line before claiming that a location is unique.
Third deduction: use the endpoints of a sign
On a 1–5 grid, the smaller endpoint of a comparison cannot be 5, and the larger endpoint cannot be 1. If an endpoint is confirmed, the restriction becomes stronger: its neighbor must belong to the values strictly above or below it. Compare those bounds with the neighbor's row and column candidates to find the remaining overlap.
You can tighten a sign even when neither endpoint is fixed. If all possible values on the larger side are at most 3, the smaller side must be below 3. If all possible values on the smaller side are at least 3, the larger side must be above 3. These are range deductions; they need not immediately give a final entry.
Fourth deduction: follow a complete increasing chain
Trace consecutive less-than relationships, even when the chain turns a corner. Each step needs a strictly larger number. Count the cells in the chain and leave enough room at both ends. A long chain on a small board can sharply restrict every member before any starting value is known.
For a chain of k increasing cells in a board using 1–n, the first value is at most n−k+1 and the last is at least k. Intermediate positions receive corresponding bounds. This formula describes a genuine connected chain of strict comparisons. Do not merge two branches merely because they meet at a common larger cell.
Start with this easy puzzle
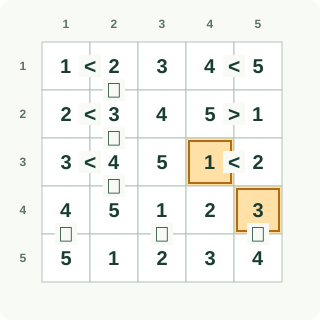
Printed inequalities stay fixed. Orange outlines show new digits; rows and columns are numbered from the top and left. Tinted squares remain undecided.
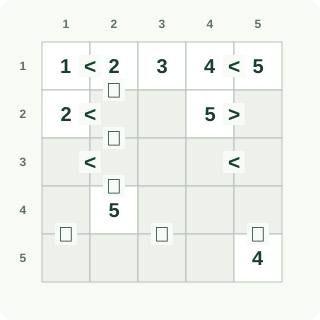
Step 1: Reduce candidates with inequalities
Use inequalities to reduce candidates before writing numbers. The inequality chain fixes the middle-column value, and the first column then has only one missing maximum. Write R3C2=4, R5C1=5.
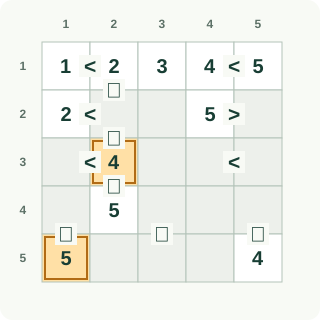
Step 2: Cross-check the second row and column
Compare the reduced candidates with digits already in the second row and second column. Only the highlighted values can fill these two remaining positions. Write R2C2=3, R5C2=1.
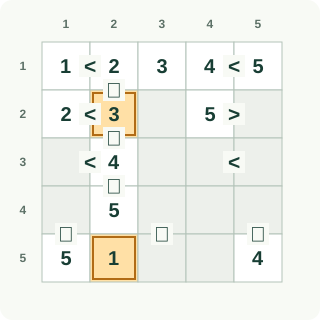
Step 3: Use missing row digits
Use missing digits across the third and fifth rows. Cross-check their columns so each placement satisfies both line uniqueness and the existing inequality bounds. Write R3C1=3, R5C3=2.
Step 4: Apply the vertical comparison
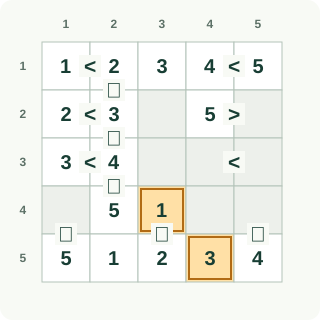
Complete the fifth row’s missing digit. Then apply the inequality linking the fourth and fifth rows to force the smaller value above. Write R5C4=3, R4C3=1.
Step 5: Complete crossing lines
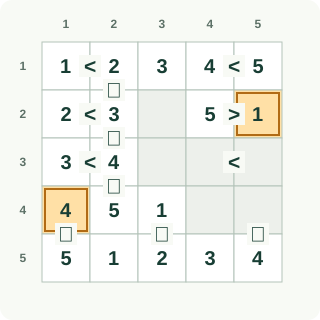
Use the first column’s remaining digit, then finish the second row’s last missing value. A row or column must contain each digit exactly once. Write R4C1=4, R2C5=1.
Step 6: Revisit newly constrained rows
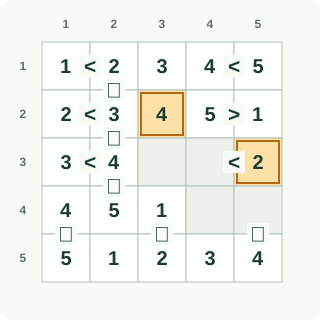
Return to the second and third rows after those placements. Each now has a missing value with only one legal position remaining. Write R2C3=4, R3C5=2.
Step 7: Finish the next row gaps
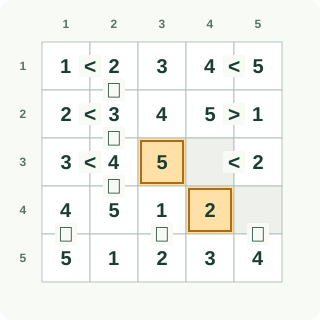
The third row fixes its final large digit. The fourth row and its crossing column then determine the next missing small digit. Write R3C3=5, R4C4=2.
Step 8: Verify the last inequalities
Complete the final crossing columns using their missing digits. Verify every printed inequality after filling the last two values, including the vertical comparisons. Write R3C4=1, R4C5=3.
Read the worked solve as a repeatable routine
At each stage of the beginner example, identify whether the move is a naked single, a hidden single or an inequality bound. Then predict how the newly confirmed value changes its neighbors. The important transition is from a local fact to its row, column and sign consequences; the same routine works even when a different puzzle opens in a different place.
- Read the number range and preserve every printed clue.
- List the missing values in a promising row or column.
- Remove candidates using crossing lines and attached signs.
- Place any naked single or hidden single you can justify.
- Propagate the new value through both lines and every sign.
- Check longer chains, then repeat the scan until the board is complete.
When progress slows
Audit your notes before trying harder ideas. A forgotten candidate removal can hide a single, while an unjustified removal can make the puzzle seem contradictory. Revisit columns as carefully as rows and reread vertical comparisons with their open side facing the larger value. If the notes are sound, look for two cells restricted to the same pair of numbers.
Those two cells reserve the pair within their shared row or column, allowing the pair to be removed elsewhere in that line. Leave their order unresolved unless another clue decides it. Finish by checking every number set and every comparison separately. A correct-looking Latin square can still contain a reversed inequality.
Sources and background
Worked example: follow each deduction
Read rows from top to bottom and columns from left to right, starting at 1. Read each instruction, then compare the orange changes with the previous picture. Keep undecided cells or segments open until the explanation settles them.
? = undecided
Follow these changes in order; the picture below includes all of them.
Write 4 at row 3, column 2. The sign requires row 3, column 2 < row 4, column 2. Compare the remaining numbers on its two sides: 4, 5 and 5. Only the stated number keeps the comparison true.
Write 5 at row 5, column 1. column 1 still needs 5. Every other position in that unit has ruled it out, so this is its only remaining place.
Step 1: the orange outlines mark the changes explained above. Follow these changes in order; the picture below includes all of them.
Write 3 at row 2, column 2. column 2 already contains 2, 4, 5. Repetition is forbidden there. From this square’s remaining choices 3, 4, only 3 survives.
Write 1 at row 5, column 2. column 2 still needs 1. Every other position in that unit has ruled it out, so this is its only remaining place.
Step 2: the orange outlines mark the changes explained above. Follow these changes in order; the picture below includes all of them.
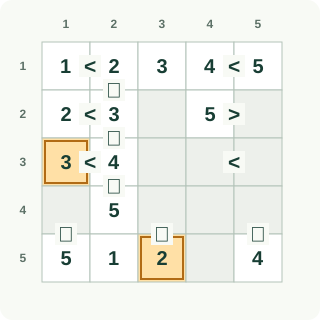
Write 3 at row 3, column 1. row 3 already contains 4. Repetition is forbidden there. From this square’s remaining choices 3, 4, only 3 survives.
Write 2 at row 5, column 3. row 5 already contains 1, 4, 5. Repetition is forbidden there. From this square’s remaining choices 2, 4, 5, only 2 survives.
Step 3: the orange outlines mark the changes explained above. Follow these changes in order; the picture below includes all of them.
Write 3 at row 5, column 4. row 5 still needs 3. Every other position in that unit has ruled it out, so this is its only remaining place.
Write 1 at row 4, column 3. The sign requires row 4, column 3 < row 5, column 3. Compare the remaining numbers on its two sides: 1, 2, 4 and 2. Only the stated number keeps the comparison true.
Step 4: the orange outlines mark the changes explained above. Follow these changes in order; the picture below includes all of them.
Write 4 at row 4, column 1. column 1 already contains 1, 2, 3, 5. Repetition is forbidden there. From this square’s remaining choices 3, 4, only 4 survives.
Write 1 at row 2, column 5. row 2 already contains 2, 3, 5. Repetition is forbidden there. From this square’s remaining choices 1, 3, only 1 survives.
Step 5: the orange outlines mark the changes explained above. Follow these changes in order; the picture below includes all of them.
Write 4 at row 2, column 3. row 2 still needs 4. Every other position in that unit has ruled it out, so this is its only remaining place.
Write 2 at row 3, column 5. row 3 already contains 3, 4. Repetition is forbidden there. From this square’s remaining choices 2, 3, only 2 survives.
Step 6: the orange outlines mark the changes explained above. Follow these changes in order; the picture below includes all of them.
Write 5 at row 3, column 3. row 3 still needs 5. Every other position in that unit has ruled it out, so this is its only remaining place.
Write 2 at row 4, column 4. column 4 already contains 3, 4, 5. Repetition is forbidden there. From this square’s remaining choices 2, 3, only 2 survives.
Step 7: the orange outlines mark the changes explained above. Follow these changes in order; the picture below includes all of them.
Write 1 at row 3, column 4. column 4 still needs 1. Every other position in that unit has ruled it out, so this is its only remaining place.
Write 3 at row 4, column 5. column 5 already contains 1, 2, 4, 5. Repetition is forbidden there. From this square’s remaining choices 2, 3, only 3 survives.
Step 8: the orange outlines mark the changes explained above.
Frequently asked questions
What is the easiest place to start Futoshiki?
Try a nearly completed row or column, or a long chain of comparison signs. Both reduce the number of possibilities you must track. Check the crossing line and signs before committing any value, even when a missing number seems obvious.
Should beginners write every candidate?
Write enough to keep alternatives accurate. Full notes can help on a slow first solve, while short notes are often sufficient in nearly completed lines. A candidate list is useful only when you update it after each confirmed entry.
Why does a chain help before any number is given?
Each strict increase needs room for another larger value. The finite range limits the smallest and largest endpoints and often the middle cells too. You can remove values outside those bounds without knowing the exact values yet.