Nonogram · EN
Nonogram Solving Strategies: Overlap, Boundaries and Line Patterns
Solve harder Nonograms by narrowing the legal placements of every run and marking cells on which all remaining placements agree. Combine overlap, run boundaries and gap analysis with repeated row-column updates; use full line-pattern comparisons when simple scans stop producing moves.
Line slack: measure the freedom before placing runs
For a line with k positive clues, the minimum required length is the sum of the clues plus k−1 separator cells. Subtract that minimum from the line's length to find its slack. Zero slack gives an exact fit. Small slack usually makes a line promising because its runs have limited room to move.
Once some cells are known, slack is only a first estimate. A fixed empty cell may prevent an otherwise legal packed arrangement, while a filled cell must be covered by some run. Use the full current line state when testing placements. Clue order and all required separators remain mandatory even when analyzing only a small part of the line.
Overlap: compare placements of the same run
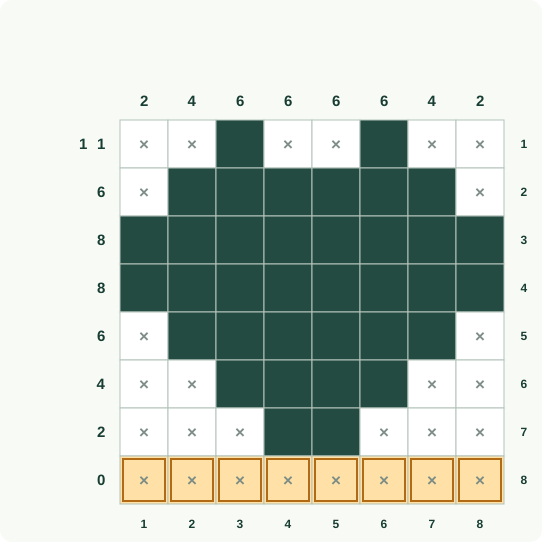
For each identified run, find its earliest and latest legal positions while leaving room for every other clue. Cells covered by that run in both extremes are forced if those extremes correctly bound all its placements. This can reveal a middle segment while leaving both ends undecided. Repeat after new empty marks tighten the available range.
Avoid comparing unrelated blocks as though they were one run. A filled cell might be covered by different clues in different legal arrangements. The broader principle is agreement across all complete legal line patterns: a cell is filled if every pattern fills it, and empty if every pattern leaves it empty. The named overlap technique is a convenient special case.
Run identification and joining: preserve clue ownership
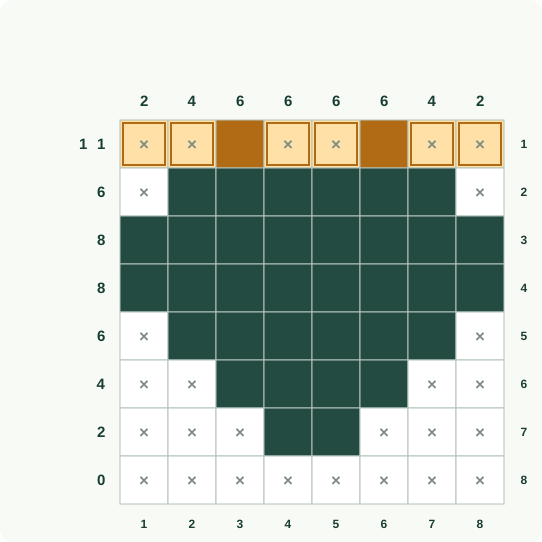
Before closing or extending a segment, determine which clue can own it. Its position relative to other segments, separators and line ends may rule out some clues. A segment as long as the largest remaining clue cannot extend further once its ownership is established. Shorter segments may still grow or merge with another segment.
Two separated filled segments must be joined only when every legal line arrangement assigns them to the same run. They must stay separate when joining would make a run too long and no clue can account for it. Do not decide from visual proximity alone. The empty cells between them may represent either required separators or unfinished parts of a longer block.
Boundary extension: use the room around a filled cell
A known empty cell or board edge creates a boundary. If an identified run must cover a filled cell near that boundary, there may be too little room on one side to reach its required length. The run must then extend in the other direction. Calculate the earliest and latest starts that still cover the segment and respect the boundary.
This technique becomes especially effective after a crossing deduction splits a line. A newly shortened space can force a run against an edge or leave an overlap even when the original whole line had none. Always reserve separators between distinct clues and avoid assuming that every gap receives a run; some gaps may remain entirely empty.
Gap analysis: match ordered clues to available spaces
Known-empty cells divide a line into spaces that runs cannot cross. Compare each space's capacity with the remaining ordered clues. A gap too short for any clue that could legally reach it is empty. A gap that must hold a specified group of clues may become an exact fit or yield an overlap after its local slack is calculated.
Ordering is critical. A short clue may fit several spaces geometrically but be blocked from one by earlier and later clues. Conversely, an empty-looking space cannot be discarded merely because you prefer placing its clue elsewhere. Enumerate the possible assignments when necessary and retain a conclusion only if every valid assignment supports it.
Full line-pattern filtering and recovery from stalls
List the complete arrangements of one restrictive row that match its clue sequence and all current filled and empty cells. Mark values shared by every survivor, then filter the crossing columns and repeat. If a row arrangement has no compatible crossing possibility at a cell, discard it. This is systematic line reasoning rather than an assumption about the final picture.
If no direct agreement remains, inspect a constrained alternative and follow its consequences carefully. Only a definite failure, such as a line with no legal pattern, disproves an assumption. Restore temporary marks before keeping the resulting exclusion. In the harder worked example, identify the run or gap responsible for each change, and finish by reconstructing every clue list from the completed grid.
A harder worked example
This board uses the Hard preset. Follow the four cumulative stages, revisiting each affected constraint after a deduction. Dark cells are filled, crosses are confirmed empty and blank cells remain undecided. Orange marks highlight new decisions. Coordinate numbers appear below and to the right. Tinted squares remain undecided.
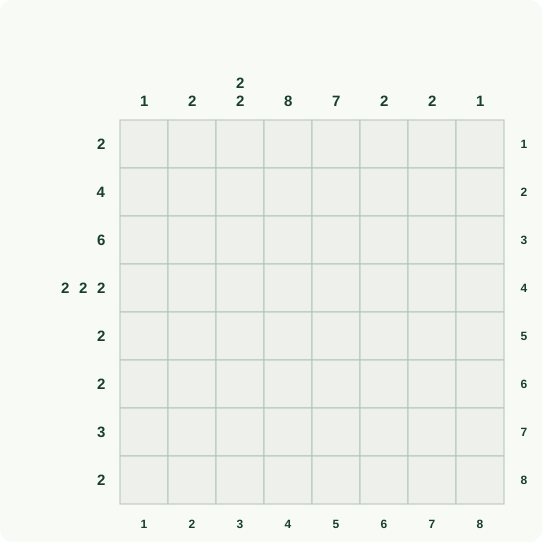
Worked stage 1
Begin with overlap in the six-cell run and the fully packed multi-run row. The column clue of eight fills its entire column. Use these fixed crossings to separate filled segments from compulsory gaps instead of outlining the final picture.
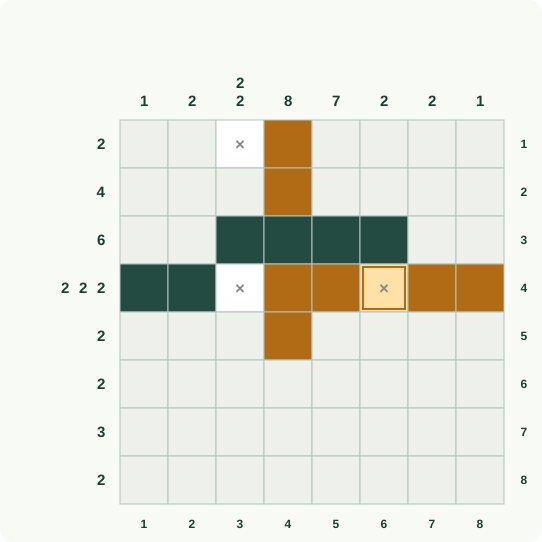
Worked stage 2
Extend the full column, then compare the short row runs with their established crossings. The seven-cell column run fixes its overlap. These line intersections determine both filled centers and empty margins without guessing where a recognisable object might appear.
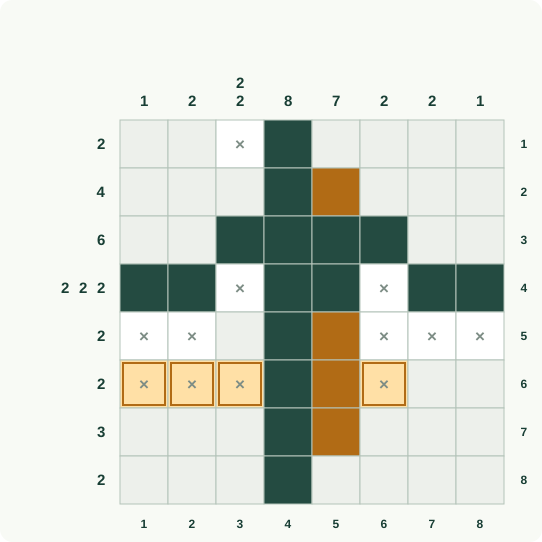
Worked stage 3
Propagate the short runs through the sixth and seventh rows. Their fixed crossings determine endpoints and empty space beyond each run. Revisit the affected columns immediately so their newly limited run positions can settle the next row’s cells.
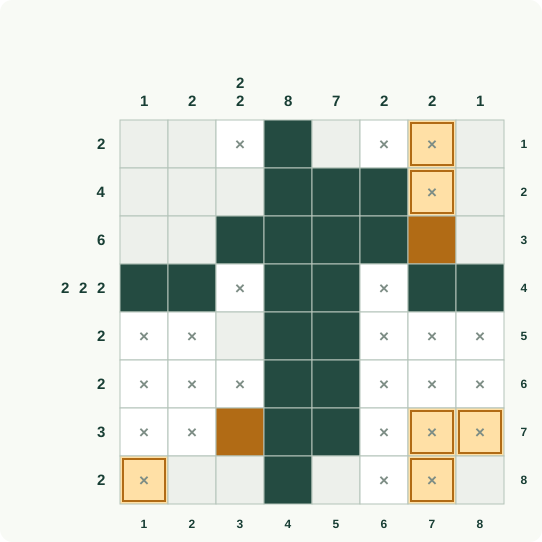
Worked stage 4
Finish the bottom and top margins, then revisit the two-part column clue and seven-cell run. Check each completed row and column in clue order, counting filled groups and verifying at least one empty square between consecutive groups.
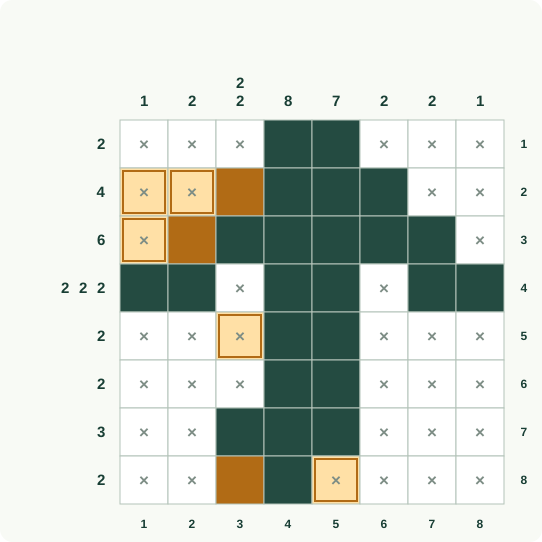
Sources and background
Worked example: follow each deduction
Read rows from top to bottom and columns from left to right, starting at 1. Read each instruction, then compare the orange changes with the previous picture. Keep undecided cells or segments open until the explanation settles them.
■ filled; × empty; ? = undecided
Follow these changes in order; the picture below includes all of them.
Fill the square at row 1, column 1. For row 1, keep only patterns that fit its clue and the cells already settled. The remaining patterns are ■ ■ ■ ■ ■. This position is filled in every one, so there is no choice left here.
Fill the square at row 1, column 2. For row 1, keep only patterns that fit its clue and the cells already settled. The remaining patterns are ■ ■ ■ ■ ■. This position is filled in every one, so there is no choice left here.
Fill the square at row 1, column 3. For row 1, keep only patterns that fit its clue and the cells already settled. The remaining patterns are ■ ■ ■ ■ ■. This position is filled in every one, so there is no choice left here.
Fill the square at row 1, column 4. For row 1, keep only patterns that fit its clue and the cells already settled. The remaining patterns are ■ ■ ■ ■ ■. This position is filled in every one, so there is no choice left here.
Fill the square at row 1, column 5. For row 1, keep only patterns that fit its clue and the cells already settled. The remaining patterns are ■ ■ ■ ■ ■. This position is filled in every one, so there is no choice left here.
Step 1: the orange outlines mark the changes explained above. Follow these changes in order; the picture below includes all of them.
Fill the square at row 2, column 1. For column 1, keep only patterns that fit its clue and the cells already settled. The remaining patterns are ■ ■ ■ ■ ■. This position is filled in every one, so there is no choice left here.
Fill the square at row 3, column 1. For column 1, keep only patterns that fit its clue and the cells already settled. The remaining patterns are ■ ■ ■ ■ ■. This position is filled in every one, so there is no choice left here.
Fill the square at row 4, column 1. For column 1, keep only patterns that fit its clue and the cells already settled. The remaining patterns are ■ ■ ■ ■ ■. This position is filled in every one, so there is no choice left here.
Fill the square at row 5, column 1. For column 1, keep only patterns that fit its clue and the cells already settled. The remaining patterns are ■ ■ ■ ■ ■. This position is filled in every one, so there is no choice left here.
Mark row 2, column 2 empty (×). For row 2, keep only patterns that fit its clue and the cells already settled. The remaining patterns are ■ × × × ■ or ■ × × ■ × or ■ × ■ × ×. This position is empty in every one, so there is no choice left here.
Step 2: the orange outlines mark the changes explained above. Follow these changes in order; the picture below includes all of them.
Fill the square at row 3, column 2. For column 2, keep only patterns that fit its clue and the cells already settled. The remaining patterns are ■ × ■ × ■. This position is filled in every one, so there is no choice left here.
Mark row 4, column 2 empty (×). For column 2, keep only patterns that fit its clue and the cells already settled. The remaining patterns are ■ × ■ × ■. This position is empty in every one, so there is no choice left here.
Fill the square at row 5, column 2. For column 2, keep only patterns that fit its clue and the cells already settled. The remaining patterns are ■ × ■ × ■. This position is filled in every one, so there is no choice left here.
Fill the square at row 3, column 3. For row 3, keep only patterns that fit its clue and the cells already settled. The remaining patterns are ■ ■ ■ ■ ■. This position is filled in every one, so there is no choice left here.
Fill the square at row 3, column 4. For row 3, keep only patterns that fit its clue and the cells already settled. The remaining patterns are ■ ■ ■ ■ ■. This position is filled in every one, so there is no choice left here.
Step 3: the orange outlines mark the changes explained above. Follow these changes in order; the picture below includes all of them.
Fill the square at row 3, column 5. For row 3, keep only patterns that fit its clue and the cells already settled. The remaining patterns are ■ ■ ■ ■ ■. This position is filled in every one, so there is no choice left here.
Mark row 2, column 3 empty (×). For column 3, keep only patterns that fit its clue and the cells already settled. The remaining patterns are ■ × ■ ■ ■. This position is empty in every one, so there is no choice left here.
Fill the square at row 4, column 3. For column 3, keep only patterns that fit its clue and the cells already settled. The remaining patterns are ■ × ■ ■ ■. This position is filled in every one, so there is no choice left here.
Fill the square at row 5, column 3. For column 3, keep only patterns that fit its clue and the cells already settled. The remaining patterns are ■ × ■ ■ ■. This position is filled in every one, so there is no choice left here.
Mark row 4, column 4 empty (×). For row 4, keep only patterns that fit its clue and the cells already settled. The remaining patterns are ■ × ■ × ■. This position is empty in every one, so there is no choice left here.
Step 4: the orange outlines mark the changes explained above. Follow these changes in order; the picture below includes all of them.
Fill the square at row 4, column 5. For row 4, keep only patterns that fit its clue and the cells already settled. The remaining patterns are ■ × ■ × ■. This position is filled in every one, so there is no choice left here.
Mark row 2, column 4 empty (×). For column 4, keep only patterns that fit its clue and the cells already settled. The remaining patterns are ■ × ■ × ■. This position is empty in every one, so there is no choice left here.
Fill the square at row 5, column 4. For column 4, keep only patterns that fit its clue and the cells already settled. The remaining patterns are ■ × ■ × ■. This position is filled in every one, so there is no choice left here.
Fill the square at row 5, column 5. For row 5, keep only patterns that fit its clue and the cells already settled. The remaining patterns are ■ ■ ■ ■ ■. This position is filled in every one, so there is no choice left here.
Fill the square at row 2, column 5. For column 5, keep only patterns that fit its clue and the cells already settled. The remaining patterns are ■ ■ ■ ■ ■. This position is filled in every one, so there is no choice left here.
Step 5: the orange outlines mark the changes explained above.
Frequently asked questions
What should I do when overlap finds nothing?
Check recently changed lines for new boundaries, identify which clues can own existing filled segments and compare available gaps with ordered clues. A short list of complete legal line patterns may reveal shared filled or empty cells that simple overlap missed.
When may I join two filled segments?
Join them only when every legal arrangement places them in the same run. Their distance alone is insufficient. If joining would exceed every possible clue, they need separation; otherwise preserve both joined and separated possibilities until another constraint decides.
Can every Nonogram be solved with row-by-row logic alone?
Not necessarily. Some puzzles require deeper interactions or temporary assumptions beyond elementary line scans. The safe principle remains the same: eliminate only alternatives that violate a clue, and distinguish a proved contradiction from a position that is merely difficult.