Nonogram · EN
Nonogram for Beginners: Fill Only What the Clues Prove
Begin a Nonogram with empty lines, full lines and clue groups that fit their line exactly, then use overlap to find cells that must be filled. Transfer every new filled or empty mark into the crossing direction instead of guessing the emerging picture.
Make empty marks part of your solving method
The board has three useful states: filled, definitely empty and undecided. Marking a cell empty is a deduction, not an erasure. It prevents runs from passing through the cell and can divide a long line into shorter spaces. Keep undecided cells available until a clue proves which state they need.
Before starting, read a few row and column clue lists aloud as ordered runs. Include the mandatory empty gap between successive runs. This habit prevents the common mistake of treating a clue list as a simple total. You are locating blocks with specific lengths and order, not distributing a number of isolated filled cells.
First deduction: clear zero lines and fill exact fits
A 0 clue makes its entire row or column empty. A single clue equal to the line length makes that line entirely filled. For several clues, add their run lengths and one mandatory gap between neighboring runs. If that minimum equals the line length, every filled cell and separator has a fixed position.
Exact fits are worth scanning in both directions before doing more detailed work. The empty separators they reveal may immediately restrict crossing lines. If the required minimum is shorter than the line, the extra space can lie in several places. You may still find overlaps, but you cannot simply pack the runs against one edge and treat that arrangement as final.
Second deduction: overlap a long run's possible positions
Imagine sliding a required run as far toward each end of its available line as the clues allow. Cells covered in every legal placement are forced filled. For a single run longer than half an otherwise open line, the extreme placements overlap in the middle. Fill that shared portion and leave the uncertain ends open.
On a line with multiple clues, reserve space for the other runs and their separators before sliding the chosen run. Ignoring those neighbors gives incorrect limits. A useful way to check an overlap is to ask whether the run can legally avoid the cell. If even one valid placement avoids it, the overlap has not proved that cell filled.
Third deduction: finish a run only after identifying it
A confirmed filled segment may already have the exact length of its assigned clue. Once you know it cannot belong to a longer run or another clue, mark the adjacent cells in that line empty wherever they exist. Those separators stop accidental extension and often help the crossing clues.
Do not mark both ends of every small segment automatically. A single filled cell could be the middle of a longer run. First identify which clue accounts for the segment, using its position, neighboring gaps and the room needed by other runs. Run identification is often the missing step between noticing a segment and safely closing it.
Fourth deduction: use boundaries and remaining space
A known empty cell blocks all runs through it. A filled segment near an edge or known separator may have only one direction in which it can grow to the required length. Extend it when every valid placement requires those extra cells. The same idea works inside a short gap that must contain a particular run.
After each change, switch to the crossing rows or columns. A filled cell can force an extension there; an empty cell can eliminate placements and create a new overlap. Revisit lines whose information actually changed. This focused alternation is more productive than rereading the whole board in the same order after every move.
Start with this easy puzzle
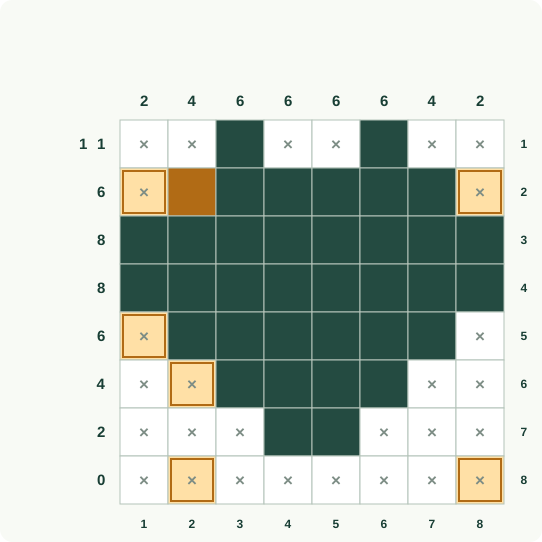
Dark cells are filled, crosses are confirmed empty and blank cells remain undecided. Orange marks highlight new decisions. Coordinate numbers appear below and to the right. Tinted squares remain undecided.
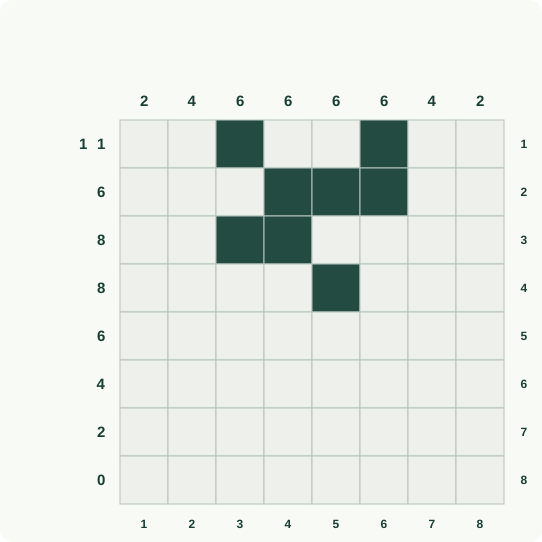
Step 1: Separate known single runs
The givens already fix the first row’s two single runs. Mark its other cells empty; the second row’s run then forces another fill. Mark R1C1, R1C2, R1C4, R1C5, R1C7 and R1C8 as empty; Mark R2C3 as filled.
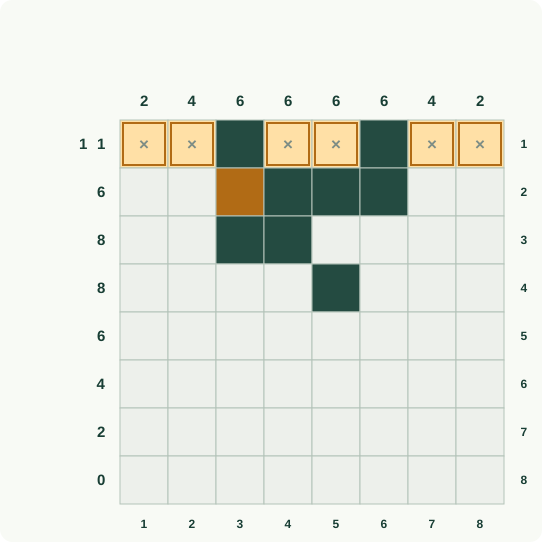
Step 2: Fill a complete row
Use the second column’s four-cell run to force its overlap. The third row is a complete run of eight, so fill every remaining cell there. Mark R5C2, R3C1, R3C2, R3C5, R3C6, R3C7 and R3C8 as filled.
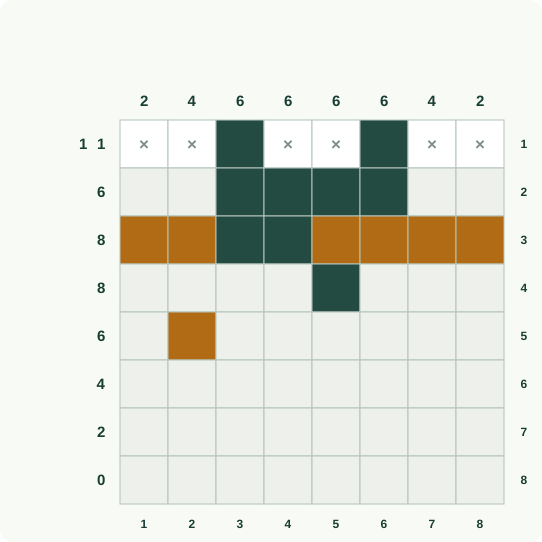
Step 3: Resolve the six-cell column run
The third column’s six-cell run has one position consistent with current marks. Fill its interior, cross its trailing cells, then extend the full fourth row. Mark R4C3, R5C3, R6C3, R4C1 and R4C2 as filled; Mark R7C3 and R8C3 as empty.
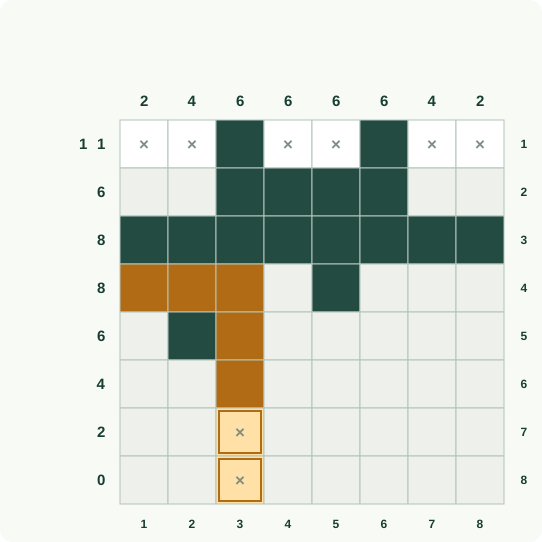
Step 4: Cross the next full row
Complete the fourth row’s run of eight. Those crossings fix the fourth column’s six-cell run, including the highlighted cells beneath the row. Mark R4C4, R4C6, R4C7, R4C8, R5C4, R6C4 and R7C4 as filled.
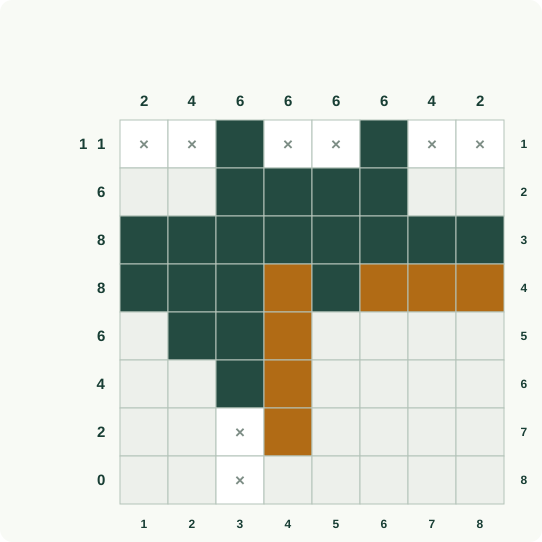
Step 5: Settle the middle blocks
Finish the fourth column’s trailing empty cell. Row and column clues then settle the middle six-cell blocks and the outer empty cells. Mark R8C4, R5C8 and R8C5 as empty; Mark R5C5, R5C6, R6C5 and R7C5 as filled.
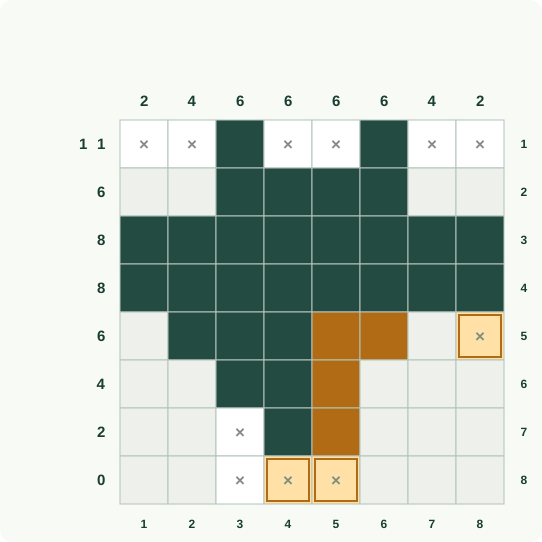
Step 6: Fix short-run endpoints
The sixth row’s four-cell run determines its empty margins. Crossing column runs place its last fill and exclude cells below, narrowing the short seventh-row run. Mark R6C1, R6C7, R6C8, R7C6, R8C6 and R7C1 as empty; Mark R6C6 as filled.
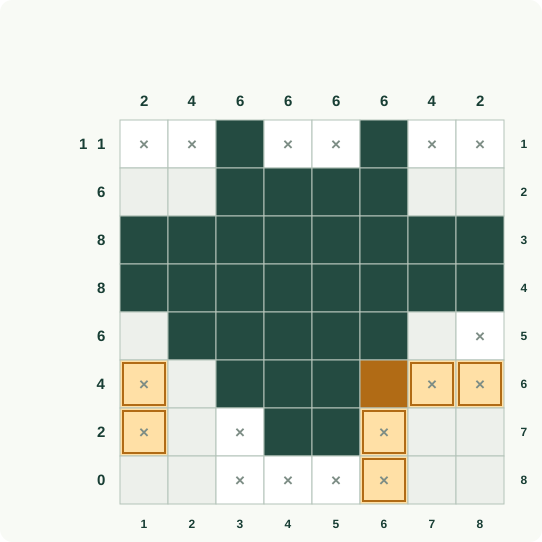
Step 7: Use the zero row
Complete the seventh row’s short run. The seventh column fixes its remaining fills, while the zero clue makes the last row entirely empty. Mark R7C2, R7C7, R7C8, R8C7 and R8C1 as empty; Mark R2C7 and R5C7 as filled.
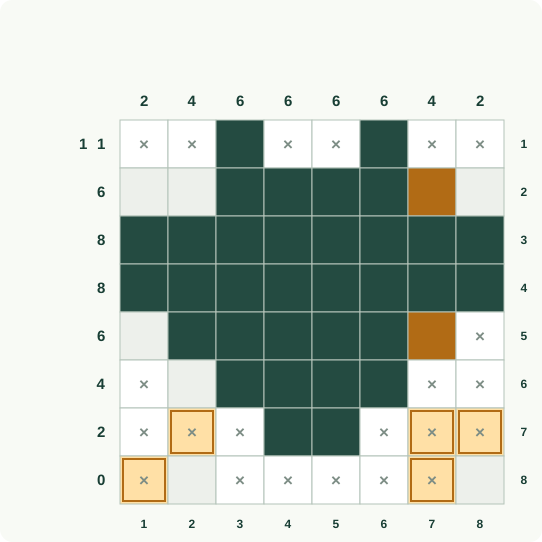
Step 8: Check the final outer runs
Finish the empty last row, then revisit the short outer-column runs. Their endpoints settle the remaining cells; confirm every separate run has a gap. Mark R8C2, R8C8, R2C8, R2C1, R5C1 and R6C2 as empty; Mark R2C2 as filled.
Follow the beginner walkthrough as a chain of proofs
For each illustrated step, name the clue, count the available cells and identify what all valid placements share. The reason may be an exact fit, an overlap or a completed run's separator. Check both filled and empty marks in the next diagram. Either kind of information can trigger the next deduction.
When the board seems stuck, review unfinished lines with long clues, newly created gaps or nearly completed runs. If no direct move appears, compare the full possible arrangements of one short line. Mark only what they all agree on. Finish by reading the run lengths back from every row and column; the apparent picture is never a substitute for that check.
Sources and background
Worked example: follow each deduction
Read rows from top to bottom and columns from left to right, starting at 1. Read each instruction, then compare the orange changes with the previous picture. Keep undecided cells or segments open until the explanation settles them.
■ filled; × empty; ? = undecided
Follow these changes in order; the picture below includes all of them.
Fill the square at row 1, column 1. For row 1, keep only patterns that fit its clue and the cells already settled. The remaining patterns are ■ ■ ■ ■ ■. This position is filled in every one, so there is no choice left here.
Fill the square at row 1, column 2. For row 1, keep only patterns that fit its clue and the cells already settled. The remaining patterns are ■ ■ ■ ■ ■. This position is filled in every one, so there is no choice left here.
Fill the square at row 1, column 3. For row 1, keep only patterns that fit its clue and the cells already settled. The remaining patterns are ■ ■ ■ ■ ■. This position is filled in every one, so there is no choice left here.
Fill the square at row 1, column 4. For row 1, keep only patterns that fit its clue and the cells already settled. The remaining patterns are ■ ■ ■ ■ ■. This position is filled in every one, so there is no choice left here.
Fill the square at row 1, column 5. For row 1, keep only patterns that fit its clue and the cells already settled. The remaining patterns are ■ ■ ■ ■ ■. This position is filled in every one, so there is no choice left here.
Step 1: the orange outlines mark the changes explained above. Follow these changes in order; the picture below includes all of them.
Fill the square at row 2, column 1. For column 1, keep only patterns that fit its clue and the cells already settled. The remaining patterns are ■ ■ ■ ■ ■. This position is filled in every one, so there is no choice left here.
Fill the square at row 3, column 1. For column 1, keep only patterns that fit its clue and the cells already settled. The remaining patterns are ■ ■ ■ ■ ■. This position is filled in every one, so there is no choice left here.
Fill the square at row 4, column 1. For column 1, keep only patterns that fit its clue and the cells already settled. The remaining patterns are ■ ■ ■ ■ ■. This position is filled in every one, so there is no choice left here.
Fill the square at row 5, column 1. For column 1, keep only patterns that fit its clue and the cells already settled. The remaining patterns are ■ ■ ■ ■ ■. This position is filled in every one, so there is no choice left here.
Mark row 2, column 2 empty (×). For row 2, keep only patterns that fit its clue and the cells already settled. The remaining patterns are ■ × × × ■ or ■ × × ■ × or ■ × ■ × ×. This position is empty in every one, so there is no choice left here.
Step 2: the orange outlines mark the changes explained above. Follow these changes in order; the picture below includes all of them.
Fill the square at row 3, column 2. For column 2, keep only patterns that fit its clue and the cells already settled. The remaining patterns are ■ × ■ × ■. This position is filled in every one, so there is no choice left here.
Mark row 4, column 2 empty (×). For column 2, keep only patterns that fit its clue and the cells already settled. The remaining patterns are ■ × ■ × ■. This position is empty in every one, so there is no choice left here.
Fill the square at row 5, column 2. For column 2, keep only patterns that fit its clue and the cells already settled. The remaining patterns are ■ × ■ × ■. This position is filled in every one, so there is no choice left here.
Fill the square at row 3, column 3. For row 3, keep only patterns that fit its clue and the cells already settled. The remaining patterns are ■ ■ ■ ■ ■. This position is filled in every one, so there is no choice left here.
Fill the square at row 3, column 4. For row 3, keep only patterns that fit its clue and the cells already settled. The remaining patterns are ■ ■ ■ ■ ■. This position is filled in every one, so there is no choice left here.
Step 3: the orange outlines mark the changes explained above. Follow these changes in order; the picture below includes all of them.
Fill the square at row 3, column 5. For row 3, keep only patterns that fit its clue and the cells already settled. The remaining patterns are ■ ■ ■ ■ ■. This position is filled in every one, so there is no choice left here.
Mark row 2, column 3 empty (×). For column 3, keep only patterns that fit its clue and the cells already settled. The remaining patterns are ■ × ■ ■ ■. This position is empty in every one, so there is no choice left here.
Fill the square at row 4, column 3. For column 3, keep only patterns that fit its clue and the cells already settled. The remaining patterns are ■ × ■ ■ ■. This position is filled in every one, so there is no choice left here.
Fill the square at row 5, column 3. For column 3, keep only patterns that fit its clue and the cells already settled. The remaining patterns are ■ × ■ ■ ■. This position is filled in every one, so there is no choice left here.
Mark row 4, column 4 empty (×). For row 4, keep only patterns that fit its clue and the cells already settled. The remaining patterns are ■ × ■ × ■. This position is empty in every one, so there is no choice left here.
Step 4: the orange outlines mark the changes explained above. Follow these changes in order; the picture below includes all of them.
Fill the square at row 4, column 5. For row 4, keep only patterns that fit its clue and the cells already settled. The remaining patterns are ■ × ■ × ■. This position is filled in every one, so there is no choice left here.
Mark row 2, column 4 empty (×). For column 4, keep only patterns that fit its clue and the cells already settled. The remaining patterns are ■ × ■ × ■. This position is empty in every one, so there is no choice left here.
Fill the square at row 5, column 4. For column 4, keep only patterns that fit its clue and the cells already settled. The remaining patterns are ■ × ■ × ■. This position is filled in every one, so there is no choice left here.
Fill the square at row 5, column 5. For row 5, keep only patterns that fit its clue and the cells already settled. The remaining patterns are ■ ■ ■ ■ ■. This position is filled in every one, so there is no choice left here.
Fill the square at row 2, column 5. For column 5, keep only patterns that fit its clue and the cells already settled. The remaining patterns are ■ ■ ■ ■ ■. This position is filled in every one, so there is no choice left here.
Step 5: the orange outlines mark the changes explained above.
Frequently asked questions
Which Nonogram line should I try first?
Start with a 0 line, a full line or a clue list whose runs and required separators exactly fill the space. Next look for long-run overlaps. These give certain cells before you need to identify a picture or consider many alternatives.
Why are empty marks useful?
A known-empty cell blocks a run and reduces the spaces in which clues can fit. It can create an exact fit or reveal which clue belongs to a filled segment. Leave undecided cells visibly different so that you do not use an unproved gap.
Can I use symmetry to finish a Nonogram?
Only if the puzzle explicitly supplies a symmetry rule, which this game does not. A symmetric-looking pattern can have asymmetric details. Every filled or empty cell needs support from the actual run clues and their crossings.