Hashi · EN
Hashi for Beginners: Count Bridges and Connect the Islands
Start Hashi by counting each island's visible neighbours and comparing their maximum bridge capacity with the island's number. Confirm forced bridges, update both endpoints, and check that no completed group becomes separated from the remaining islands.
Map neighbours before counting bridges
Choose an island and look straight in each of the four compass directions. The first island you see is a possible neighbour; anything behind it is not directly reachable. Ignore diagonal islands, even if they appear closer than a distant island sharing the row or column.
This neighbour scan is worth doing slowly at first. A missed direction can make a bridge look forced when another route remains available. As bridges appear, repeat the scan because crossing exclusions and completed endpoints can remove routes that were possible at the start.
First deduction: use maximum-capacity islands
Every usable direction can provide at most two bridges. An island whose number equals that combined capacity needs every available route at its maximum. The familiar large-number openings follow from this count, but the method applies to any island whose actual available capacity is exactly sufficient.
Check the neighbouring numbers before using the simple two-per-direction bound. A neighbour needing only one more bridge cannot supply two additional bridges. Capacity is a limit set by both endpoints, so the smaller remaining requirement can make a seemingly ordinary island much more restricted.
Second deduction: compare one direction with the others
Sometimes an island has more total capacity than it needs, yet part of a route is still forced. Temporarily ignore one direction and add the capacity of all the others. If they cannot meet the remaining requirement, the ignored direction must supply the shortfall.
This explains why a 3 with two usable neighbours needs at least one bridge toward each. One neighbour alone cannot supply three. You can confirm those minimum connections without choosing which route eventually becomes double, keeping the unresolved part of the count open.
Third deduction: close satisfied islands
After drawing a bridge, subtract its contribution from both endpoint numbers. When an island's remaining requirement becomes zero, no other route touching it can be added or increased. Revisiting satisfied islands prevents accidental overfilling and removes options from their neighbours.
A double bridge does not mean an island is necessarily finished: compare its whole number with all its incident bridges. Similarly, two singles may complete a 2 but leave a 4 only half satisfied. Keep the remaining requirement explicit instead of judging from the number of drawn directions.
Fourth deduction: remove crossing possibilities
Each confirmed route excludes every candidate route that would cross it. Follow the full length of a new bridge, especially on an open board where a crossing candidate may have distant endpoints. The excluded route can reduce another island's capacity enough to force its next connection.
Do not remove parallel routes merely because they are close together, and do not treat routes meeting at a shared endpoint as crossings. The prohibition concerns intersections between bridge interiors. Keeping that distinction clear makes the diagram much easier to read.
Start with this easy puzzle
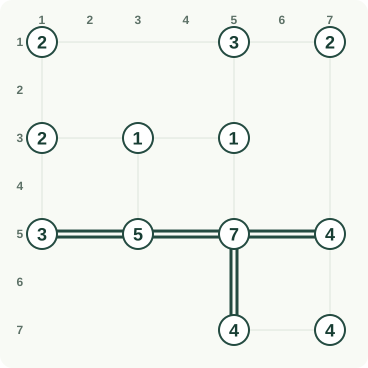
A double stroke means two bridges. Orange lines or crosses show the current decisions. Rows and columns identify island positions.
Step 1: Use constrained island capacities
Compare each island’s required total with its remaining bridge capacity. The constrained middle islands force the indicated single connections rather than an optional choice. Set R3C1–R5C1 and R3C3–R5C3 to 1 bridge.
Step 2: Satisfy the seven-bridge island
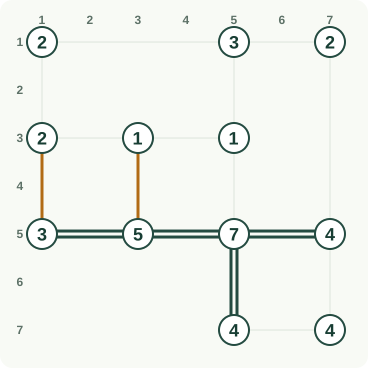
The island numbered 7 needs almost every available bridge slot. After its neighboring capacities are respected, this remaining connection must carry one bridge. Set R3C5–R5C5 to 1 bridge.
Step 3: Double the lower connections
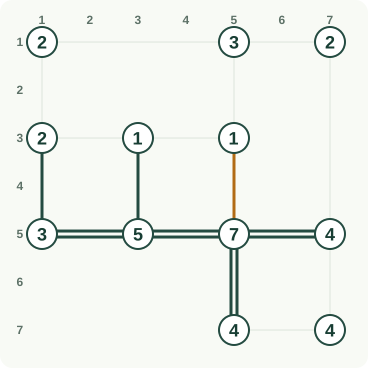
Both lower islands numbered 4 need four bridges through just two available directions. Each of those directions must therefore contain a double bridge. Set R7C5–R7C7 and R5C7–R7C7 to 2 bridges.
Step 4: Exclude a satisfied corridor
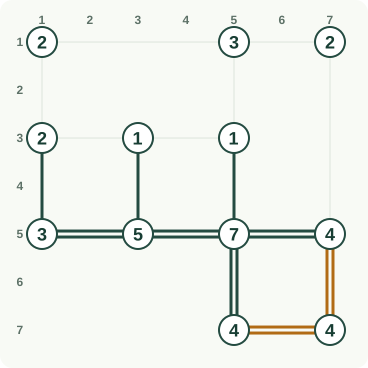
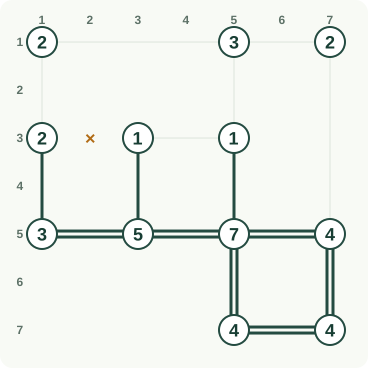
One neighboring island already receives its entire total. Its remaining corridor cannot carry a bridge, or the clue would be exceeded. Set R3C1–R3C3 to 0 bridges.
Step 5: Close the one-bridge islands
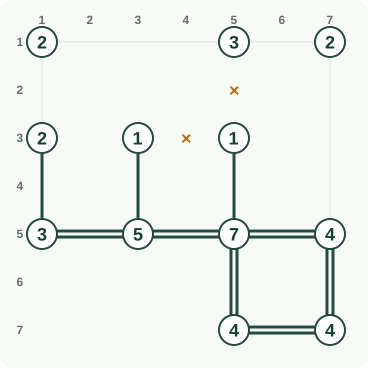
The two islands numbered 1 already receive their required single bridge. Exclude every additional corridor incident to those satisfied islands. Set R3C3–R3C5 and R1C5–R3C5 to 0 bridges.
Step 6: Respect the right-hand total
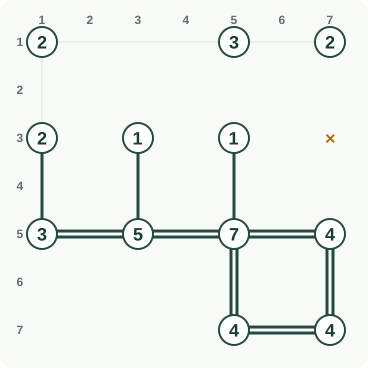
The right-hand island already receives four bridges from its established connections. The remaining vertical corridor must stay empty to preserve its exact total. Set R1C7–R5C7 to 0 bridges.
Step 7: Propagate upward
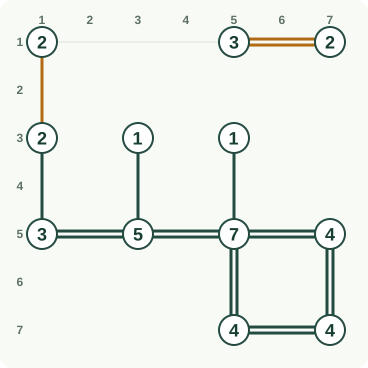
Propagate the remaining island totals upward. Available capacities force the upper double bridge and the left vertical single bridge; neither can be reduced. Set R1C5–R1C7 to 2 bridges; R1C1–R3C1 to 1 bridge.
Step 8: Supply the last bridge
The top-left island still needs one bridge after its vertical connection. Its horizontal corridor supplies exactly that remainder, completing the connected network. Set R1C1–R1C5 to 1 bridge.
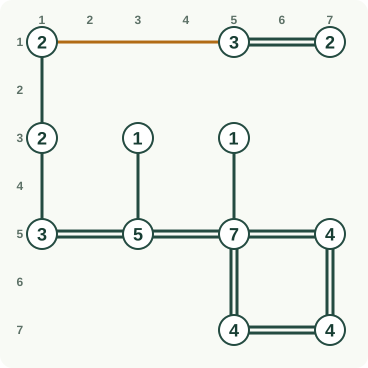
Read the easy solve as a chain of updates
For every illustrated step, identify the island's remaining requirement and the capacity that forces the highlighted route. Then inspect the far endpoint immediately. A useful chain often travels across the board: a forced bridge completes a neighbour, which blocks another route, which forces a bridge elsewhere.
Pause before the next diagram and predict one consequence. This makes the walkthrough a reasoning exercise instead of a copying exercise. You do not need to solve the whole network at once; one bridge with a sound reason is progress, even if its final single-or-double status remains undecided.
Protect the connection between groups
As islands join, trace their connected groups. A group whose members are all fully satisfied can never gain another bridge. Unless it already contains every island, closing that group is forbidden. Small self-sufficient pairs are a useful place to notice this rule early.
Before completing a route that seems to settle two nearby islands, ask whether either still has a way to connect outward afterward. This network check is separate from arithmetic. Hashi requires both local totals and a route connecting every island to the rest.
Finish with a repeatable review
When progress slows, scan islands with one unfinished direction, endpoints with very little remaining capacity, and routes recently removed by crossings. Recalculate rather than relying on old mental totals. A count that was inconclusive earlier may become forced after a distant change.
At completion, count every island, inspect crossings, and trace the whole network. Nikoli's official Hashiwokakero page is the primary rule reference for this process. Play Hashi free for another round, use the rules guide for details, or continue to solving strategies for component exits and capacity bounds.
Sources and background
Worked example: follow each deduction
Read rows from top to bottom and columns from left to right, starting at 1. Read each instruction, then compare the orange changes with the previous picture. Keep undecided cells or segments open until the explanation settles them.
One or two lines are bridges; a pale corridor is undecided; ? = undecided
Follow these changes in order; the picture below includes all of them.
Draw one bridge between row 3, column 1 and row 5, column 1. The island at row 5, column 1 needs 3 bridges. Its other connections already supply 2, so 3 − 2 = 1 must go on this corridor.
Draw one bridge between row 3, column 3 and row 5, column 3. The island at row 5, column 3 needs 5 bridges. Its other connections already supply 4, so 5 − 4 = 1 must go on this corridor.
Step 1: the orange outlines mark the changes explained above. Follow these changes in order; the picture below includes all of them.
Draw one bridge between row 3, column 5 and row 5, column 5. The island at row 5, column 5 needs 7 bridges. Its other connections already supply 6, so 7 − 6 = 1 must go on this corridor.
Step 2: the orange outlines mark the changes explained above. Follow these changes in order; the picture below includes all of them.
Draw two bridges between row 7, column 5 and row 7, column 7. The island at row 7, column 5 needs 4 bridges. Its other connections already supply 2, so 4 − 2 = 2 must go on this corridor.
Draw two bridges between row 5, column 7 and row 7, column 7. The island at row 7, column 7 needs 4 bridges. Its other connections already supply 2, so 4 − 2 = 2 must go on this corridor.
Step 3: the orange outlines mark the changes explained above. Follow these changes in order; the picture below includes all of them.
Leave the corridor between row 3, column 1 and row 3, column 3 without a bridge. The island at row 3, column 3 needs 1 bridges altogether. Its other corridors can supply 1–2. This corridor therefore needs 0–0; among its remaining choices 0, 1, only 0 fits.
Step 4: the orange outlines mark the changes explained above. Follow these changes in order; the picture below includes all of them.
Leave the corridor between row 3, column 3 and row 3, column 5 without a bridge. The island at row 3, column 3 needs 1 bridges. Its other connections already supply 1, so 1 − 1 = 0 must go on this corridor.
Leave the corridor between row 1, column 5 and row 3, column 5 without a bridge. The island at row 3, column 5 needs 1 bridges. Its other connections already supply 1, so 1 − 1 = 0 must go on this corridor.
Step 5: the orange outlines mark the changes explained above. Follow these changes in order; the picture below includes all of them.
Leave the corridor between row 1, column 7 and row 5, column 7 without a bridge. The island at row 5, column 7 needs 4 bridges. Its other connections already supply 4, so 4 − 4 = 0 must go on this corridor.
Step 6: the orange outlines mark the changes explained above. Follow these changes in order; the picture below includes all of them.
Draw two bridges between row 1, column 5 and row 1, column 7. The island at row 1, column 7 needs 2 bridges. Its other connections already supply 0, so 2 − 0 = 2 must go on this corridor.
Draw one bridge between row 1, column 1 and row 3, column 1. The island at row 3, column 1 needs 2 bridges. Its other connections already supply 1, so 2 − 1 = 1 must go on this corridor.
Step 7: the orange outlines mark the changes explained above. Follow these changes in order; the picture below includes all of them.
Draw one bridge between row 1, column 1 and row 1, column 5. The island at row 1, column 1 needs 2 bridges. Its other connections already supply 1, so 2 − 1 = 1 must go on this corridor.
Step 8: the orange outlines mark the changes explained above.
Frequently asked questions
What should a beginner look for first in Hashi?
Look for islands whose available neighbours can supply exactly the required bridge total. Then look for a direction that must be used because all the other directions together cannot meet the requirement.
Should I draw a double bridge immediately?
Only when two bridges in that route are forced. A guaranteed single bridge is useful even if a second remains possible. Do not turn a minimum connection into a double without checking the remaining alternatives.
Why are all the numbers right but the puzzle unsolved?
Check whether the islands form separate connected groups. Hashi requires one network as well as correct totals and noncrossing routes. A locally satisfied isolated group still violates the rules.
What can I practise after Hashi?
Slitherlink and Masyu teach loop continuity, while Nurikabe combines local size limits with a connected sea. All reward checking global connections after a local deduction.