Hashi · EN
Hashi Solving Strategies: Capacity, Crossings and Network Exits
The most useful Hashi strategies combine bridge-capacity bounds with crossing exclusions and the requirement that every island joins one network. Track each island's remaining demand, then prove which routes must carry at least one or two more bridges.
Remaining demand and endpoint capacity
Subtract all confirmed bridges touching an island from its printed total. The result is its remaining demand. For each incident route, the possible additional bridges are limited by the route's two-bridge maximum and by the remaining demand at the far endpoint.
Use these actual remaining capacities instead of automatically assigning two to every direction. A route already carrying one bridge has at most one extra slot. A route toward a satisfied island has none. A route that crosses a confirmed bridge is unavailable regardless of either endpoint's demand.
Forced minimum bridges
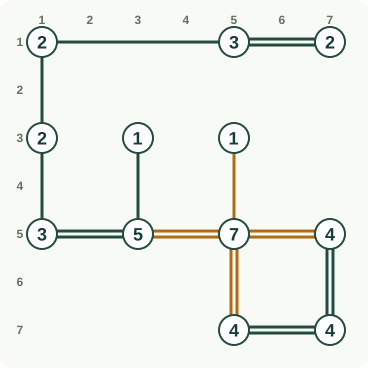
Consider one candidate route and total the maximum additional bridges available through every other route. If that total is smaller than the island's remaining demand, the selected route must supply the difference. This is a lower bound: it proves a minimum without necessarily fixing the final count.
Apply the bound in both directions along a route. One endpoint may prove a bridge necessary even when the other endpoint has many choices. After increasing the confirmed minimum, update both demands and repeat. This turns familiar high-number patterns into a general arithmetic method.
Saturation and forced maximums
When remaining demand equals total available additional capacity, every remaining slot is needed. Fill each route up to its allowed capacity. If demand exceeds capacity, something earlier is wrong or a tested assumption has failed; no rearrangement of the current routes can repair the shortage.
Saturation is particularly useful after a crossing elimination or a nearby island becomes satisfied. Recompute only the affected endpoints first, then follow any forced bridge to its other endpoint. Keeping the calculation local avoids rescanning every island after every minor change.
Crossing propagation
A confirmed route deletes all routes crossing its interior. Each deletion reduces the possible supply at two other islands. Those islands may become saturated, forcing new bridges that remove further crossing routes. Follow this chain until no affected demand or capacity changes.
The useful unit is a route, not the length or number of its drawn lines. A single confirmed bridge already excludes crossings, and adding the parallel second bridge does not create extra exclusions. Distinguishing these effects helps explain which consequence follows from geometry and which from arithmetic.
Component exits and network bottlenecks
Group islands connected by confirmed bridges into components. Unless a component already contains the entire puzzle, it needs at least one eventual bridge to an outside island. If exactly one candidate route can leave it, that route must be used at least once.
Count distinct possible outgoing routes after all crossing and endpoint restrictions. A route between two islands already inside the component does not help it reach the rest, however useful it may be numerically. Component reasoning can prove a bridge when no individual island has a capacity shortage.
Avoid closing a proper subset
A proposed bridge can be illegal because it would satisfy every island in a component before that component connects to the rest. After the proposal, check whether any member retains both remaining demand and a usable outward route. If none does, the component would become permanently isolated.
This explains small-pair exclusions without memorising them as special patterns. The crucial condition is isolation from other islands, not simply that the two numbers match. A connection that looks similar can be legal when one endpoint still has capacity to connect outward.
Short contradiction chains
When direct bounds stall, test a route with a narrow choice: absent versus present, or single versus double. Propagate only forced endpoint counts, crossing exclusions, and component requirements. An island with demand above capacity or an isolated satisfied component disproves the tested choice.
Keep the hypothesis separate from confirmed bridges and record the exact failure. Undo its dependent consequences before continuing. The opposite count is proved only when the tested alternatives have been ruled out; a branch that merely becomes inconvenient or complicated is not a contradiction.
A harder worked example
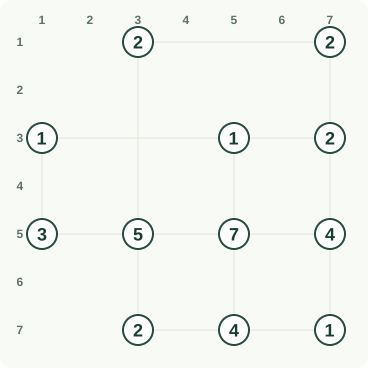
This board uses the Hard preset. Follow the four cumulative stages, revisiting each affected constraint after a deduction. A double stroke means two bridges. Orange lines or crosses show the current decisions. Rows and columns identify island positions.
Worked stage 1
Begin with islands whose large totals nearly exhaust their available capacities. Each corridor holds at most two bridges. Combining that limit with adjacent one-bridge clues forces the highlighted connections without guessing which direction merely looks most plausible.
Worked stage 2
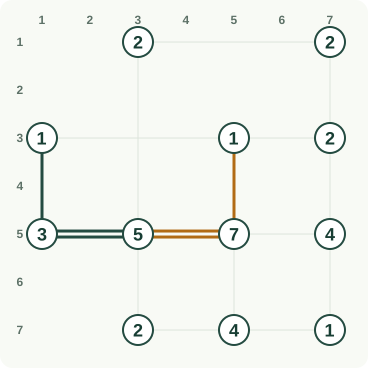
Finish satisfying the seven-bridge island, then revisit the one-bridge islands. Their established connections consume their full totals, so competing corridors must be empty. These exclusions are necessary deductions even though they add no visible bridge to the network.
Worked stage 3
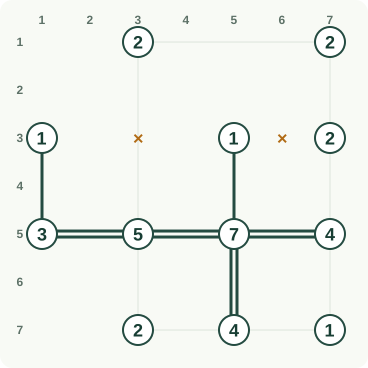
Test a double bridge across the remaining upper corridor. Although its local totals can be satisfied, that assumption isolates part of the network. Reject it, keep the single bridge, and propagate the neighboring islands’ remaining capacities.
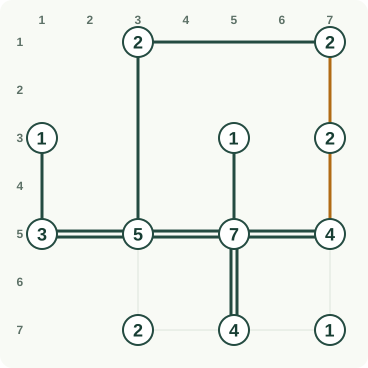
Worked stage 4
Complete the remaining central and lower connections by subtracting established bridges from each island total. Verify that no corridor exceeds two bridges, no drawn bridges cross and every island belongs to the same connected network before declaring the puzzle finished.
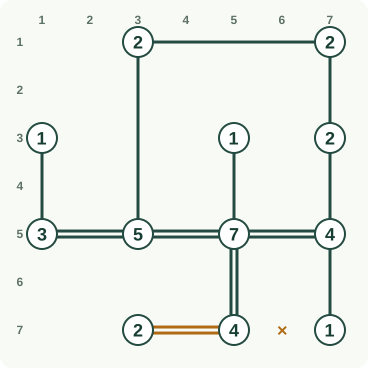
Sources and background
Worked example: follow each deduction
Read rows from top to bottom and columns from left to right, starting at 1. Read each instruction, then compare the orange changes with the previous picture. Keep undecided cells or segments open until the explanation settles them.
One or two lines are bridges; a pale corridor is undecided; ? = undecided
Follow these changes in order; the picture below includes all of them.
Draw one bridge between row 3, column 1 and row 5, column 1. The island at row 5, column 1 needs 3 bridges altogether. Its other corridors can supply 0–2. This corridor therefore needs 1–2; among its remaining choices 0, 1, only 1 fits.
Draw two bridges between row 5, column 1 and row 5, column 3. The island at row 5, column 1 needs 3 bridges. Its other connections already supply 1, so 3 − 1 = 2 must go on this corridor.
Draw one bridge between row 3, column 5 and row 5, column 5. The island at row 5, column 5 needs 7 bridges altogether. Its other corridors can supply 0–6. This corridor therefore needs 1–2; among its remaining choices 0, 1, only 1 fits.
Draw two bridges between row 5, column 3 and row 5, column 5. The island at row 5, column 5 needs 7 bridges altogether. Its other corridors can supply 1–5. This corridor therefore needs 2–2; among its remaining choices 0, 1, 2, only 2 fits.
Step 1: the orange outlines mark the changes explained above. Follow these changes in order; the picture below includes all of them.
Draw two bridges between row 5, column 5 and row 5, column 7. The island at row 5, column 5 needs 7 bridges altogether. Its other corridors can supply 3–5. This corridor therefore needs 2–2; among its remaining choices 0, 1, 2, only 2 fits.
Draw two bridges between row 5, column 5 and row 7, column 5. The island at row 5, column 5 needs 7 bridges. Its other connections already supply 5, so 7 − 5 = 2 must go on this corridor.
Leave the corridor between row 3, column 1 and row 3, column 5 without a bridge. The island at row 3, column 1 needs 1 bridges. Its other connections already supply 1, so 1 − 1 = 0 must go on this corridor.
Leave the corridor between row 3, column 5 and row 3, column 7 without a bridge. The island at row 3, column 5 needs 1 bridges. Its other connections already supply 1, so 1 − 1 = 0 must go on this corridor.
Step 2: the orange outlines mark the changes explained above. Follow these changes in order; the picture below includes all of them.
Draw one bridge between row 1, column 3 and row 1, column 7. This is a trial-and-contradiction step. Temporarily try two bridges here and continue the rules from the current grid. Every continuation fails: the islands or loop segments split into separate networks. Undo that trial and use the stated choice.
Draw one bridge between row 1, column 3 and row 5, column 3. The island at row 1, column 3 needs 2 bridges. Its other connections already supply 1, so 2 − 1 = 1 must go on this corridor.
Draw one bridge between row 1, column 7 and row 3, column 7. The island at row 1, column 7 needs 2 bridges. Its other connections already supply 1, so 2 − 1 = 1 must go on this corridor.
Draw one bridge between row 3, column 7 and row 5, column 7. The island at row 3, column 7 needs 2 bridges. Its other connections already supply 1, so 2 − 1 = 1 must go on this corridor.
Step 3: the orange outlines mark the changes explained above. Follow these changes in order; the picture below includes all of them.
Leave the corridor between row 5, column 3 and row 7, column 3 without a bridge. The island at row 5, column 3 needs 5 bridges. Its other connections already supply 5, so 5 − 5 = 0 must go on this corridor.
Draw one bridge between row 5, column 7 and row 7, column 7. The island at row 5, column 7 needs 4 bridges. Its other connections already supply 3, so 4 − 3 = 1 must go on this corridor.
Draw two bridges between row 7, column 3 and row 7, column 5. The island at row 7, column 3 needs 2 bridges. Its other connections already supply 0, so 2 − 0 = 2 must go on this corridor.
Leave the corridor between row 7, column 5 and row 7, column 7 without a bridge. The island at row 7, column 5 needs 4 bridges. Its other connections already supply 4, so 4 − 4 = 0 must go on this corridor.
Step 4: the orange outlines mark the changes explained above.
Frequently asked questions
What is the difference between demand and capacity?
Demand is how many more bridges an island needs. Capacity is how many more its currently available routes could supply at most, taking account of both endpoints and the two-bridge limit.
Can connectivity force a bridge without arithmetic?
Yes. If an unfinished connected group has only one possible route to outside islands, that route must contain a bridge. Individual island totals may still leave several local choices.
Does a double bridge connect a component twice?
It contributes two to each endpoint's count but provides one route between the same islands. For deciding whether groups are connected, one bridge and two bridges both make that route available.
What is a useful contradiction to look for?
Look for an island needing more bridges than its remaining routes can provide, or a satisfied group unable to reach the rest. Both are clear failures that can disprove a temporary route choice.