Hitori · EN
Hitori Solving Strategies: Forced Whites, Connectivity and Chains
Solve harder Hitori puzzles by chaining confirmed whites and blacks while protecting the side-connected white region. Adjacent equal pairs, sandwich centres, and mandatory white connectors provide deductions before you need to choose between distant repeated values.
Turn colour decisions into propagation chains
A black cell makes all its side-neighbours white. A white cell makes every matching copy in its row and column black. Alternate these consequences until the chain stops. Each new decision can affect several lines, so following the chain is more useful than repeatedly scanning one row.
Use only confirmed colours. An undecided printed value does not establish which duplicate survives. Keep the reasoning attached to each mark so a contradiction can be traced to an assumption rather than blamed on a later, correctly propagated consequence.
Adjacent duplicate pairs as a line constraint
Equal cells sharing a side cannot both be white and cannot both be black. Exactly one is retained. Any additional occurrence of that value in the same line must therefore be black, regardless of which member of the pair eventually survives.
This is a shared-consequence deduction. You do not need to resolve the pair itself before using it. Recheck the newly black cells' neighbours and the resulting confirmed whites' duplicates, including in perpendicular lines far from the original pair.
Sandwich centres and equal triples
For equal numbers separated by one cell in a row or column, the centre must be white. Otherwise its black colour would force both equal outer neighbours white. The proof uses adjacency and duplicate avoidance together, rather than any property of the middle number.
If all three consecutive values are equal, the same centre-white deduction then forces both outer copies black. Apply the full consequences carefully: those outer blacks can retain neighbours in other rows or columns and start a larger chain.
White articulation cells and bottlenecks
Consider the graph of cells that are white or still able to become white, joined through shared sides. If removing one undecided cell would separate confirmed white groups with no alternative route, that cell is forced white. It is a mandatory connector, sometimes called an articulation cell in the possible-white network.
Check the whole available network before declaring a bottleneck. A route can travel around the board boundary or through several unknown cells. Diagonal white contacts never supply an alternative. After proving the connector white, shade its duplicate values and follow the resulting local chain.
Use black barriers without inventing extra rules
Diagonal black contact is legal, but a collection of black cells can block all side-connected routes between white areas. Trace the available white passages on both sides of a suspected barrier. A candidate shade is impossible when it would close the last connection between retained groups.
Do not turn this into a blanket ban on diagonal black chains or on black cells near the boundary. Their legality depends on the resulting white network. The proof must identify which confirmed white groups would become disconnected, not simply that the pattern resembles a barrier.
Compare alternative survivors for common effects
An unresolved adjacent pair has two possible colour orders. Follow each briefly and compare the forced consequences. A remote cell that becomes the same colour in both orders is confirmed, even if the original pair remains undecided.
Derive each branch using the ordinary rules and stop before it becomes difficult to audit. A consequence must appear in every valid alternative to be forced. Distant repeated values that are not adjacent can allow both copies to be black, so do not silently reduce them to the same two-case pair.
Use contradictions with clear failure conditions
Test a constrained undecided colour only when direct scans stall. Follow forced neighbours, duplicate exclusions, and connectivity requirements. Two side-touching blacks, two retained equal values in a line, or disconnected confirmed white groups disproves the assumption.
Undo the whole branch before confirming the opposite colour. A unique value in one row alone is not a proof of whiteness, and the task is not to minimise shading. Keep every inference grounded in the three actual rules rather than an unstated preference for fewer black cells.
A harder worked example
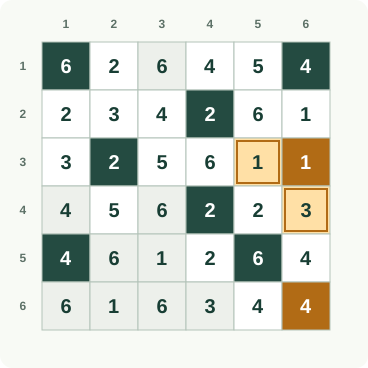
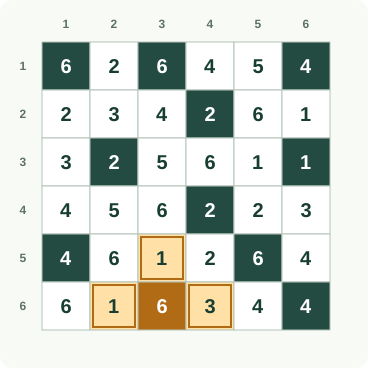
This board uses the Hard preset. Follow the four cumulative stages, revisiting each affected constraint after a deduction. Dark cells are shaded and white cells are retained. Printed numbers are clues, so their appearance alone does not decide a cell’s state. Orange marks highlight new decisions. Tinted squares remain undecided.
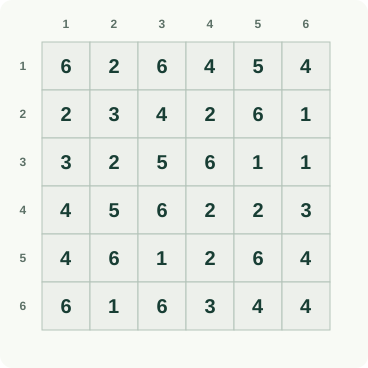
Worked stage 1
Test keeping the upper-left repeated number. The resulting compulsory shading would disconnect the retained cells, so reject that assumption and shade it. Keep its side neighbors unshaded, then use the newly retained numbers to resolve duplicate pairs.
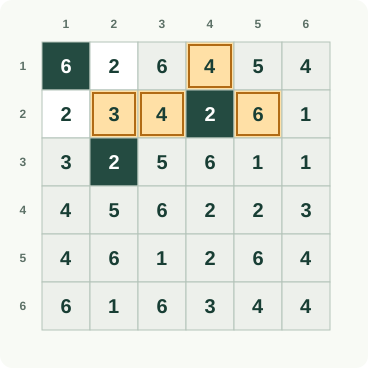
Worked stage 2
Each newly shaded duplicate forces its side neighbors to stay unshaded. Those retained values decide further duplicate pairs in the same rows and columns. Alternate the two rules rather than shading every repeated number independently of its surroundings.
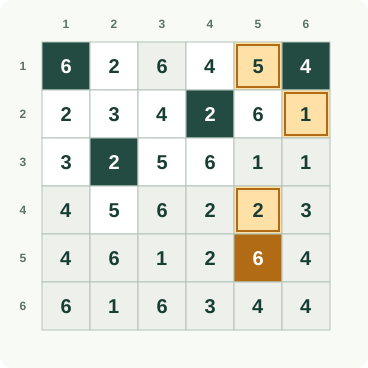
Worked stage 3
Continue the duplicate-and-neighbor chain through the lower half. Whenever a value is retained, its matching value in the same line must be shaded. Confirm that compulsory shading never creates an adjacent pair or blocks an unshaded connection.
Worked stage 4
Use the last retained sixes to resolve the remaining duplicate cells, then mark their compulsory unshaded neighbors. Check all retained values for row and column uniqueness and trace a side-connected route through every unshaded cell before accepting the board.
Sources and background
Worked example: follow each deduction
Read rows from top to bottom and columns from left to right, starting at 1. Read each instruction, then compare the orange changes with the previous picture. Keep undecided cells or segments open until the explanation settles them.
■ shaded; □ unshaded; ? = undecided
Follow these changes in order; the picture below includes all of them.
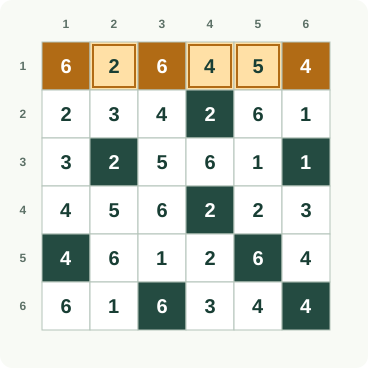
Shade the square at row 1, column 1. This is a trial-and-contradiction step. Temporarily try an unshaded square here and continue the rules from the current grid. Every continuation fails: the unshaded squares split into groups that cannot connect by sides. Undo that trial and use the stated choice.
Keep the square at row 1, column 2 unshaded. A square sharing a side with a shaded square must remain white. Two shaded squares are not allowed to touch along a side.
Keep the square at row 2, column 1 unshaded. A square sharing a side with a shaded square must remain white. Two shaded squares are not allowed to touch along a side.
Shade the square at row 2, column 4. The other 2 at row 2, column 1 is retained in the same row or column. Both copies cannot remain white, so shade this copy.
Shade the square at row 3, column 2. The other 2 at row 1, column 2 is retained in the same row or column. Both copies cannot remain white, so shade this copy.
Keep the square at row 1, column 4 unshaded. A square sharing a side with a shaded square must remain white. Two shaded squares are not allowed to touch along a side.
Keep the square at row 2, column 2 unshaded. A square sharing a side with a shaded square must remain white. Two shaded squares are not allowed to touch along a side.
Keep the square at row 2, column 3 unshaded. A square sharing a side with a shaded square must remain white. Two shaded squares are not allowed to touch along a side.
Keep the square at row 2, column 5 unshaded. A square sharing a side with a shaded square must remain white. Two shaded squares are not allowed to touch along a side.
Step 1: the orange outlines mark the changes explained above. Follow these changes in order; the picture below includes all of them.
Keep the square at row 3, column 4 unshaded. A square sharing a side with a shaded square must remain white. Two shaded squares are not allowed to touch along a side.
Keep the square at row 3, column 1 unshaded. A square sharing a side with a shaded square must remain white. Two shaded squares are not allowed to touch along a side.
Keep the square at row 3, column 3 unshaded. A square sharing a side with a shaded square must remain white. Two shaded squares are not allowed to touch along a side.
Keep the square at row 4, column 2 unshaded. A square sharing a side with a shaded square must remain white. Two shaded squares are not allowed to touch along a side.
Shade the square at row 1, column 6. The other 4 at row 1, column 4 is retained in the same row or column. Both copies cannot remain white, so shade this copy.
Shade the square at row 5, column 5. The other 6 at row 2, column 5 is retained in the same row or column. Both copies cannot remain white, so shade this copy.
Keep the square at row 1, column 5 unshaded. A square sharing a side with a shaded square must remain white. Two shaded squares are not allowed to touch along a side.
Keep the square at row 2, column 6 unshaded. A square sharing a side with a shaded square must remain white. Two shaded squares are not allowed to touch along a side.
Keep the square at row 4, column 5 unshaded. A square sharing a side with a shaded square must remain white. Two shaded squares are not allowed to touch along a side.
Step 2: the orange outlines mark the changes explained above. Follow these changes in order; the picture below includes all of them.
Keep the square at row 5, column 4 unshaded. A square sharing a side with a shaded square must remain white. Two shaded squares are not allowed to touch along a side.
Keep the square at row 5, column 6 unshaded. A square sharing a side with a shaded square must remain white. Two shaded squares are not allowed to touch along a side.
Keep the square at row 6, column 5 unshaded. A square sharing a side with a shaded square must remain white. Two shaded squares are not allowed to touch along a side.
Shade the square at row 4, column 4. The other 2 at row 4, column 5 is retained in the same row or column. Both copies cannot remain white, so shade this copy.
Shade the square at row 5, column 1. The other 4 at row 5, column 6 is retained in the same row or column. Both copies cannot remain white, so shade this copy.
Shade the square at row 6, column 6. The other 4 at row 6, column 5 is retained in the same row or column. Both copies cannot remain white, so shade this copy.
Shade the square at row 3, column 6. The other 1 at row 2, column 6 is retained in the same row or column. Both copies cannot remain white, so shade this copy.
Keep the square at row 3, column 5 unshaded. A square sharing a side with a shaded square must remain white. Two shaded squares are not allowed to touch along a side.
Keep the square at row 4, column 6 unshaded. A square sharing a side with a shaded square must remain white. Two shaded squares are not allowed to touch along a side.
Step 3: the orange outlines mark the changes explained above. Follow these changes in order; the picture below includes all of them.
Keep the square at row 4, column 1 unshaded. A square sharing a side with a shaded square must remain white. Two shaded squares are not allowed to touch along a side.
Keep the square at row 4, column 3 unshaded. A square sharing a side with a shaded square must remain white. Two shaded squares are not allowed to touch along a side.
Keep the square at row 5, column 2 unshaded. A square sharing a side with a shaded square must remain white. Two shaded squares are not allowed to touch along a side.
Keep the square at row 6, column 1 unshaded. A square sharing a side with a shaded square must remain white. Two shaded squares are not allowed to touch along a side.
Shade the square at row 1, column 3. The other 6 at row 4, column 3 is retained in the same row or column. Both copies cannot remain white, so shade this copy.
Shade the square at row 6, column 3. The other 6 at row 4, column 3 is retained in the same row or column. Both copies cannot remain white, so shade this copy.
Keep the square at row 5, column 3 unshaded. A square sharing a side with a shaded square must remain white. Two shaded squares are not allowed to touch along a side.
Keep the square at row 6, column 2 unshaded. A square sharing a side with a shaded square must remain white. Two shaded squares are not allowed to touch along a side.
Keep the square at row 6, column 4 unshaded. A square sharing a side with a shaded square must remain white. Two shaded squares are not allowed to touch along a side.
Step 4: the orange outlines mark the changes explained above.
Frequently asked questions
Can connectivity prove a Hitori cell white?
Yes. If shading it would destroy every available side-connected route between confirmed white groups, it must remain white. Check all alternatives through undecided cells before making this claim.
Are diagonal black chains forbidden?
No. Diagonal black contact is allowed. A particular arrangement can still be impossible if it disconnects the white area, but that requires a connection proof rather than a separate pattern rule.
Must a repeated pair keep one white?
An adjacent equal pair must, because its members cannot both be black. A nonadjacent pair does not automatically have that restriction: both may be shaded if the full set of rules permits it.
What makes a useful Hitori contradiction?
A definite rule failure: touching black sides, matching confirmed whites in one line, or white groups with no possible connection. An unresolved or visually awkward branch alone does not disprove an assumption.