Hitori · EN
Hitori for Beginners: Pairs, Sandwiches and Connected White Cells
Start Hitori with adjacent equal pairs and equal numbers separated by one cell, then propagate each confirmed black or white decision. Keep all retained cells connected and distinguish undecided cells from whites you have actually proved.
Find repeats without choosing a survivor yet
Scan rows and columns for repeated numbers. These identify conflicts that eventually need shading, but a nonadjacent pair does not tell you immediately which cell remains white. Keep both possibilities open until another rule supplies a reason.
Mark decisions in three mental categories: black, white, and unknown. A printed number visible in an unknown cell is not yet a confirmed survivor. This distinction matters because only a proved white cell forces all matching copies in its row and column black.
First deduction: use an adjacent equal pair
Two equal cells sharing a side in one row cannot both stay white, because they repeat. They cannot both be black, because black cells cannot share a side. Exactly one must remain white, even though you may not yet know which one.
Therefore every other copy of that value in the same row is black. The same argument works for a vertical adjacent pair and other copies in its column. This is useful progress without having to decide the pair's order.
Second deduction: confirm a sandwich centre white
When equal numbers lie in the same row with exactly one cell between them, the middle cell must be white. If the middle were black, both side-neighbours would have to be white, leaving the equal outer numbers together in the row.
The argument also works vertically. It proves the centre's colour without deciding which outer cell becomes black. Check that the two outer values really match and that only one cell separates them before applying the pattern.
Third deduction: surround black cells with white
A confirmed black square forces every side-neighbour white. Diagonal neighbours are not forced by this rule alone. After retaining the side-neighbours, scan each one's whole row and column for matching values that must now be shaded.
This creates the main beginner chain: black forces neighbouring whites; white forces matching copies black; those blacks force more neighbouring whites. Follow the chain until no new decision follows, then return to the next pair or sandwich elsewhere.
Fourth deduction: protect white connections
Trace the routes still available between confirmed white cells, allowing undecided cells as possible future whites. If shading one undecided square would leave two retained white groups with no route between them, that square must remain white.
Inspect corners and narrow passages carefully, but check every alternative route before declaring a connector necessary. A nearby diagonal contact does not connect whites. Equally, a longer route around another side of the board may keep them connected when a short route closes.
Start with this easy puzzle
Dark cells are shaded and white cells are retained. Printed numbers are clues, so their appearance alone does not decide a cell’s state. Orange marks highlight new decisions. Tinted squares remain undecided.
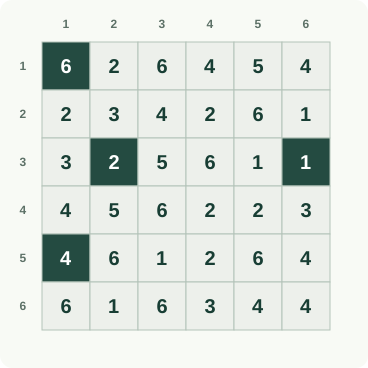
Step 1: Keep neighbors of shaded clues
A shaded square forces every side neighbor to remain unshaded. Apply that rule around the starting shaded clues; keeping these numbers is compulsory. Mark R1C2, R2C1, R2C2 and R2C6 as unshaded.
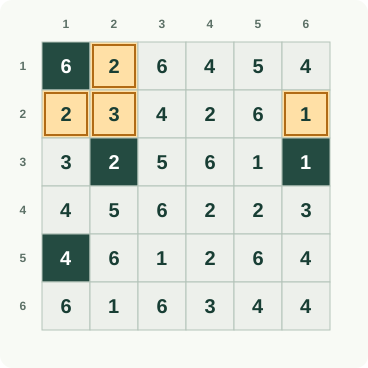
Step 2: Continue the unshaded boundary
Continue around the other starting shaded squares. These highlighted cells share a side with shading, so none may be shaded as well. Mark R3C1, R3C3, R4C2 and R3C5 as unshaded.
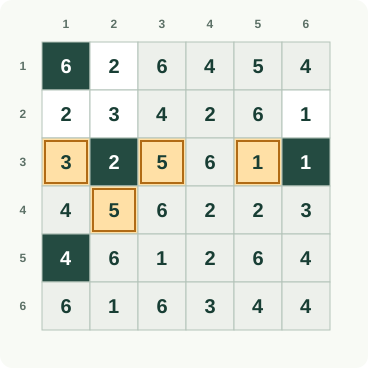
Step 3: Establish retained duplicate partners
Finish the immediate neighborhoods of the starting shaded cells. This establishes several retained numbers that will decide duplicate pairs in their rows and columns. Mark R4C6, R4C1, R5C2 and R6C1 as unshaded.
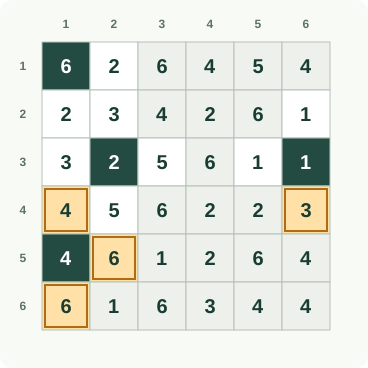
Step 4: Shade conflicting duplicates
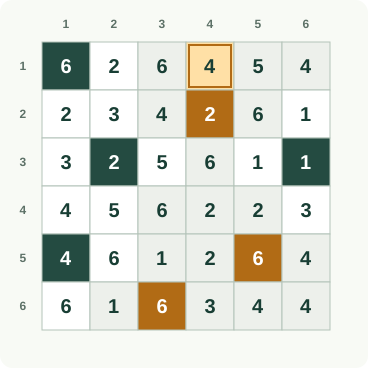
A retained number forces its duplicate in the same line to be shaded. After marking those duplicates, keep their side neighbors unshaded. Mark R2C4, R5C5 and R6C3 as shaded; Mark R1C4 as unshaded.
Step 5: Keep the new neighbors
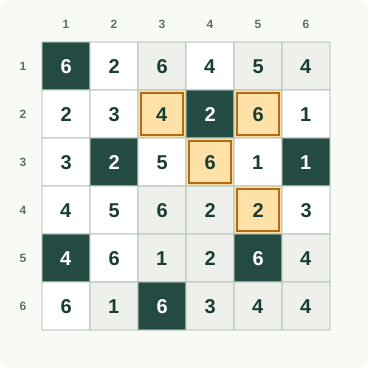
Each newly shaded square creates another set of compulsory unshaded neighbors. Mark these first so later duplicate checks use confirmed retained numbers. Mark R2C3, R2C5, R3C4 and R4C5 as unshaded.
Step 6: Extend confirmed unshaded cells
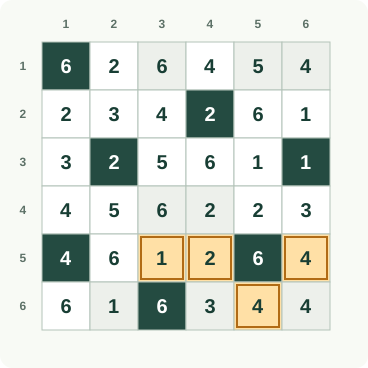
Extend the unshaded boundary around the latest shaded cells. This step adds retained cells; it does not shade extra squares merely because numbers repeat elsewhere. Mark R5C3, R5C4, R5C6 and R6C5 as unshaded.
Step 7: Resolve the remaining repeated values
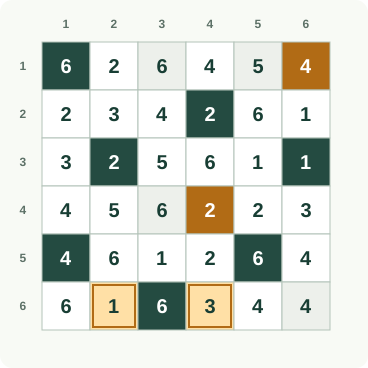
Use the newly retained values to resolve remaining duplicate pairs. Keep the compulsory neighbor cells, then shade the conflicting repeated numbers. Mark R6C2 and R6C4 as unshaded; Mark R1C6 and R4C4 as shaded.
Step 8: Finish the connected unshaded area
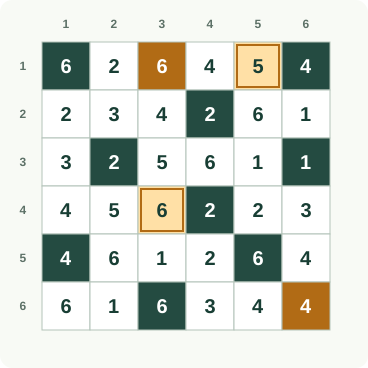
Resolve the final repeated numbers, keeping every side neighbor of shading unshaded. Confirm that all retained cells still form one connected area. Mark R6C6 and R1C3 as shaded; Mark R1C5 and R4C3 as unshaded.
Recover and finish with three separate checks
If you stall, revisit unresolved adjacent pairs and sandwiches, then trace the confirmed white components through remaining possible connections. If two blacks touch or two confirmed whites repeat, inspect the earliest unsupported decision in that chain. Undo its consequences before continuing.
At completion, check white duplicates, black side contact, and full white connectivity separately. Nikoli's Hitori page supplies the primary rules. Play Hitori free to practise again, use the rules guide for definitions, or read solving strategies for longer chains and common consequences.
Sources and background
Worked example: follow each deduction
Read rows from top to bottom and columns from left to right, starting at 1. Read each instruction, then compare the orange changes with the previous picture. Keep undecided cells or segments open until the explanation settles them.
■ shaded; □ unshaded; ? = undecided
Follow these changes in order; the picture below includes all of them.
Keep the square at row 1, column 2 unshaded. A square sharing a side with a shaded square must remain white. Two shaded squares are not allowed to touch along a side.
Keep the square at row 2, column 1 unshaded. A square sharing a side with a shaded square must remain white. Two shaded squares are not allowed to touch along a side.
Keep the square at row 2, column 2 unshaded. A square sharing a side with a shaded square must remain white. Two shaded squares are not allowed to touch along a side.
Keep the square at row 2, column 6 unshaded. A square sharing a side with a shaded square must remain white. Two shaded squares are not allowed to touch along a side.
Step 1: the orange outlines mark the changes explained above. Follow these changes in order; the picture below includes all of them.
Keep the square at row 3, column 1 unshaded. A square sharing a side with a shaded square must remain white. Two shaded squares are not allowed to touch along a side.
Keep the square at row 3, column 3 unshaded. A square sharing a side with a shaded square must remain white. Two shaded squares are not allowed to touch along a side.
Keep the square at row 4, column 2 unshaded. A square sharing a side with a shaded square must remain white. Two shaded squares are not allowed to touch along a side.
Keep the square at row 3, column 5 unshaded. A square sharing a side with a shaded square must remain white. Two shaded squares are not allowed to touch along a side.
Step 2: the orange outlines mark the changes explained above. Follow these changes in order; the picture below includes all of them.
Keep the square at row 4, column 6 unshaded. A square sharing a side with a shaded square must remain white. Two shaded squares are not allowed to touch along a side.
Keep the square at row 4, column 1 unshaded. A square sharing a side with a shaded square must remain white. Two shaded squares are not allowed to touch along a side.
Keep the square at row 5, column 2 unshaded. A square sharing a side with a shaded square must remain white. Two shaded squares are not allowed to touch along a side.
Keep the square at row 6, column 1 unshaded. A square sharing a side with a shaded square must remain white. Two shaded squares are not allowed to touch along a side.
Step 3: the orange outlines mark the changes explained above. Follow these changes in order; the picture below includes all of them.
Shade the square at row 2, column 4. The other 2 at row 2, column 1 is retained in the same row or column. Both copies cannot remain white, so shade this copy.
Shade the square at row 5, column 5. The other 6 at row 5, column 2 is retained in the same row or column. Both copies cannot remain white, so shade this copy.
Shade the square at row 6, column 3. The other 6 at row 6, column 1 is retained in the same row or column. Both copies cannot remain white, so shade this copy.
Keep the square at row 1, column 4 unshaded. A square sharing a side with a shaded square must remain white. Two shaded squares are not allowed to touch along a side.
Step 4: the orange outlines mark the changes explained above. Follow these changes in order; the picture below includes all of them.
Keep the square at row 2, column 3 unshaded. A square sharing a side with a shaded square must remain white. Two shaded squares are not allowed to touch along a side.
Keep the square at row 2, column 5 unshaded. A square sharing a side with a shaded square must remain white. Two shaded squares are not allowed to touch along a side.
Keep the square at row 3, column 4 unshaded. A square sharing a side with a shaded square must remain white. Two shaded squares are not allowed to touch along a side.
Keep the square at row 4, column 5 unshaded. A square sharing a side with a shaded square must remain white. Two shaded squares are not allowed to touch along a side.
Step 5: the orange outlines mark the changes explained above. Follow these changes in order; the picture below includes all of them.
Keep the square at row 5, column 3 unshaded. A square sharing a side with a shaded square must remain white. Two shaded squares are not allowed to touch along a side.
Keep the square at row 5, column 4 unshaded. A square sharing a side with a shaded square must remain white. Two shaded squares are not allowed to touch along a side.
Keep the square at row 5, column 6 unshaded. A square sharing a side with a shaded square must remain white. Two shaded squares are not allowed to touch along a side.
Keep the square at row 6, column 5 unshaded. A square sharing a side with a shaded square must remain white. Two shaded squares are not allowed to touch along a side.
Step 6: the orange outlines mark the changes explained above. Follow these changes in order; the picture below includes all of them.
Keep the square at row 6, column 2 unshaded. A square sharing a side with a shaded square must remain white. Two shaded squares are not allowed to touch along a side.
Keep the square at row 6, column 4 unshaded. A square sharing a side with a shaded square must remain white. Two shaded squares are not allowed to touch along a side.
Shade the square at row 1, column 6. The other 4 at row 1, column 4 is retained in the same row or column. Both copies cannot remain white, so shade this copy.
Shade the square at row 4, column 4. The other 2 at row 4, column 5 is retained in the same row or column. Both copies cannot remain white, so shade this copy.
Step 7: the orange outlines mark the changes explained above. Follow these changes in order; the picture below includes all of them.
Shade the square at row 6, column 6. The other 4 at row 6, column 5 is retained in the same row or column. Both copies cannot remain white, so shade this copy.
Keep the square at row 1, column 5 unshaded. A square sharing a side with a shaded square must remain white. Two shaded squares are not allowed to touch along a side.
Keep the square at row 4, column 3 unshaded. A square sharing a side with a shaded square must remain white. Two shaded squares are not allowed to touch along a side.
Shade the square at row 1, column 3. The other 6 at row 4, column 3 is retained in the same row or column. Both copies cannot remain white, so shade this copy.
Step 8: the orange outlines mark the changes explained above.
Frequently asked questions
What is the sandwich rule in Hitori?
If equal values have exactly one cell between them in a row or column, that centre cell is white. Making it black would force both equal outer neighbours white and leave a duplicate.
Does an adjacent pair tell me which copy to shade?
Not always. It proves that exactly one copy is white and one black. That is enough to shade every other matching value in the same line, even while the pair itself remains unresolved.
What should I do after shading a cell?
Retain every side-neighbour as white. Then shade matching copies of each confirmed white value in its row and column. Check connectivity as the chain develops.
What if every duplicate is removed but Hitori is unfinished?
Inspect black side contact and white connectivity. Correct duplicate removal alone does not prove a solution. Every retained cell must belong to one side-connected white region.