Masyu · EN
Masyu for Beginners: Follow the Pearls Step by Step
Begin Masyu with pearls near the boundary, where the board eliminates impossible straight passages or black-pearl arms. Draw only the segments shared by every legal option, then carry each new line's consequences into the neighbouring pearls and the single-loop check.
Learn the two colour instructions separately
Say the rules in a fixed order: white goes straight at the pearl and turns next door; black turns at the pearl and goes straight next door on both sides. The word next means the immediately neighbouring position along the route, not any turn somewhere nearby.
Before studying a whole puzzle, identify these features in the solved rule diagram. Trace a short section through a pearl and point out where its local obligation is met. Once the colours are familiar, the beginner walkthrough becomes a sequence of constraints instead of an exercise in remembering definitions.
First deduction: start with boundary white pearls
A white pearl on an outside edge cannot pass straight through the board boundary. Its route must therefore run parallel to the edge. Confirm that straight passage, then examine the two immediately neighbouring positions to find where its required turn can occur.
Do not automatically choose which neighbour turns. Both may remain possible. The forced straight passage is already useful: it gives those neighbours an incident segment and may constrain a nearby black pearl. Keep the confirmed part even when the next part remains open.
Second deduction: measure black arms
List the right-angle turns available at a black pearl. For each, check that both arms have room for two grid steps without leaving the board or violating a confirmed line. Reject a turn if either arm would have to bend again at the very next position.
If only one orientation survives, draw the turn and both straight extensions. Sometimes several orientations remain but share one arm. That common arm is still forced. Drawing only the intersection of all valid options prevents a plausible-looking choice from becoming an unsupported commitment.
Third deduction: complete a white pearl's nearby turn
Once a white pearl's direction is known, inspect the neighbour on each side along its passage. If one neighbour is forced straight, the other must turn. If both are forced straight, the current drawing is impossible because the white pearl's nearby-turn requirement cannot be satisfied.
Follow the actual direction of travel. For a horizontal white pearl, a turn above the pearl is irrelevant unless the route reaches that position as one of its two immediate neighbours, which it does not. This precise neighbour check avoids a common early misunderstanding.
Fourth deduction: finish degree-two positions
At any position with two confirmed incident segments, no third line is allowed. At the open end of a confirmed path, if just one continuation remains possible, it must be used. This endpoint rule often links the local pearl deductions into longer sections of route.
An ordinary position can remain unused, so do not force a line simply because it has two available edges. The position needs an obligation to be visited, such as a pearl or an existing incident segment. Availability and necessity are different pieces of information.
Start with this easy puzzle
Filled pearls are black and hollow pearls are white. Orange lines and crosses show newly decided loop edges between the numbered points.
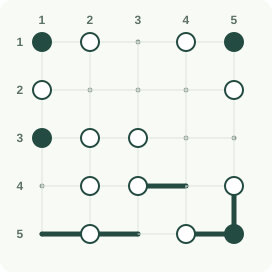
Step 1: Start at the corner pearls
Pearls require two incident loop edges. At the corner pearls only two directions exist; use these forced connections and the lower boundary continuation. Draw R1C1–R1C2, R1C1–R2C1, R1C4–R1C5, R1C5–R2C5 and R4C1–R5C1.
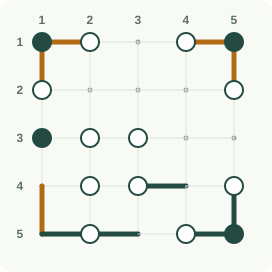
Step 2: Extend beside the black pearl
The black upper-left pearl must turn, with straight segments immediately before and after. Its adjacent white pearl also rules out a downward branch. Exclude R4C2–R5C2, R1C2–R2C2 and R2C1–R2C2; Draw R1C2–R1C3.
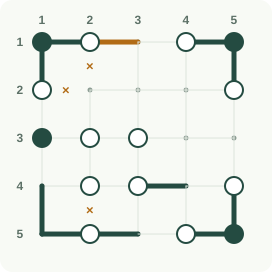
Step 3: Follow the top pearls
The upper white pearl continues straight, while the black upper-right pearl forces straight neighboring segments. Exclude the side branches those conditions forbid. Draw R2C1–R3C1 and R1C3–R1C4; Exclude R1C4–R2C4, R1C3–R2C3 and R2C4–R2C5.
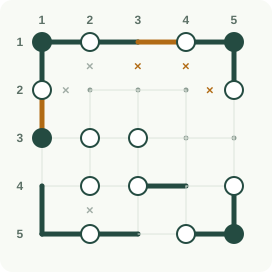
Step 4: Resolve the left black pearl
Apply the same black-pearl rule on the left edge. Its turn determines the next two straight segments and excludes competing branches. Draw R2C5–R3C5 and R3C1–R3C2; Exclude R3C1–R4C1 and R2C2–R3C2.
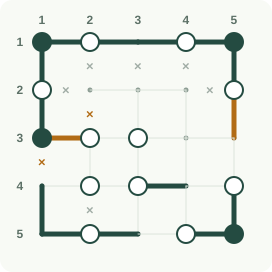
Step 5: Cross the central white pearl
The central white pearl must be crossed straight. Its neighboring turn requirement selects the horizontal route and rejects the downward and upward alternatives. Draw R3C2–R3C3 and R3C3–R3C4; Exclude R3C2–R4C2 and R2C3–R3C3.
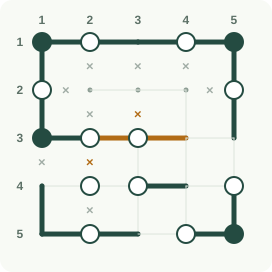
Step 6: Continue the lower white passages
Continue through the two lower white pearls without turning on them. Their required neighboring turns determine which side branches remain available. Exclude R3C3–R4C3, R3C4–R3C5 and R4C3–R5C3; Draw R4C1–R4C2 and R4C2–R4C3.
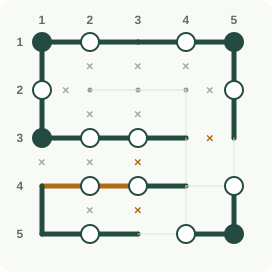
Step 7: Follow the right and bottom pearls
Use each white pearl’s straight passage and nearby turn requirement. Extend the right-hand route and bottom segment while excluding the competing inward branches. Exclude R4C4–R4C5 and R4C4–R5C4; Draw R3C5–R4C5 and R5C3–R5C4.
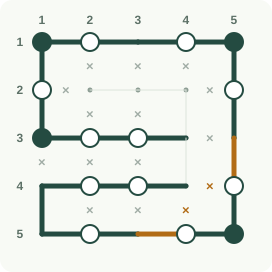
Step 8: Join the last route
Finish at unmarked points using zero or two incident edges. Remove stranded branches and join the remaining ends into the single verified loop. Exclude R2C2–R2C3, R2C3–R2C4 and R2C4–R3C4; Draw R3C4–R4C4.
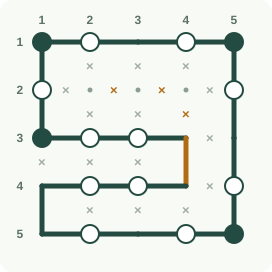
Work through the illustrated easy puzzle
At each step, find the highlighted pearl and name the restriction: boundary orientation, two-step black arm, white neighbouring turn, or degree two. Check the before-and-after diagrams and explain why the omitted alternative fails. The useful lesson is the reason for the added segment.
After following a local deduction, trace the current open path to its other end. That end may sit far from the pearl you just used. Carrying information along a path lets one boundary clue help another part of the board without requiring a difficult new technique.
Keep the final route in view
Before joining two ends, check whether they belong to the same open path. Joining them closes that path into a loop. It is legal only when the resulting loop can be the complete solution, with all pearls and every other confirmed segment included.
If other required material remains outside, the closing edge is excluded for now. Continue through another available direction instead. This is a global deduction: no individual pearl has to be wrong for a tempting small loop to be forbidden.
Review mistakes and practise with purpose
When stuck, revisit edge white pearls, black pearls with restricted arms, and white pearls whose one neighbour cannot turn. Then inspect the endpoints of long paths. If a contradiction appears, check the earliest orientation you chose without proving it rather than redrawing every line.
Finish by auditing every pearl and tracing one complete loop. Nikoli's Masyu rule page is the primary reference for these checks. Play Masyu free for another puzzle, use the rules guide to revisit colour details, or read solving strategies for systematic orientation elimination and short contradiction chains.
Sources and background
Worked example: follow each deduction
Read rows from top to bottom and columns from left to right, starting at 1. Read each instruction, then compare the orange changes with the previous picture. Keep undecided cells or segments open until the explanation settles them.
● black pearl; ○ white pearl; × no line; ? = undecided
Follow these changes in order; the picture below includes all of them.
Draw the segment between row 1, column 1 and row 1, column 2. At the junction at row 1, column 1, the loop must use exactly two segments. Other segments already contribute 0, with 1 still undecided. The stated choice is the only one that allows the required total.
Draw the segment between row 1, column 1 and row 2, column 1. At the junction at row 1, column 1, the loop must use exactly two segments. Other segments already contribute 1, with 0 still undecided. The stated choice is the only one that allows the required total.
Draw the segment between row 1, column 4 and row 1, column 5. At the junction at row 1, column 5, the loop must use exactly two segments. Other segments already contribute 0, with 1 still undecided. The stated choice is the only one that allows the required total.
Draw the segment between row 1, column 5 and row 2, column 5. At the junction at row 1, column 5, the loop must use exactly two segments. Other segments already contribute 1, with 0 still undecided. The stated choice is the only one that allows the required total.
Draw the segment between row 4, column 1 and row 5, column 1. At the junction at row 5, column 1, the loop must use zero or two segments, never one or three. Other segments already contribute 1, with 0 still undecided. The stated choice is the only one that allows the required total.
Step 1: the orange outlines mark the changes explained above. Follow these changes in order; the picture below includes all of them.
Mark the segment between row 4, column 2 and row 5, column 2 unused (×). At the junction at row 5, column 2, the loop must use exactly two segments. Other segments already contribute 2, with 0 still undecided. The stated choice is the only one that allows the required total.
Draw the segment between row 1, column 2 and row 1, column 3. At the black pearl at row 1, column 1, turn, then continue straight at both neighbouring points. With the segments already fixed, only this choice fits those three linked requirements.
Mark the segment between row 1, column 2 and row 2, column 2 unused (×). At the black pearl at row 1, column 1, turn, then continue straight at both neighbouring points. With the segments already fixed, only this choice fits those three linked requirements.
Mark the segment between row 2, column 1 and row 2, column 2 unused (×). At the black pearl at row 1, column 1, turn, then continue straight at both neighbouring points. With the segments already fixed, only this choice fits those three linked requirements.
Step 2: the orange outlines mark the changes explained above. Follow these changes in order; the picture below includes all of them.
Draw the segment between row 2, column 1 and row 3, column 1. At the black pearl at row 1, column 1, turn, then continue straight at both neighbouring points. With the segments already fixed, only this choice fits those three linked requirements.
Draw the segment between row 1, column 3 and row 1, column 4. Go straight through the white pearl at row 1, column 4, with a turn immediately before or after it. Comparing the remaining routes with the drawn segments leaves only this choice.
Mark the segment between row 1, column 4 and row 2, column 4 unused (×). Go straight through the white pearl at row 1, column 4, with a turn immediately before or after it. Comparing the remaining routes with the drawn segments leaves only this choice.
Mark the segment between row 1, column 3 and row 2, column 3 unused (×). Go straight through the white pearl at row 1, column 4, with a turn immediately before or after it. Comparing the remaining routes with the drawn segments leaves only this choice.
Mark the segment between row 2, column 4 and row 2, column 5 unused (×). At the black pearl at row 1, column 5, turn, then continue straight at both neighbouring points. With the segments already fixed, only this choice fits those three linked requirements.
Step 3: the orange outlines mark the changes explained above. Follow these changes in order; the picture below includes all of them.
Draw the segment between row 2, column 5 and row 3, column 5. At the black pearl at row 1, column 5, turn, then continue straight at both neighbouring points. With the segments already fixed, only this choice fits those three linked requirements.
Draw the segment between row 3, column 1 and row 3, column 2. At the black pearl at row 3, column 1, turn, then continue straight at both neighbouring points. With the segments already fixed, only this choice fits those three linked requirements.
Mark the segment between row 3, column 1 and row 4, column 1 unused (×). At the black pearl at row 3, column 1, turn, then continue straight at both neighbouring points. With the segments already fixed, only this choice fits those three linked requirements.
Mark the segment between row 2, column 2 and row 3, column 2 unused (×). At the black pearl at row 3, column 1, turn, then continue straight at both neighbouring points. With the segments already fixed, only this choice fits those three linked requirements.
Step 4: the orange outlines mark the changes explained above. Follow these changes in order; the picture below includes all of them.
Draw the segment between row 3, column 2 and row 3, column 3. At the black pearl at row 3, column 1, turn, then continue straight at both neighbouring points. With the segments already fixed, only this choice fits those three linked requirements.
Mark the segment between row 3, column 2 and row 4, column 2 unused (×). At the black pearl at row 3, column 1, turn, then continue straight at both neighbouring points. With the segments already fixed, only this choice fits those three linked requirements.
Mark the segment between row 2, column 3 and row 3, column 3 unused (×). Go straight through the white pearl at row 3, column 3, with a turn immediately before or after it. Comparing the remaining routes with the drawn segments leaves only this choice.
Draw the segment between row 3, column 3 and row 3, column 4. Go straight through the white pearl at row 3, column 3, with a turn immediately before or after it. Comparing the remaining routes with the drawn segments leaves only this choice.
Step 5: the orange outlines mark the changes explained above. Follow these changes in order; the picture below includes all of them.
Mark the segment between row 3, column 3 and row 4, column 3 unused (×). Go straight through the white pearl at row 3, column 3, with a turn immediately before or after it. Comparing the remaining routes with the drawn segments leaves only this choice.
Mark the segment between row 3, column 4 and row 3, column 5 unused (×). Go straight through the white pearl at row 3, column 3, with a turn immediately before or after it. Comparing the remaining routes with the drawn segments leaves only this choice.
Draw the segment between row 4, column 1 and row 4, column 2. Go straight through the white pearl at row 4, column 2, with a turn immediately before or after it. Comparing the remaining routes with the drawn segments leaves only this choice.
Draw the segment between row 4, column 2 and row 4, column 3. Go straight through the white pearl at row 4, column 2, with a turn immediately before or after it. Comparing the remaining routes with the drawn segments leaves only this choice.
Mark the segment between row 4, column 3 and row 5, column 3 unused (×). Go straight through the white pearl at row 4, column 2, with a turn immediately before or after it. Comparing the remaining routes with the drawn segments leaves only this choice.
Step 6: the orange outlines mark the changes explained above. Follow these changes in order; the picture below includes all of them.
Mark the segment between row 4, column 4 and row 4, column 5 unused (×). Go straight through the white pearl at row 4, column 3, with a turn immediately before or after it. Comparing the remaining routes with the drawn segments leaves only this choice.
Draw the segment between row 3, column 5 and row 4, column 5. Go straight through the white pearl at row 4, column 5, with a turn immediately before or after it. Comparing the remaining routes with the drawn segments leaves only this choice.
Draw the segment between row 5, column 3 and row 5, column 4. Go straight through the white pearl at row 5, column 2, with a turn immediately before or after it. Comparing the remaining routes with the drawn segments leaves only this choice.
Mark the segment between row 4, column 4 and row 5, column 4 unused (×). Go straight through the white pearl at row 5, column 4, with a turn immediately before or after it. Comparing the remaining routes with the drawn segments leaves only this choice.
Step 7: the orange outlines mark the changes explained above. Follow these changes in order; the picture below includes all of them.
Mark the segment between row 2, column 2 and row 2, column 3 unused (×). At the junction at row 2, column 2, the loop must use zero or two segments, never one or three. Other segments already contribute 0, with 0 still undecided. The stated choice is the only one that allows the required total.
Mark the segment between row 2, column 3 and row 2, column 4 unused (×). At the junction at row 2, column 3, the loop must use zero or two segments, never one or three. Other segments already contribute 0, with 0 still undecided. The stated choice is the only one that allows the required total.
Mark the segment between row 2, column 4 and row 3, column 4 unused (×). At the junction at row 2, column 4, the loop must use zero or two segments, never one or three. Other segments already contribute 0, with 0 still undecided. The stated choice is the only one that allows the required total.
Draw the segment between row 3, column 4 and row 4, column 4. At the junction at row 3, column 4, the loop must use zero or two segments, never one or three. Other segments already contribute 1, with 0 still undecided. The stated choice is the only one that allows the required total.
Step 8: the orange outlines mark the changes explained above.
Frequently asked questions
Where should I start a Masyu puzzle?
Look near the boundary. White pearls there often have a forced straight direction, while black pearls may lack room for some two-step arms. Confirm only what every remaining legal orientation requires.
Do I have to decide a whole black turn at once?
No. If several legal turns share one arm, you may draw that common arm while leaving the other direction unresolved. A partial forced result is useful and safer than choosing an entire turn.
Why did my small loop fail?
It may leave other pearls or confirmed segments outside. Masyu requires a single loop through every pearl, so closing one part too early can make the remaining requirements impossible.
Which puzzle should I try alongside Masyu?
Slitherlink practises degree-two and single-loop reasoning with numbered clues. Hashi and Nurikabe offer related connection checks without Masyu's two different pearl behaviours.