Masyu · EN
Masyu Solving Strategies: Pearl Orientations and Loop Continuity
Improve at Masyu by eliminating illegal pearl orientations, propagating their required neighbouring segments, and refusing edges that close an incomplete loop. Track both local turn obligations and the endpoints of the growing paths; neither view alone captures the whole puzzle.
Black-pearl orientation filtering
A black pearl has four possible right-angle orientations before other constraints are considered. Each orientation includes two-step arms, so test the entire shape against the boundary, existing lines, and nearby pearl requirements. A turn that fits at the centre can still fail one step farther along.
Keep all surviving orientations. Their shared edges are forced even when the complete turn is undecided. Revisit this set after any neighbouring change; a white pearl's straight passage or an excluded edge can remove an orientation that was previously viable.
White-pearl axis elimination
A white pearl has a horizontal or vertical straight-through axis. Each axis must leave at least one immediately neighbouring position able to turn. Reject an axis if it leaves the board, conflicts with an existing incident line, or forces both neighbouring positions to continue straight.
Do not test only whether two opposite edges are available at the pearl. The nearby-turn condition can decide between two axes that both look locally open. When one axis survives, draw both opposite edges and carry the remaining turn obligation into its two neighbours.
Turn-obligation transfer
Once a white pearl's axis is fixed, treat its adjacent turn as an explicit unresolved obligation. If one neighbouring position is proved straight, the other is forced to turn. Conversely, a confirmed turn on one side satisfies the obligation and may leave the opposite side flexible.
A black pearl can supply a useful straightness constraint because its neighbouring positions along both arms must remain straight. Where these neighbourhood requirements interact, a deduction can travel from one pearl to another without directly joining their centres. Check the direction of each affected segment carefully.
Degree-two propagation and forced endpoints
Every used position has degree two. Two confirmed edges exclude all others there; one confirmed edge with a single feasible continuation forces that continuation. Follow such endpoint deductions along an entire chain until it reaches a choice or a pearl needing a more specific orientation check.
The degree-two rule applies to used positions. An ordinary position with no incident line may be unused, so two available edges alone do not force both. A pearl, by contrast, must be visited. Keeping this distinction explicit prevents false forced paths through empty parts of the grid.
Premature-loop prevention
Track which open endpoints belong to the same path component. An edge joining the two ends of one component would close it. Exclude that edge if another pearl or confirmed segment remains outside the resulting loop, because no further material could join it without branching or revisiting a position.
Two nearby endpoints from different components can usually be joined without closing a loop, subject to the pearl rules. The important test is their path identity, not their visual proximity. Tracing a long component is often enough to find a forced direction near an otherwise ambiguous pearl.
Shared consequences across alternatives
When a pearl has two surviving orientations, compare their consequences rather than immediately choosing between them. Both may force the same remote endpoint to continue, exclude the same edge, or require a particular neighbouring turn. That common consequence is proved without resolving the original choice.
Keep the alternatives short and complete. Derive only forced effects within each, and distinguish direct shared edges from consequences that need an extra step. If an option merely looks less elegant, it remains possible. Masyu permits irregular paths and unused ordinary positions.
Controlled contradiction chains
For a narrow unresolved choice, assume one axis or turn and propagate its mandatory edges. A black arm forced to bend too soon, a white pearl with no neighbouring turn, a branch, a dead endpoint, or an incomplete closed loop disproves that assumption.
Record the tested orientation and the first failed rule. Undo all dependent edges before confirming the alternative. A long route that becomes difficult is not a proof of failure; the contradiction must identify an impossible local requirement or a global loop that cannot include everything required.
A harder worked example
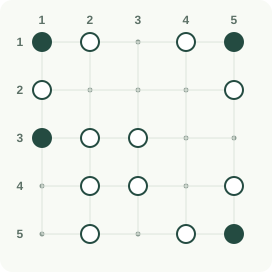
This board uses the Hard preset. Follow the four cumulative stages, revisiting each affected constraint after a deduction. Filled pearls are black and hollow pearls are white. Orange lines and crosses show newly decided loop edges between the numbered points.
Worked stage 1
At the black corner pearls, the loop has only two available directions and must turn. Extend straight through the immediate neighboring points. These compulsory extensions also remove branches that would introduce a forbidden turn beside a black pearl.
Worked stage 2
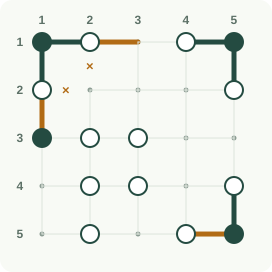
Use the upper white pearl’s straight passage, then apply the black-pearl condition on the left boundary. Each new segment constrains its neighboring points. Exclude side branches only when pearl geometry or a point’s two-edge degree forbids them.
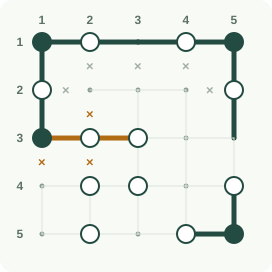
Worked stage 3
Work through the central and lower white pearls. A white pearl stays straight but requires a turn at an immediately neighboring point. Follow the forced horizontal passages and reject the vertical branches that would violate those conditions.
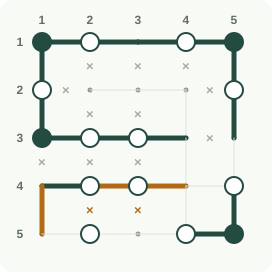
Worked stage 4
Finish the bottom white pearls, then settle unmarked points using zero or two incident edges. The last open route joins the existing segments. Trace the completed loop through every pearl and check that no separate cycle or branch remains.
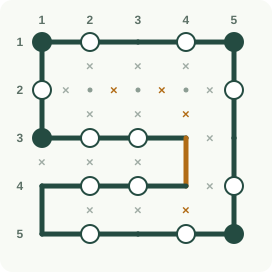
Sources and background
Worked example: follow each deduction
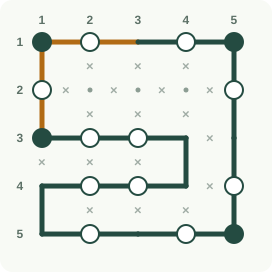
Read rows from top to bottom and columns from left to right, starting at 1. Read each instruction, then compare the orange changes with the previous picture. Keep undecided cells or segments open until the explanation settles them.
● black pearl; ○ white pearl; × no line; ? = undecided
Follow these changes in order; the picture below includes all of them.
Draw the segment between row 1, column 1 and row 1, column 2. At the junction at row 1, column 1, the loop must use exactly two segments. Other segments already contribute 0, with 1 still undecided. The stated choice is the only one that allows the required total.
Draw the segment between row 1, column 1 and row 2, column 1. At the junction at row 1, column 1, the loop must use exactly two segments. Other segments already contribute 1, with 0 still undecided. The stated choice is the only one that allows the required total.
Draw the segment between row 1, column 4 and row 1, column 5. At the junction at row 1, column 5, the loop must use exactly two segments. Other segments already contribute 0, with 1 still undecided. The stated choice is the only one that allows the required total.
Draw the segment between row 1, column 5 and row 2, column 5. At the junction at row 1, column 5, the loop must use exactly two segments. Other segments already contribute 1, with 0 still undecided. The stated choice is the only one that allows the required total.
Draw the segment between row 4, column 5 and row 5, column 5. At the junction at row 5, column 5, the loop must use exactly two segments. Other segments already contribute 0, with 1 still undecided. The stated choice is the only one that allows the required total.
Draw the segment between row 5, column 4 and row 5, column 5. At the junction at row 5, column 5, the loop must use exactly two segments. Other segments already contribute 1, with 0 still undecided. The stated choice is the only one that allows the required total.
Draw the segment between row 1, column 2 and row 1, column 3. At the black pearl at row 1, column 1, turn, then continue straight at both neighbouring points. With the segments already fixed, only this choice fits those three linked requirements.
Mark the segment between row 1, column 2 and row 2, column 2 unused (×). At the black pearl at row 1, column 1, turn, then continue straight at both neighbouring points. With the segments already fixed, only this choice fits those three linked requirements.
Mark the segment between row 2, column 1 and row 2, column 2 unused (×). At the black pearl at row 1, column 1, turn, then continue straight at both neighbouring points. With the segments already fixed, only this choice fits those three linked requirements.
Draw the segment between row 2, column 1 and row 3, column 1. At the black pearl at row 1, column 1, turn, then continue straight at both neighbouring points. With the segments already fixed, only this choice fits those three linked requirements.
Step 1: the orange outlines mark the changes explained above. Follow these changes in order; the picture below includes all of them.
Draw the segment between row 1, column 3 and row 1, column 4. Go straight through the white pearl at row 1, column 4, with a turn immediately before or after it. Comparing the remaining routes with the drawn segments leaves only this choice.
Mark the segment between row 1, column 4 and row 2, column 4 unused (×). Go straight through the white pearl at row 1, column 4, with a turn immediately before or after it. Comparing the remaining routes with the drawn segments leaves only this choice.
Mark the segment between row 1, column 3 and row 2, column 3 unused (×). Go straight through the white pearl at row 1, column 4, with a turn immediately before or after it. Comparing the remaining routes with the drawn segments leaves only this choice.
Mark the segment between row 2, column 4 and row 2, column 5 unused (×). At the black pearl at row 1, column 5, turn, then continue straight at both neighbouring points. With the segments already fixed, only this choice fits those three linked requirements.
Draw the segment between row 2, column 5 and row 3, column 5. At the black pearl at row 1, column 5, turn, then continue straight at both neighbouring points. With the segments already fixed, only this choice fits those three linked requirements.
Draw the segment between row 3, column 1 and row 3, column 2. At the black pearl at row 3, column 1, turn, then continue straight at both neighbouring points. With the segments already fixed, only this choice fits those three linked requirements.
Mark the segment between row 3, column 1 and row 4, column 1 unused (×). At the black pearl at row 3, column 1, turn, then continue straight at both neighbouring points. With the segments already fixed, only this choice fits those three linked requirements.
Mark the segment between row 2, column 2 and row 3, column 2 unused (×). At the black pearl at row 3, column 1, turn, then continue straight at both neighbouring points. With the segments already fixed, only this choice fits those three linked requirements.
Draw the segment between row 3, column 2 and row 3, column 3. At the black pearl at row 3, column 1, turn, then continue straight at both neighbouring points. With the segments already fixed, only this choice fits those three linked requirements.
Mark the segment between row 3, column 2 and row 4, column 2 unused (×). At the black pearl at row 3, column 1, turn, then continue straight at both neighbouring points. With the segments already fixed, only this choice fits those three linked requirements.
Step 2: the orange outlines mark the changes explained above. Follow these changes in order; the picture below includes all of them.
Mark the segment between row 2, column 3 and row 3, column 3 unused (×). Go straight through the white pearl at row 3, column 3, with a turn immediately before or after it. Comparing the remaining routes with the drawn segments leaves only this choice.
Draw the segment between row 3, column 3 and row 3, column 4. Go straight through the white pearl at row 3, column 3, with a turn immediately before or after it. Comparing the remaining routes with the drawn segments leaves only this choice.
Mark the segment between row 3, column 3 and row 4, column 3 unused (×). Go straight through the white pearl at row 3, column 3, with a turn immediately before or after it. Comparing the remaining routes with the drawn segments leaves only this choice.
Mark the segment between row 3, column 4 and row 3, column 5 unused (×). Go straight through the white pearl at row 3, column 3, with a turn immediately before or after it. Comparing the remaining routes with the drawn segments leaves only this choice.
Draw the segment between row 4, column 1 and row 4, column 2. Go straight through the white pearl at row 4, column 2, with a turn immediately before or after it. Comparing the remaining routes with the drawn segments leaves only this choice.
Draw the segment between row 4, column 2 and row 4, column 3. Go straight through the white pearl at row 4, column 2, with a turn immediately before or after it. Comparing the remaining routes with the drawn segments leaves only this choice.
Mark the segment between row 4, column 2 and row 5, column 2 unused (×). Go straight through the white pearl at row 4, column 2, with a turn immediately before or after it. Comparing the remaining routes with the drawn segments leaves only this choice.
Draw the segment between row 4, column 1 and row 5, column 1. Go straight through the white pearl at row 4, column 2, with a turn immediately before or after it. Comparing the remaining routes with the drawn segments leaves only this choice.
Draw the segment between row 4, column 3 and row 4, column 4. Go straight through the white pearl at row 4, column 3, with a turn immediately before or after it. Comparing the remaining routes with the drawn segments leaves only this choice.
Mark the segment between row 4, column 3 and row 5, column 3 unused (×). Go straight through the white pearl at row 4, column 3, with a turn immediately before or after it. Comparing the remaining routes with the drawn segments leaves only this choice.
Step 3: the orange outlines mark the changes explained above. Follow these changes in order; the picture below includes all of them.
Mark the segment between row 4, column 4 and row 4, column 5 unused (×). Go straight through the white pearl at row 4, column 3, with a turn immediately before or after it. Comparing the remaining routes with the drawn segments leaves only this choice.
Draw the segment between row 3, column 5 and row 4, column 5. Go straight through the white pearl at row 4, column 5, with a turn immediately before or after it. Comparing the remaining routes with the drawn segments leaves only this choice.
Draw the segment between row 5, column 1 and row 5, column 2. Go straight through the white pearl at row 5, column 2, with a turn immediately before or after it. Comparing the remaining routes with the drawn segments leaves only this choice.
Draw the segment between row 5, column 2 and row 5, column 3. Go straight through the white pearl at row 5, column 2, with a turn immediately before or after it. Comparing the remaining routes with the drawn segments leaves only this choice.
Draw the segment between row 5, column 3 and row 5, column 4. Go straight through the white pearl at row 5, column 2, with a turn immediately before or after it. Comparing the remaining routes with the drawn segments leaves only this choice.
Mark the segment between row 4, column 4 and row 5, column 4 unused (×). Go straight through the white pearl at row 5, column 4, with a turn immediately before or after it. Comparing the remaining routes with the drawn segments leaves only this choice.
Mark the segment between row 2, column 2 and row 2, column 3 unused (×). At the junction at row 2, column 2, the loop must use zero or two segments, never one or three. Other segments already contribute 0, with 0 still undecided. The stated choice is the only one that allows the required total.
Mark the segment between row 2, column 3 and row 2, column 4 unused (×). At the junction at row 2, column 3, the loop must use zero or two segments, never one or three. Other segments already contribute 0, with 0 still undecided. The stated choice is the only one that allows the required total.
Mark the segment between row 2, column 4 and row 3, column 4 unused (×). At the junction at row 2, column 4, the loop must use zero or two segments, never one or three. Other segments already contribute 0, with 0 still undecided. The stated choice is the only one that allows the required total.
Draw the segment between row 3, column 4 and row 4, column 4. At the junction at row 3, column 4, the loop must use zero or two segments, never one or three. Other segments already contribute 1, with 0 still undecided. The stated choice is the only one that allows the required total.
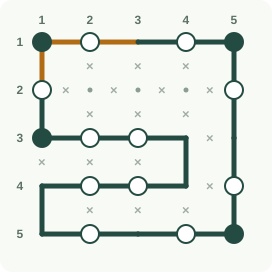
Step 4: the orange outlines mark the changes explained above.
Frequently asked questions
What is a white-pearl turn obligation?
After fixing its straight axis, at least one immediate neighbour along that axis must turn. If one is forced straight, the other must turn. A turn farther along the path does not satisfy it.
Can an unresolved black pearl still give a forced line?
Yes. Filter its legal right-angle orientations, including full two-step arms. An edge shared by every surviving orientation must belong to the solution even if the other arm remains undecided.
How do I recognise an illegal early loop?
Trace whether the edge under consideration joins the two ends of the same path. If closing it leaves another pearl or confirmed segment outside, that edge is forbidden until the complete route can include everything.
What should I scan when all pearls look ambiguous?
Inspect existing path endpoints and positions already carrying two edges. Then revisit white pearls with restricted neighbouring turns and black pearls whose arms meet those paths. A path deduction may resolve a pearl indirectly.