Nurikabe · EN
Nurikabe for Beginners: A Step-by-Step Solving Guide
Begin a Nurikabe puzzle by surrounding every 1 with sea, separating nearby clues, and closing the boundaries of islands that have reached their sizes. After each deduction, check both island growth and sea connectivity before making another mark.
Understand the three states before starting
You are deciding whether each unnumbered square becomes white land or black sea. Keep undecided cells separate from confirmed land in your thinking. A blank square may eventually be either colour, and a number is already one confirmed land cell belonging to its own island.
The simplest useful note is a reason attached to a mark. For example, a sea cell might be necessary because a neighbouring island is complete. When you cannot explain a choice without saying it looks right, leave that cell undecided and look for a firmer deduction elsewhere.
First deduction: surround every island of 1
A 1 has its full area from the beginning. Any square sharing its side must be black, or the island would contain at least two cells. At a boundary there are fewer neighbours to mark, but the reasoning is identical. Diagonal neighbours are unaffected by this rule alone.
This opening often creates several useful black cells at once. After marking them, inspect nearby four-cell squares for three black cells and check whether a sea pocket has only one possible way out. One easy clue can start a chain of different deductions.
Second deduction: keep numbered islands apart
Two clues separated by one intervening cell in a straight line cannot both connect through that cell. Mark the intervening square sea. For diagonally neighbouring clues, each of their two shared side-neighbours would join the clues if white, so both shared neighbours must be sea.
Use this reasoning only when the white connection really would join two clues. A square merely close to two numbers is not automatically black. Draw the potential side-to-side connection mentally and confirm that both numbers would belong to the same white component.
Third deduction: complete and border small islands
Count the white cells already joined to each clue. If the count matches the number, close every remaining side of that island with sea. If it is short, list the open neighbouring squares instead. This separates an island's confirmed area from the area it still needs.
An unfinished island with just one available square on its whole frontier must expand there. Count the full island frontier, not just neighbours of the numbered cell: a previously placed white extension may give the island a second route that is easy to overlook.
Fourth deduction: break a possible black square
Three confirmed sea cells in a 2×2 square force the last cell to be land. Mark it white, then investigate how it can reach a clue. The no-square rule proves its colour, but it does not always immediately prove which island will eventually include it.
Watch for the reverse mistake: three white cells do not force the fourth black. Nurikabe has no corresponding ban on white 2×2 squares. White area is controlled by island size and the one-clue rule, so an island large enough can legitimately contain such a square.
Start with this easy puzzle
Dark green is sea; white cells are islands. Orange marks identify the current deductions. Each clue counts its own island cell. Tinted squares remain undecided.
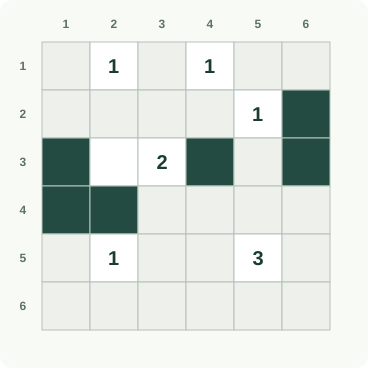
Step 1: Surround the first 1
An island numbered 1 is already complete. Its side neighbors must therefore be sea; diagonal contact does not enlarge that island. Mark R1C1, R1C3 and R2C2 as sea.
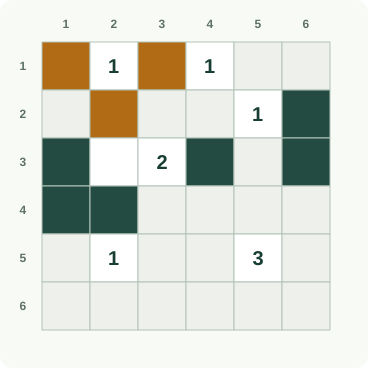
Step 2: Separate the other single islands
The other completed one-cell islands impose the same boundary. Keep numbered land separate by marking every remaining side neighbor as sea. Mark R1C5, R2C4 and R3C5 as sea.
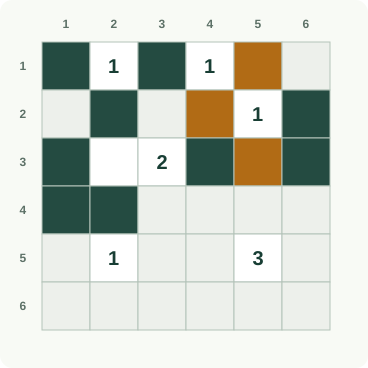
Step 3: Finish complete island boundaries
The assisted two-cell island already has its full area. Complete its sea boundary, then continue around the one-cell island lower down. Mark R2C3, R4C3 and R5C1 as sea.
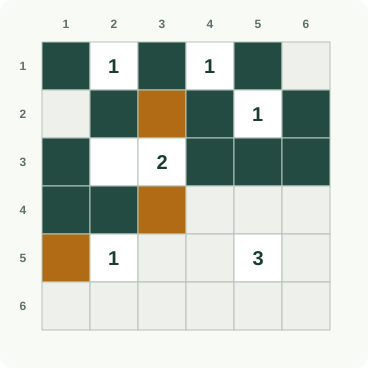
Step 4: Exclude unreachable land
Finish surrounding the completed island. A distant square that cannot fit any numbered island must also become sea, even without a neighboring clue. Mark R5C3, R6C2 and R1C6 as sea.
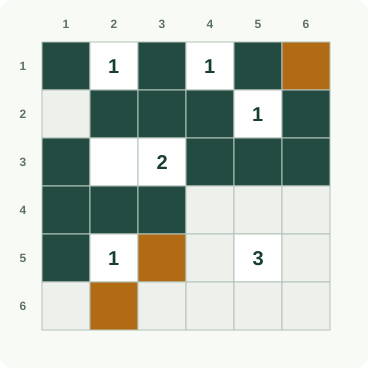
Step 5: Check the outer cells
Check each remaining island’s maximum reach. These outer squares belong to no legal island shape, so their only possible state is sea. Mark R2C1, R6C1 and R6C3 as sea.
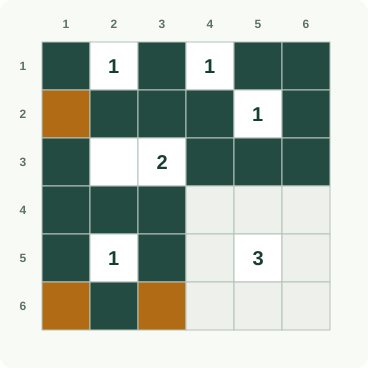
Step 6: Prevent a sea pool
Testing R4C4 as island leaves unreachable land or a forbidden sea pool. Make it sea; three-sea squares then force the two highlighted island cells. Mark R4C4 as sea; Mark R4C5 and R5C4 as island.
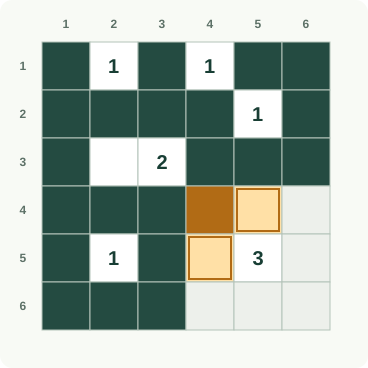
Step 7: Surround the completed 3
The island numbered 3 now contains exactly three cells. Its remaining side neighbors must become sea to prevent accidental growth or merging. Mark R4C6, R5C6 and R6C5 as sea.
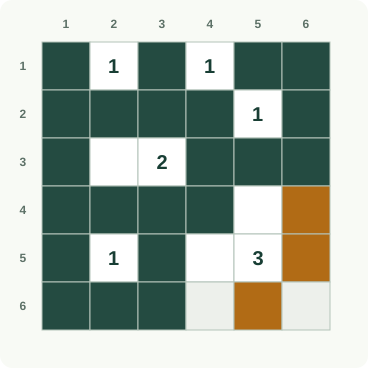
Step 8: Complete the connected sea
Finish the completed island’s boundary. The detached bottom corner cannot join any numbered island, so it is sea; check the sea remains connected. Mark R6C4 and R6C6 as sea.
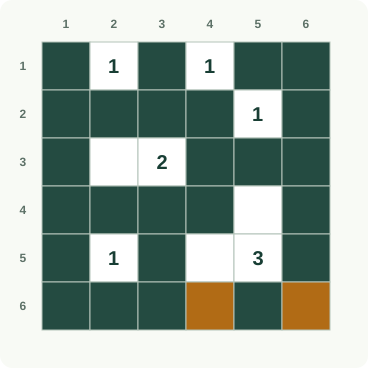
Recover when the next move is unclear
Recount small islands first, including the clue cells. Then inspect all 2×2 squares touching your latest black marks. Finally, trace each separate sea component and ask where it could still connect to the others. Restrictive boundaries often reveal a route that a clue-only scan misses.
If an island is too large or two clues have joined, return to the earliest uncertain white mark. If the sea is trapped, inspect the last border you completed. Undo the unsupported choice and retain earlier deductions whose reasons still hold, instead of recolouring a whole area at random.
Build a repeatable practice routine
Finish by counting every island, checking one clue per island, tracing one side-connected sea, and scanning for black 2×2 blocks. Perform these checks separately: concentrating only on the white areas can hide a sea mistake, while an attractive sea pattern can hide an island with the wrong size.
Nikoli's official Nurikabe page provides the primary rules behind this method. For another round, use Play Nurikabe free, then explain your first five deductions aloud or in notes. Read the rules guide for colour and connection details, or the strategy guide when simple local marks stop producing progress.
Sources and background
Worked example: follow each deduction
Read rows from top to bottom and columns from left to right, starting at 1. Read each instruction, then compare the orange changes with the previous picture. Keep undecided cells or segments open until the explanation settles them.
■ sea; □ island; ? = undecided
Follow these changes in order; the picture below includes all of them.
Colour row 1, column 1 black for sea. The island at row 1, column 2 has already reached its clue, 1. The numbered square counts toward that area. Another white square would exceed it, so every side neighbour must be black sea.
Colour row 1, column 3 black for sea. The island at row 1, column 2 has already reached its clue, 1. The numbered square counts toward that area. Another white square would exceed it, so every side neighbour must be black sea.
Colour row 2, column 2 black for sea. The island at row 1, column 2 has already reached its clue, 1. The numbered square counts toward that area. Another white square would exceed it, so every side neighbour must be black sea.
Step 1: the orange outlines mark the changes explained above. Follow these changes in order; the picture below includes all of them.
Colour row 1, column 5 black for sea. The island at row 1, column 4 has already reached its clue, 1. The numbered square counts toward that area. Another white square would exceed it, so every side neighbour must be black sea.
Colour row 2, column 4 black for sea. The island at row 1, column 4 has already reached its clue, 1. The numbered square counts toward that area. Another white square would exceed it, so every side neighbour must be black sea.
Colour row 3, column 5 black for sea. The island at row 2, column 5 has already reached its clue, 1. The numbered square counts toward that area. Another white square would exceed it, so every side neighbour must be black sea.
Step 2: the orange outlines mark the changes explained above. Follow these changes in order; the picture below includes all of them.
Colour row 2, column 3 black for sea. The island at row 3, column 3 has already reached its clue, 2. The numbered square counts toward that area. Another white square would exceed it, so every side neighbour must be black sea.
Colour row 4, column 3 black for sea. The island at row 3, column 3 has already reached its clue, 2. The numbered square counts toward that area. Another white square would exceed it, so every side neighbour must be black sea.
Colour row 5, column 1 black for sea. The island at row 5, column 2 has already reached its clue, 1. The numbered square counts toward that area. Another white square would exceed it, so every side neighbour must be black sea.
Step 3: the orange outlines mark the changes explained above. Follow these changes in order; the picture below includes all of them.
Colour row 5, column 3 black for sea. The island at row 5, column 2 has already reached its clue, 1. The numbered square counts toward that area. Another white square would exceed it, so every side neighbour must be black sea.
Colour row 6, column 2 black for sea. The island at row 5, column 2 has already reached its clue, 1. The numbered square counts toward that area. Another white square would exceed it, so every side neighbour must be black sea.
Colour row 1, column 6 black for sea. Every white square must join one numbered island by sides, within that island’s size limit. No remaining legal island can reach this square, so it must be sea.
Step 4: the orange outlines mark the changes explained above. Follow these changes in order; the picture below includes all of them.
Colour row 2, column 1 black for sea. Every white square must join one numbered island by sides, within that island’s size limit. No remaining legal island can reach this square, so it must be sea.
Colour row 6, column 1 black for sea. Every white square must join one numbered island by sides, within that island’s size limit. No remaining legal island can reach this square, so it must be sea.
Colour row 6, column 3 black for sea. Every white square must join one numbered island by sides, within that island’s size limit. No remaining legal island can reach this square, so it must be sea.
Step 5: the orange outlines mark the changes explained above. Follow these changes in order; the picture below includes all of them.
Colour row 4, column 4 black for sea. This is a trial-and-contradiction step. Temporarily try a white island square here and continue the rules from the current grid. Every continuation fails: an established white square cannot join any numbered island or the remaining islands leave an unavoidable solid 2×2 sea block. Undo that trial and use the stated choice.
Keep row 4, column 5 white as part of an island. The other three squares of this 2×2 block are sea: row 3, column 4; row 3, column 5; row 4, column 4. Making the fourth sea would create a forbidden solid pool. Keep it white.
Keep row 5, column 4 white as part of an island. The other three squares of this 2×2 block are sea: row 4, column 3; row 4, column 4; row 5, column 3. Making the fourth sea would create a forbidden solid pool. Keep it white.
Step 6: the orange outlines mark the changes explained above. Follow these changes in order; the picture below includes all of them.
Colour row 4, column 6 black for sea. The island at row 5, column 5 has already reached its clue, 3. The numbered square counts toward that area. Another white square would exceed it, so every side neighbour must be black sea.
Colour row 5, column 6 black for sea. The island at row 5, column 5 has already reached its clue, 3. The numbered square counts toward that area. Another white square would exceed it, so every side neighbour must be black sea.
Colour row 6, column 5 black for sea. The island at row 5, column 5 has already reached its clue, 3. The numbered square counts toward that area. Another white square would exceed it, so every side neighbour must be black sea.
Step 7: the orange outlines mark the changes explained above. Follow these changes in order; the picture below includes all of them.
Colour row 6, column 4 black for sea. The island at row 5, column 5 has already reached its clue, 3. The numbered square counts toward that area. Another white square would exceed it, so every side neighbour must be black sea.
Colour row 6, column 6 black for sea. Every white square must join one numbered island by sides, within that island’s size limit. No remaining legal island can reach this square, so it must be sea.
Step 8: the orange outlines mark the changes explained above.
Frequently asked questions
What are the easiest Nurikabe clues to start with?
Start with 1s because their islands are already complete. Nearby clues that need separating and islands with one possible growth exit are also productive. A large clue is not necessarily the best starting point.
Should I guess an island shape?
Keep possible shapes as alternatives until a rule forces one. If you test a hypothesis, label it clearly and undo it completely when it fails. Beginners usually learn more by checking completed boundaries and sea routes first.
Why can I mark land without knowing its island?
The ban on a black 2×2 square can force a cell white before its clue connection is known. It still must eventually join exactly one numbered island, so keep the connection question open rather than inventing a new island.
Which puzzles use similar beginner skills?
Hitori also asks you to protect a connected unshaded area. Slitherlink rewards local deductions followed by a global connection check, and Hashi develops the habit of revisiting a whole network after each confirmed link.