Slitherlink · EN
Slitherlink for Beginners: Build the Loop Step by Step
Start Slitherlink by excluding all four sides of every 0, then use clue counts and the rule of two lines at each used dot to force nearby edges. Build short confirmed paths and join them carefully until one loop satisfies every number.
Separate lines from ruled-out edges
A useful solve records both decisions: this edge belongs to the loop, and this edge cannot belong. An empty-looking edge may still be undecided, so do not mentally treat every missing line as an exclusion. The distinction matters whenever an endpoint has only one legal continuation.
Begin by finding the cell borders and the dots at their ends. Numbers count borders; dots control continuity. Alternating those two views is the basic solving rhythm: a clue forces a line, the line constrains a dot, and the dot constrains another clue.
First deduction: surround every 0 with exclusions
A 0 cannot have any loop edge on its four sides. Exclude those sides immediately. Then inspect the four corner dots around that cell. The missing options there can force an incoming line to turn away from the 0 or prevent another edge from being used.
A neighbouring clue may become much tighter after these exclusions. Count how many available sides it still has rather than looking only at its printed number. A 3 with one side excluded needs all three other sides, which can start a useful chain.
Second deduction: finish a clue's count
For each clue, count confirmed lines and undecided sides. If it already has enough lines, exclude every remaining side. If all its remaining available sides are needed to reach the number, draw them. This works for every clue value, including nearly completed 1s and 2s.
Do the subtraction explicitly. A 2 with one confirmed line still needs one more; it does not need both remaining options merely because two are available. Keep alternatives unresolved unless the number of available edges exactly matches the missing count.
Third deduction: use the outside corners
At a corner dot of the whole board, only two edges are available. They must both be present or both absent. A corner cell labelled 1 cannot use that pair because it would already have two sides, so the two edges meeting at the corner dot are excluded.
A corner cell labelled 3 must use the pair meeting at the outside corner: without them it could use at most its other two sides. These conclusions follow from the corner dot's continuity and the cell's number together. They are useful opening patterns because the boundary removes alternatives.
Fourth deduction: continue open endpoints
A used dot needs two lines. If it has one confirmed line and only one other available edge, that edge must be drawn. If it already has two confirmed lines, exclude all other incident edges. Follow these consequences along the new path until another choice appears.
A dot with no lines can remain unused, so do not automatically draw its last two available edges. If only one edge remains available at an unused dot, exclude it: using it would create an endpoint that could never gain a second line.
Start with this easy puzzle
Lines belong to the loop and crosses exclude an edge. Orange marks identify the new decisions; a number counts only its four surrounding edges.
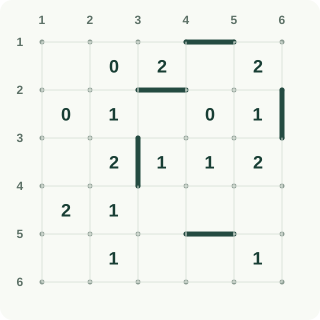
Step 1: Clear the zero clues
A zero clue forbids all four surrounding edges. Start by excluding the highlighted borders around the upper zero clues before attempting any loop segments. Exclude R1C2–R1C3, R2C2–R2C3, R1C2–R2C2, R1C3–R2C3, R2C1–R2C2, R3C1–R3C2 and R2C1–R3C1.
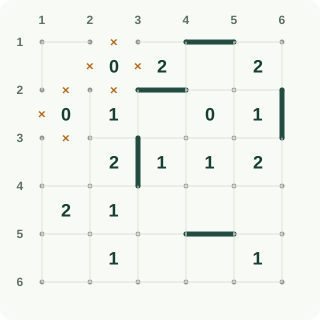
Step 2: Carry zero exclusions outward
Continue excluding zero-clue borders. The adjacent 1 already has its permitted edge accounted for, so its other highlighted borders must remain absent. Exclude R2C2–R3C2, R2C4–R2C5, R3C4–R3C5, R2C4–R3C4, R2C5–R3C5, R2C5–R2C6 and R3C5–R3C6.
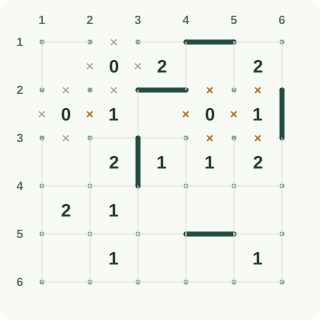
Step 3: Use fixed totals and vertices
The central 1 has its edge allowance fixed. At nearby vertices, excluded edges leave either no loop passage or one forced continuation. Exclude R3C3–R3C4, R4C3–R4C4, R3C4–R4C4, R1C1–R1C2, R1C3–R1C4 and R1C1–R2C1; Draw R1C4–R2C4.
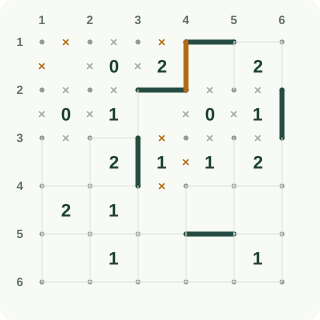
Step 4: Continue each visited vertex
Every visited vertex must have two edges. Follow existing segments through forced continuations; remove alternatives that would create a dead end or a branch. Draw R2C3–R3C3, R1C6–R2C6 and R3C6–R4C6; Exclude R1C5–R2C5, R3C1–R4C1, R3C2–R3C3 and R3C5–R4C5.
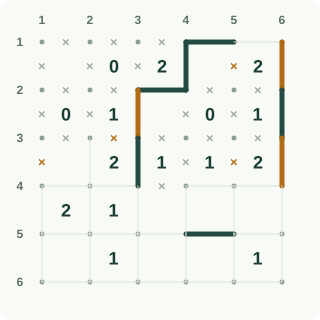
Step 5: Return to the clue totals
Return to the numbered cells after each continuation. Their remaining edge totals force new segments, which then determine the next vertex choices. Draw R1C5–R1C6, R4C4–R4C5, R4C5–R4C6 and R4C4–R5C4; Exclude R3C2–R4C2, R4C5–R5C5 and R4C6–R5C6.
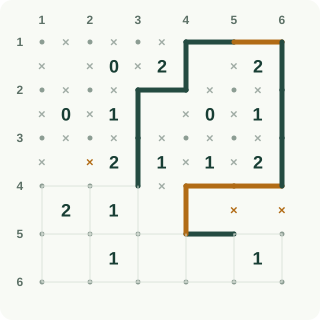
Step 6: Join counts with continuations
An edge cannot stop at an interior vertex. Combine that continuation rule with the neighboring 2 and 1 totals to resolve the highlighted corridors. Exclude R5C3–R5C4, R5C4–R6C4, R5C2–R5C3, R4C2–R5C2 and R4C3–R5C3; Draw R4C2–R4C3 and R4C1–R4C2.
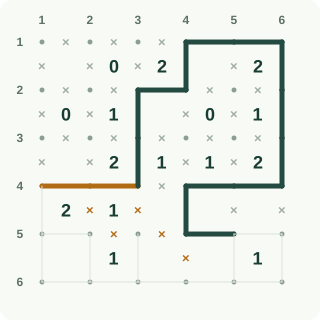
Step 7: Propagate around the lower boundary
Propagate the lower loop using the same degree rule. A vertex with one line needs one continuation; a vertex with no possible continuation stays unused. Exclude R5C3–R6C3, R5C1–R5C2 and R5C2–R6C2; Draw R4C1–R5C1, R5C1–R6C1, R6C1–R6C2 and R6C2–R6C3.
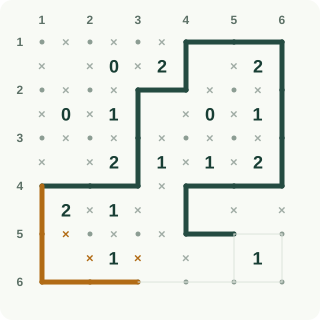
Step 8: Reject the last overcount
Test the last uncertain line against the bottom-right 1: it would exceed that clue. Exclude it, then complete the forced lower-right continuations. Draw R6C3–R6C4, R6C4–R6C5 and R5C5–R6C5; Exclude R5C5–R5C6, R5C6–R6C6 and R6C5–R6C6.
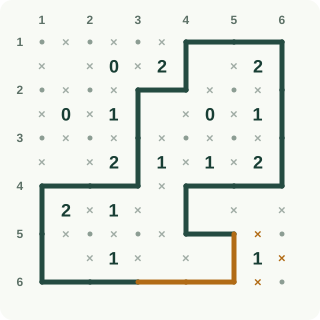
Follow the illustrated easy solve actively
For each diagram, say which requirement forces the highlighted change. It will usually be a clue count, a dot needing a continuation, or a premature-loop exclusion. Count again on the updated diagram before moving on, so you can see how one small change supplies the next deduction.
Do not insist on extending one path continuously from beginning to end. You may prove several disconnected short paths before the links between them are clear. Each confirmed section is valid information; the final loop is assembled when the surrounding clues eliminate its remaining alternatives.
Stop a small loop from closing too early
Before joining two nearby endpoints, trace whether they are the ends of the same path. If joining them would close a loop while other confirmed lines or unsatisfied requirements remain elsewhere, that closing edge is unavailable. The route needs room to incorporate the rest of the puzzle.
This explains why a locally legal-looking edge can still be wrong. Its nearby clues may accept it, but the one-loop rule considers the whole board. Trace the path patiently; a long bend can make two ends look unrelated even though they already belong to one component.
Use a short review when stuck
Revisit cells touched by your latest lines and exclusions, then inspect dots with one incident line. Next check clues with only one missing side decision and paths close to forming a loop. These focused scans usually produce more information than repeatedly counting every number from scratch.
Finish by checking all clue counts, all used-dot degrees, and one continuous loop. Nikoli's official Slitherlink page supplies the primary rules. Play Slitherlink free for another round, read the rules guide for definitions, or continue to solving strategies for inside-outside reasoning and shared consequences.
Sources and background
Worked example: follow each deduction
Read rows from top to bottom and columns from left to right, starting at 1. Read each instruction, then compare the orange changes with the previous picture. Keep undecided cells or segments open until the explanation settles them.
× no line; ? = undecided
Follow these changes in order; the picture below includes all of them.
Mark the segment between row 1, column 2 and row 1, column 3 unused (×). The clue at row 1, column 2 requires exactly 0 of its four borders. The other borders already provide 0, with 3 undecided. Count those first; only this choice reaches the clue without exceeding it.
Mark the segment between row 2, column 2 and row 2, column 3 unused (×). The clue at row 1, column 2 requires exactly 0 of its four borders. The other borders already provide 0, with 2 undecided. Count those first; only this choice reaches the clue without exceeding it.
Mark the segment between row 1, column 2 and row 2, column 2 unused (×). The clue at row 1, column 2 requires exactly 0 of its four borders. The other borders already provide 0, with 1 undecided. Count those first; only this choice reaches the clue without exceeding it.
Mark the segment between row 1, column 3 and row 2, column 3 unused (×). The clue at row 1, column 2 requires exactly 0 of its four borders. The other borders already provide 0, with 0 undecided. Count those first; only this choice reaches the clue without exceeding it.
Mark the segment between row 2, column 1 and row 2, column 2 unused (×). The clue at row 2, column 1 requires exactly 0 of its four borders. The other borders already provide 0, with 3 undecided. Count those first; only this choice reaches the clue without exceeding it.
Mark the segment between row 3, column 1 and row 3, column 2 unused (×). The clue at row 2, column 1 requires exactly 0 of its four borders. The other borders already provide 0, with 2 undecided. Count those first; only this choice reaches the clue without exceeding it.
Mark the segment between row 2, column 1 and row 3, column 1 unused (×). The clue at row 2, column 1 requires exactly 0 of its four borders. The other borders already provide 0, with 1 undecided. Count those first; only this choice reaches the clue without exceeding it.
Step 1: the orange outlines mark the changes explained above. Follow these changes in order; the picture below includes all of them.
Mark the segment between row 2, column 2 and row 3, column 2 unused (×). The clue at row 2, column 1 requires exactly 0 of its four borders. The other borders already provide 0, with 0 undecided. Count those first; only this choice reaches the clue without exceeding it.
Mark the segment between row 2, column 4 and row 2, column 5 unused (×). The clue at row 2, column 4 requires exactly 0 of its four borders. The other borders already provide 0, with 3 undecided. Count those first; only this choice reaches the clue without exceeding it.
Mark the segment between row 3, column 4 and row 3, column 5 unused (×). The clue at row 2, column 4 requires exactly 0 of its four borders. The other borders already provide 0, with 2 undecided. Count those first; only this choice reaches the clue without exceeding it.
Mark the segment between row 2, column 4 and row 3, column 4 unused (×). The clue at row 2, column 4 requires exactly 0 of its four borders. The other borders already provide 0, with 1 undecided. Count those first; only this choice reaches the clue without exceeding it.
Mark the segment between row 2, column 5 and row 3, column 5 unused (×). The clue at row 2, column 4 requires exactly 0 of its four borders. The other borders already provide 0, with 0 undecided. Count those first; only this choice reaches the clue without exceeding it.
Mark the segment between row 2, column 5 and row 2, column 6 unused (×). The clue at row 2, column 5 requires exactly 1 of its four borders. The other borders already provide 1, with 1 undecided. Count those first; only this choice reaches the clue without exceeding it.
Mark the segment between row 3, column 5 and row 3, column 6 unused (×). The clue at row 2, column 5 requires exactly 1 of its four borders. The other borders already provide 1, with 0 undecided. Count those first; only this choice reaches the clue without exceeding it.
Step 2: the orange outlines mark the changes explained above. Follow these changes in order; the picture below includes all of them.
Mark the segment between row 3, column 3 and row 3, column 4 unused (×). The clue at row 3, column 3 requires exactly 1 of its four borders. The other borders already provide 1, with 2 undecided. Count those first; only this choice reaches the clue without exceeding it.
Mark the segment between row 4, column 3 and row 4, column 4 unused (×). The clue at row 3, column 3 requires exactly 1 of its four borders. The other borders already provide 1, with 1 undecided. Count those first; only this choice reaches the clue without exceeding it.
Mark the segment between row 3, column 4 and row 4, column 4 unused (×). The clue at row 3, column 3 requires exactly 1 of its four borders. The other borders already provide 1, with 0 undecided. Count those first; only this choice reaches the clue without exceeding it.
Mark the segment between row 1, column 1 and row 1, column 2 unused (×). At the junction at row 1, column 2, the loop must use zero or two segments, never one or three. Other segments already contribute 0, with 0 still undecided. The stated choice is the only one that allows the required total.
Mark the segment between row 1, column 3 and row 1, column 4 unused (×). At the junction at row 1, column 3, the loop must use zero or two segments, never one or three. Other segments already contribute 0, with 0 still undecided. The stated choice is the only one that allows the required total.
Draw the segment between row 1, column 4 and row 2, column 4. At the junction at row 1, column 4, the loop must use zero or two segments, never one or three. Other segments already contribute 1, with 0 still undecided. The stated choice is the only one that allows the required total.
Mark the segment between row 1, column 1 and row 2, column 1 unused (×). At the junction at row 2, column 1, the loop must use zero or two segments, never one or three. Other segments already contribute 0, with 0 still undecided. The stated choice is the only one that allows the required total.
Step 3: the orange outlines mark the changes explained above. Follow these changes in order; the picture below includes all of them.
Draw the segment between row 2, column 3 and row 3, column 3. At the junction at row 2, column 3, the loop must use zero or two segments, never one or three. Other segments already contribute 1, with 0 still undecided. The stated choice is the only one that allows the required total.
Mark the segment between row 1, column 5 and row 2, column 5 unused (×). At the junction at row 2, column 5, the loop must use zero or two segments, never one or three. Other segments already contribute 0, with 0 still undecided. The stated choice is the only one that allows the required total.
Draw the segment between row 1, column 6 and row 2, column 6. At the junction at row 2, column 6, the loop must use zero or two segments, never one or three. Other segments already contribute 1, with 0 still undecided. The stated choice is the only one that allows the required total.
Mark the segment between row 3, column 1 and row 4, column 1 unused (×). At the junction at row 3, column 1, the loop must use zero or two segments, never one or three. Other segments already contribute 0, with 0 still undecided. The stated choice is the only one that allows the required total.
Mark the segment between row 3, column 2 and row 3, column 3 unused (×). At the junction at row 3, column 3, the loop must use zero or two segments, never one or three. Other segments already contribute 2, with 0 still undecided. The stated choice is the only one that allows the required total.
Mark the segment between row 3, column 5 and row 4, column 5 unused (×). At the junction at row 3, column 5, the loop must use zero or two segments, never one or three. Other segments already contribute 0, with 0 still undecided. The stated choice is the only one that allows the required total.
Draw the segment between row 3, column 6 and row 4, column 6. At the junction at row 3, column 6, the loop must use zero or two segments, never one or three. Other segments already contribute 1, with 0 still undecided. The stated choice is the only one that allows the required total.
Step 4: the orange outlines mark the changes explained above. Follow these changes in order; the picture below includes all of them.
Draw the segment between row 1, column 5 and row 1, column 6. The clue at row 1, column 5 requires exactly 2 of its four borders. The other borders already provide 1, with 0 undecided. Count those first; only this choice reaches the clue without exceeding it.
Draw the segment between row 4, column 4 and row 4, column 5. The clue at row 3, column 4 requires exactly 1 of its four borders. The other borders already provide 0, with 0 undecided. Count those first; only this choice reaches the clue without exceeding it.
Draw the segment between row 4, column 5 and row 4, column 6. The clue at row 3, column 5 requires exactly 2 of its four borders. The other borders already provide 1, with 0 undecided. Count those first; only this choice reaches the clue without exceeding it.
Mark the segment between row 3, column 2 and row 4, column 2 unused (×). At the junction at row 3, column 2, the loop must use zero or two segments, never one or three. Other segments already contribute 0, with 0 still undecided. The stated choice is the only one that allows the required total.
Draw the segment between row 4, column 4 and row 5, column 4. At the junction at row 4, column 4, the loop must use zero or two segments, never one or three. Other segments already contribute 1, with 0 still undecided. The stated choice is the only one that allows the required total.
Mark the segment between row 4, column 5 and row 5, column 5 unused (×). At the junction at row 4, column 5, the loop must use zero or two segments, never one or three. Other segments already contribute 2, with 0 still undecided. The stated choice is the only one that allows the required total.
Mark the segment between row 4, column 6 and row 5, column 6 unused (×). At the junction at row 4, column 6, the loop must use zero or two segments, never one or three. Other segments already contribute 2, with 0 still undecided. The stated choice is the only one that allows the required total.
Step 5: the orange outlines mark the changes explained above. Follow these changes in order; the picture below includes all of them.
Mark the segment between row 5, column 3 and row 5, column 4 unused (×). At the junction at row 5, column 4, the loop must use zero or two segments, never one or three. Other segments already contribute 2, with 1 still undecided. The stated choice is the only one that allows the required total.
Mark the segment between row 5, column 4 and row 6, column 4 unused (×). At the junction at row 5, column 4, the loop must use zero or two segments, never one or three. Other segments already contribute 2, with 0 still undecided. The stated choice is the only one that allows the required total.
Draw the segment between row 4, column 2 and row 4, column 3. The clue at row 3, column 2 requires exactly 2 of its four borders. The other borders already provide 1, with 0 undecided. Count those first; only this choice reaches the clue without exceeding it.
Mark the segment between row 5, column 2 and row 5, column 3 unused (×). The clue at row 4, column 2 requires exactly 1 of its four borders. The other borders already provide 1, with 2 undecided. Count those first; only this choice reaches the clue without exceeding it.
Mark the segment between row 4, column 2 and row 5, column 2 unused (×). The clue at row 4, column 2 requires exactly 1 of its four borders. The other borders already provide 1, with 1 undecided. Count those first; only this choice reaches the clue without exceeding it.
Mark the segment between row 4, column 3 and row 5, column 3 unused (×). The clue at row 4, column 2 requires exactly 1 of its four borders. The other borders already provide 1, with 0 undecided. Count those first; only this choice reaches the clue without exceeding it.
Draw the segment between row 4, column 1 and row 4, column 2. At the junction at row 4, column 2, the loop must use zero or two segments, never one or three. Other segments already contribute 1, with 0 still undecided. The stated choice is the only one that allows the required total.
Step 6: the orange outlines mark the changes explained above. Follow these changes in order; the picture below includes all of them.
Mark the segment between row 5, column 3 and row 6, column 3 unused (×). At the junction at row 5, column 3, the loop must use zero or two segments, never one or three. Other segments already contribute 0, with 0 still undecided. The stated choice is the only one that allows the required total.
Draw the segment between row 4, column 1 and row 5, column 1. At the junction at row 4, column 1, the loop must use zero or two segments, never one or three. Other segments already contribute 1, with 0 still undecided. The stated choice is the only one that allows the required total.
Mark the segment between row 5, column 1 and row 5, column 2 unused (×). The clue at row 4, column 1 requires exactly 2 of its four borders. The other borders already provide 2, with 0 undecided. Count those first; only this choice reaches the clue without exceeding it.
Draw the segment between row 5, column 1 and row 6, column 1. At the junction at row 5, column 1, the loop must use zero or two segments, never one or three. Other segments already contribute 1, with 0 still undecided. The stated choice is the only one that allows the required total.
Mark the segment between row 5, column 2 and row 6, column 2 unused (×). At the junction at row 5, column 2, the loop must use zero or two segments, never one or three. Other segments already contribute 0, with 0 still undecided. The stated choice is the only one that allows the required total.
Draw the segment between row 6, column 1 and row 6, column 2. At the junction at row 6, column 1, the loop must use zero or two segments, never one or three. Other segments already contribute 1, with 0 still undecided. The stated choice is the only one that allows the required total.
Draw the segment between row 6, column 2 and row 6, column 3. At the junction at row 6, column 2, the loop must use zero or two segments, never one or three. Other segments already contribute 1, with 0 still undecided. The stated choice is the only one that allows the required total.
Step 7: the orange outlines mark the changes explained above. Follow these changes in order; the picture below includes all of them.
Draw the segment between row 6, column 3 and row 6, column 4. At the junction at row 6, column 3, the loop must use zero or two segments, never one or three. Other segments already contribute 1, with 0 still undecided. The stated choice is the only one that allows the required total.
Draw the segment between row 6, column 4 and row 6, column 5. At the junction at row 6, column 4, the loop must use zero or two segments, never one or three. Other segments already contribute 1, with 0 still undecided. The stated choice is the only one that allows the required total.
Mark the segment between row 5, column 5 and row 5, column 6 unused (×). This is a trial-and-contradiction step. Temporarily try a line here and continue the rules from the current grid. Every continuation fails: the clue 1 at row 5, column 5 cannot have exactly 1 drawn borders. Undo that trial and use the stated choice.
Draw the segment between row 5, column 5 and row 6, column 5. At the junction at row 5, column 5, the loop must use zero or two segments, never one or three. Other segments already contribute 1, with 0 still undecided. The stated choice is the only one that allows the required total.
Mark the segment between row 5, column 6 and row 6, column 6 unused (×). At the junction at row 5, column 6, the loop must use zero or two segments, never one or three. Other segments already contribute 0, with 0 still undecided. The stated choice is the only one that allows the required total.
Mark the segment between row 6, column 5 and row 6, column 6 unused (×). At the junction at row 6, column 5, the loop must use zero or two segments, never one or three. Other segments already contribute 2, with 0 still undecided. The stated choice is the only one that allows the required total.
Step 8: the orange outlines mark the changes explained above.
Frequently asked questions
What is the best first Slitherlink move?
Exclude the four sides of every 0, then inspect neighbouring clues and dots. Boundary corner clues are also useful because the corner dot has only two available edges.
Can I draw both available edges at a dot?
Only if that dot must be used. An ordinary dot with no confirmed line may stay unused. A dot with one confirmed line, however, must receive exactly one more.
Why are exclusions useful if they are not loop lines?
They remove possible continuations and reduce the sides available to clues. Often an excluded edge is what proves the next line necessary. Treat it as confirmed information, not an absence of progress.
What should I try after the beginner guide?
The strategy guide introduces inside-outside labels and more systematic path checks. Masyu is a useful related loop puzzle; Hashi and Nurikabe offer other ways to practise local deductions plus global connectivity.