Slitherlink · EN
Slitherlink Solving Strategies: Counts, Paths and Inside-Outside Logic
Solve harder Slitherlink puzzles by combining clue arithmetic, zero-or-two edge counts at dots, and the requirement that all selected edges form one loop. Inside-outside labels add another useful view: a loop edge separates opposite sides, while an excluded edge joins cells on the same side.
Clue saturation and remaining-edge counts
For each clue, subtract the confirmed surrounding lines from its number. Compare the missing count with its undecided sides. A missing count of zero excludes the rest; a missing count equal to the available sides forces them all. Too few available sides reveals a contradiction.
Use this calculation after every neighbouring change. A clue that looked loose can become decisive after a dot excludes one edge. Keep lines and exclusions equally visible so the count reflects actual possibilities rather than merely the number of edges not yet drawn.
Dot propagation and parity
A dot's final degree is zero or two. One confirmed edge with one legal continuation forces that continuation; two confirmed edges exclude all other incident edges. With no confirmed edges and just one possible edge left, that final edge must also be excluded.
This even-degree condition is a useful way to understand boundary corners. Their two edges are either both present or both absent. Combining that fact with a corner clue can force decisions that neither the number nor the dot would determine alone.
Combine neighbouring clues without memorising shapes
Adjacent cells share an edge and two endpoint dots. Consider how each possible state of that edge affects both counts and the available continuations at those dots. A high clue near a 0 is particularly restrictive because one cell removes options while the other needs most of its sides.
When learning a pattern, reconstruct its proof on the actual board rather than applying a remembered outline blindly. Boundary placement, other confirmed edges, and an already connected path can matter. The transferable skill is seeing how shared constraints eliminate an alternative.
Inside-outside labelling
A simple closed loop separates the plane into inside and outside. Treat the space beyond the board as outside. Across an excluded cell border, the two neighbouring cells lie on the same side of the loop; across a present loop edge, they lie on opposite sides.
Propagate these relationships through known borders. Once two neighbouring cells have known labels, opposite labels force their shared edge present and matching labels force it absent. At the board boundary, a present edge separates an inside cell from the outside, while an excluded boundary edge leaves that cell outside.
Use labels carefully near corners and blanks
A blank cell has no numerical clue but still participates fully in inside-outside reasoning. It can carry a label through a chain of excluded borders and help determine a distant edge. This gives otherwise uninformative empty space a useful role in the solve.
Cells meeting only diagonally do not automatically share a label. A loop may turn at their common dot and separate them in different ways. Transfer labels through shared borders whose edge states are known, or through an independently proved relationship, rather than through visual proximity.
Track path components and forbid early closure
Trace each confirmed open path from one endpoint to the other. A proposed edge joining its own two ends closes a loop. It is forbidden if the resulting loop leaves other confirmed edges or required clues unsatisfied elsewhere. This global check often resolves an endpoint that has two locally acceptable choices.
Joining endpoints from different components is a different situation: it merges paths rather than closes one. Record that distinction before using the no-early-loop rule. A short visual gap can connect points that are already linked through a long route on the other side of the board.
Shared consequences and short contradictions
For a constrained undecided edge, examine present and absent as separate alternatives. Propagate only forced clue counts, dot degrees, labels, and path effects. Any edge state required in both alternatives is a direct shared consequence, even when the original edge remains undecided.
If one alternative gives a wrong clue count, an unavoidable endpoint, a branch, or an incomplete closed loop, it is disproved. Keep the assumption and its dependent marks distinct. Stop at a precise failure; a complicated branch with no visible next step is not itself a contradiction.
A harder worked example
This board uses the Hard preset. Follow the four cumulative stages, revisiting each affected constraint after a deduction. Lines belong to the loop and crosses exclude an edge. Orange marks identify the new decisions; a number counts only its four surrounding edges.
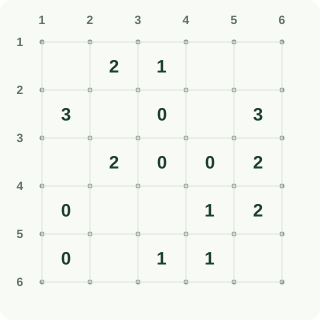
Worked stage 1
Begin with all zero clues: none of their borders may be used. Transfer each exclusion to neighboring cells and vertices. This stage marks absence rather than drawing speculative lines, but it removes most of the lower-left alternatives.
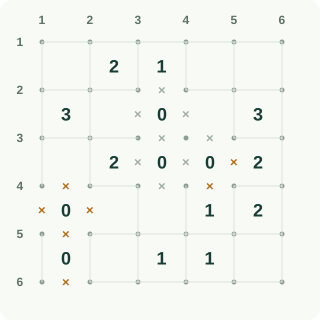
Worked stage 2
Propagate the nearby 2 and the vertex degree rule. Test uncertain upper edges when direct counts stall: one assumed line overfills a 2, while one assumed absence prevents a vertex continuation. Reject both assumptions.
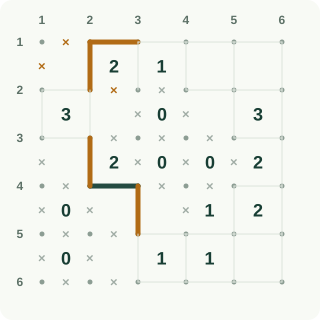
Worked stage 3
Continue around the upper boundary. The two 3 clues each need three borders; testing the competing absences makes those totals impossible. Restore the forced lines, then carry their degree-two continuations down through the adjacent vertices.
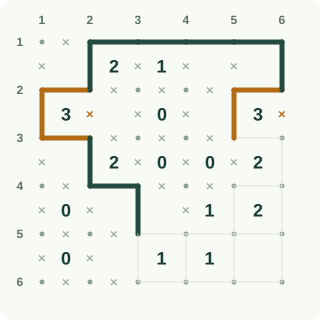
Worked stage 4
Resolve the lower clues after those upper choices. Their exact counts determine the final horizontal and vertical segments. At every visited vertex retain two edges, and confirm the result is one loop rather than several locally valid cycles.
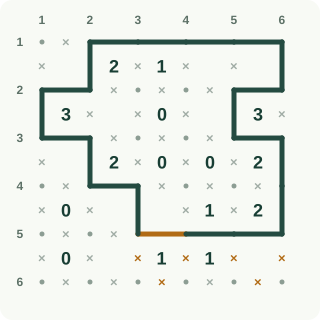
Sources and background
Worked example: follow each deduction
Read rows from top to bottom and columns from left to right, starting at 1. Read each instruction, then compare the orange changes with the previous picture. Keep undecided cells or segments open until the explanation settles them.
× no line; ? = undecided
Follow these changes in order; the picture below includes all of them.
Mark the segment between row 2, column 3 and row 2, column 4 unused (×). The clue at row 2, column 3 requires exactly 0 of its four borders. The other borders already provide 0, with 3 undecided. Count those first; only this choice reaches the clue without exceeding it.
Mark the segment between row 3, column 3 and row 3, column 4 unused (×). The clue at row 2, column 3 requires exactly 0 of its four borders. The other borders already provide 0, with 2 undecided. Count those first; only this choice reaches the clue without exceeding it.
Mark the segment between row 2, column 3 and row 3, column 3 unused (×). The clue at row 2, column 3 requires exactly 0 of its four borders. The other borders already provide 0, with 1 undecided. Count those first; only this choice reaches the clue without exceeding it.
Mark the segment between row 2, column 4 and row 3, column 4 unused (×). The clue at row 2, column 3 requires exactly 0 of its four borders. The other borders already provide 0, with 0 undecided. Count those first; only this choice reaches the clue without exceeding it.
Mark the segment between row 4, column 3 and row 4, column 4 unused (×). The clue at row 3, column 3 requires exactly 0 of its four borders. The other borders already provide 0, with 2 undecided. Count those first; only this choice reaches the clue without exceeding it.
Mark the segment between row 3, column 3 and row 4, column 3 unused (×). The clue at row 3, column 3 requires exactly 0 of its four borders. The other borders already provide 0, with 1 undecided. Count those first; only this choice reaches the clue without exceeding it.
Mark the segment between row 3, column 4 and row 4, column 4 unused (×). The clue at row 3, column 3 requires exactly 0 of its four borders. The other borders already provide 0, with 0 undecided. Count those first; only this choice reaches the clue without exceeding it.
Mark the segment between row 3, column 4 and row 3, column 5 unused (×). The clue at row 3, column 4 requires exactly 0 of its four borders. The other borders already provide 0, with 2 undecided. Count those first; only this choice reaches the clue without exceeding it.
Mark the segment between row 4, column 4 and row 4, column 5 unused (×). The clue at row 3, column 4 requires exactly 0 of its four borders. The other borders already provide 0, with 1 undecided. Count those first; only this choice reaches the clue without exceeding it.
Mark the segment between row 3, column 5 and row 4, column 5 unused (×). The clue at row 3, column 4 requires exactly 0 of its four borders. The other borders already provide 0, with 0 undecided. Count those first; only this choice reaches the clue without exceeding it.
Mark the segment between row 4, column 1 and row 4, column 2 unused (×). The clue at row 4, column 1 requires exactly 0 of its four borders. The other borders already provide 0, with 3 undecided. Count those first; only this choice reaches the clue without exceeding it.
Mark the segment between row 5, column 1 and row 5, column 2 unused (×). The clue at row 4, column 1 requires exactly 0 of its four borders. The other borders already provide 0, with 2 undecided. Count those first; only this choice reaches the clue without exceeding it.
Mark the segment between row 4, column 1 and row 5, column 1 unused (×). The clue at row 4, column 1 requires exactly 0 of its four borders. The other borders already provide 0, with 1 undecided. Count those first; only this choice reaches the clue without exceeding it.
Mark the segment between row 4, column 2 and row 5, column 2 unused (×). The clue at row 4, column 1 requires exactly 0 of its four borders. The other borders already provide 0, with 0 undecided. Count those first; only this choice reaches the clue without exceeding it.
Mark the segment between row 6, column 1 and row 6, column 2 unused (×). The clue at row 5, column 1 requires exactly 0 of its four borders. The other borders already provide 0, with 2 undecided. Count those first; only this choice reaches the clue without exceeding it.
Step 1: the orange outlines mark the changes explained above. Follow these changes in order; the picture below includes all of them.
Mark the segment between row 5, column 1 and row 6, column 1 unused (×). The clue at row 5, column 1 requires exactly 0 of its four borders. The other borders already provide 0, with 1 undecided. Count those first; only this choice reaches the clue without exceeding it.
Mark the segment between row 5, column 2 and row 6, column 2 unused (×). The clue at row 5, column 1 requires exactly 0 of its four borders. The other borders already provide 0, with 0 undecided. Count those first; only this choice reaches the clue without exceeding it.
Mark the segment between row 3, column 2 and row 3, column 3 unused (×). At the junction at row 3, column 3, the loop must use zero or two segments, never one or three. Other segments already contribute 0, with 0 still undecided. The stated choice is the only one that allows the required total.
Mark the segment between row 3, column 1 and row 4, column 1 unused (×). At the junction at row 4, column 1, the loop must use zero or two segments, never one or three. Other segments already contribute 0, with 0 still undecided. The stated choice is the only one that allows the required total.
Mark the segment between row 4, column 4 and row 5, column 4 unused (×). At the junction at row 4, column 4, the loop must use zero or two segments, never one or three. Other segments already contribute 0, with 0 still undecided. The stated choice is the only one that allows the required total.
Mark the segment between row 5, column 2 and row 5, column 3 unused (×). At the junction at row 5, column 2, the loop must use zero or two segments, never one or three. Other segments already contribute 0, with 0 still undecided. The stated choice is the only one that allows the required total.
Mark the segment between row 6, column 2 and row 6, column 3 unused (×). At the junction at row 6, column 2, the loop must use zero or two segments, never one or three. Other segments already contribute 0, with 0 still undecided. The stated choice is the only one that allows the required total.
Draw the segment between row 4, column 2 and row 4, column 3. The clue at row 3, column 2 requires exactly 2 of its four borders. The other borders already provide 0, with 1 undecided. Count those first; only this choice reaches the clue without exceeding it.
Draw the segment between row 3, column 2 and row 4, column 2. The clue at row 3, column 2 requires exactly 2 of its four borders. The other borders already provide 1, with 0 undecided. Count those first; only this choice reaches the clue without exceeding it.
Draw the segment between row 4, column 3 and row 5, column 3. At the junction at row 4, column 3, the loop must use zero or two segments, never one or three. Other segments already contribute 1, with 0 still undecided. The stated choice is the only one that allows the required total.
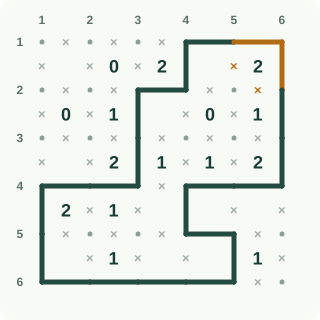
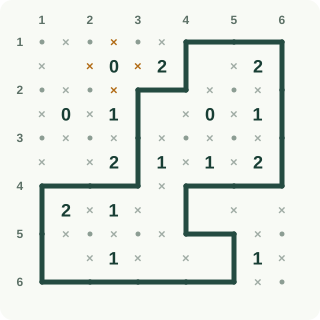
Mark the segment between row 1, column 1 and row 1, column 2 unused (×). This is a trial-and-contradiction step. Temporarily try a line here and continue the rules from the current grid. Every continuation fails: the clue 2 at row 1, column 2 cannot have exactly 2 drawn borders. Undo that trial and use the stated choice.
Mark the segment between row 1, column 1 and row 2, column 1 unused (×). At the junction at row 1, column 1, the loop must use zero or two segments, never one or three. Other segments already contribute 0, with 0 still undecided. The stated choice is the only one that allows the required total.
Draw the segment between row 1, column 2 and row 1, column 3. This is a trial-and-contradiction step. Temporarily try no line here and continue the rules from the current grid. Every continuation fails: the loop would stop or branch at the junction at row 1, column 3. Undo that trial and use the stated choice.
Draw the segment between row 1, column 2 and row 2, column 2. At the junction at row 1, column 2, the loop must use zero or two segments, never one or three. Other segments already contribute 1, with 0 still undecided. The stated choice is the only one that allows the required total.
Mark the segment between row 2, column 2 and row 2, column 3 unused (×). The clue at row 1, column 2 requires exactly 2 of its four borders. The other borders already provide 2, with 1 undecided. Count those first; only this choice reaches the clue without exceeding it.
Step 2: the orange outlines mark the changes explained above. Follow these changes in order; the picture below includes all of them.
Mark the segment between row 1, column 3 and row 2, column 3 unused (×). The clue at row 1, column 2 requires exactly 2 of its four borders. The other borders already provide 2, with 0 undecided. Count those first; only this choice reaches the clue without exceeding it.
Draw the segment between row 1, column 3 and row 1, column 4. At the junction at row 1, column 3, the loop must use zero or two segments, never one or three. Other segments already contribute 1, with 0 still undecided. The stated choice is the only one that allows the required total.
Mark the segment between row 1, column 4 and row 2, column 4 unused (×). The clue at row 1, column 3 requires exactly 1 of its four borders. The other borders already provide 1, with 0 undecided. Count those first; only this choice reaches the clue without exceeding it.
Draw the segment between row 1, column 4 and row 1, column 5. At the junction at row 1, column 4, the loop must use zero or two segments, never one or three. Other segments already contribute 1, with 0 still undecided. The stated choice is the only one that allows the required total.
Mark the segment between row 2, column 4 and row 2, column 5 unused (×). At the junction at row 2, column 4, the loop must use zero or two segments, never one or three. Other segments already contribute 0, with 0 still undecided. The stated choice is the only one that allows the required total.
Draw the segment between row 1, column 5 and row 1, column 6. This is a trial-and-contradiction step. Temporarily try no line here and continue the rules from the current grid. Every continuation fails: the clue 3 at row 2, column 1 cannot have exactly 3 drawn borders or the clue 3 at row 2, column 5 cannot have exactly 3 drawn borders. Undo that trial and use the stated choice.
Mark the segment between row 1, column 5 and row 2, column 5 unused (×). At the junction at row 1, column 5, the loop must use zero or two segments, never one or three. Other segments already contribute 2, with 0 still undecided. The stated choice is the only one that allows the required total.
Draw the segment between row 1, column 6 and row 2, column 6. At the junction at row 1, column 6, the loop must use zero or two segments, never one or three. Other segments already contribute 1, with 0 still undecided. The stated choice is the only one that allows the required total.
Draw the segment between row 2, column 1 and row 2, column 2. This is a trial-and-contradiction step. Temporarily try no line here and continue the rules from the current grid. Every continuation fails: the clue 3 at row 2, column 1 cannot have exactly 3 drawn borders. Undo that trial and use the stated choice.
Draw the segment between row 2, column 1 and row 3, column 1. At the junction at row 2, column 1, the loop must use zero or two segments, never one or three. Other segments already contribute 1, with 0 still undecided. The stated choice is the only one that allows the required total.
Mark the segment between row 2, column 2 and row 3, column 2 unused (×). At the junction at row 2, column 2, the loop must use zero or two segments, never one or three. Other segments already contribute 2, with 0 still undecided. The stated choice is the only one that allows the required total.
Draw the segment between row 3, column 1 and row 3, column 2. At the junction at row 3, column 1, the loop must use zero or two segments, never one or three. Other segments already contribute 1, with 0 still undecided. The stated choice is the only one that allows the required total.
Draw the segment between row 2, column 5 and row 2, column 6. This is a trial-and-contradiction step. Temporarily try no line here and continue the rules from the current grid. Every continuation fails: the clue 3 at row 2, column 5 cannot have exactly 3 drawn borders. Undo that trial and use the stated choice.
Draw the segment between row 2, column 5 and row 3, column 5. At the junction at row 2, column 5, the loop must use zero or two segments, never one or three. Other segments already contribute 1, with 0 still undecided. The stated choice is the only one that allows the required total.
Mark the segment between row 2, column 6 and row 3, column 6 unused (×). At the junction at row 2, column 6, the loop must use zero or two segments, never one or three. Other segments already contribute 2, with 0 still undecided. The stated choice is the only one that allows the required total.
Step 3: the orange outlines mark the changes explained above. Follow these changes in order; the picture below includes all of them.
Draw the segment between row 3, column 5 and row 3, column 6. At the junction at row 3, column 5, the loop must use zero or two segments, never one or three. Other segments already contribute 1, with 0 still undecided. The stated choice is the only one that allows the required total.
Draw the segment between row 3, column 6 and row 4, column 6. At the junction at row 3, column 6, the loop must use zero or two segments, never one or three. Other segments already contribute 1, with 0 still undecided. The stated choice is the only one that allows the required total.
Mark the segment between row 4, column 5 and row 4, column 6 unused (×). The clue at row 3, column 5 requires exactly 2 of its four borders. The other borders already provide 2, with 0 undecided. Count those first; only this choice reaches the clue without exceeding it.
Mark the segment between row 4, column 5 and row 5, column 5 unused (×). At the junction at row 4, column 5, the loop must use zero or two segments, never one or three. Other segments already contribute 0, with 0 still undecided. The stated choice is the only one that allows the required total.
Draw the segment between row 4, column 6 and row 5, column 6. At the junction at row 4, column 6, the loop must use zero or two segments, never one or three. Other segments already contribute 1, with 0 still undecided. The stated choice is the only one that allows the required total.
Draw the segment between row 5, column 4 and row 5, column 5. The clue at row 4, column 4 requires exactly 1 of its four borders. The other borders already provide 0, with 0 undecided. Count those first; only this choice reaches the clue without exceeding it.
Draw the segment between row 5, column 5 and row 5, column 6. The clue at row 4, column 5 requires exactly 2 of its four borders. The other borders already provide 1, with 0 undecided. Count those first; only this choice reaches the clue without exceeding it.
Mark the segment between row 6, column 4 and row 6, column 5 unused (×). The clue at row 5, column 4 requires exactly 1 of its four borders. The other borders already provide 1, with 2 undecided. Count those first; only this choice reaches the clue without exceeding it.
Mark the segment between row 5, column 4 and row 6, column 4 unused (×). The clue at row 5, column 4 requires exactly 1 of its four borders. The other borders already provide 1, with 1 undecided. Count those first; only this choice reaches the clue without exceeding it.
Mark the segment between row 5, column 5 and row 6, column 5 unused (×). The clue at row 5, column 4 requires exactly 1 of its four borders. The other borders already provide 1, with 0 undecided. Count those first; only this choice reaches the clue without exceeding it.
Draw the segment between row 5, column 3 and row 5, column 4. At the junction at row 5, column 4, the loop must use zero or two segments, never one or three. Other segments already contribute 1, with 0 still undecided. The stated choice is the only one that allows the required total.
Mark the segment between row 5, column 6 and row 6, column 6 unused (×). At the junction at row 5, column 6, the loop must use zero or two segments, never one or three. Other segments already contribute 2, with 0 still undecided. The stated choice is the only one that allows the required total.
Mark the segment between row 6, column 3 and row 6, column 4 unused (×). At the junction at row 6, column 4, the loop must use zero or two segments, never one or three. Other segments already contribute 0, with 0 still undecided. The stated choice is the only one that allows the required total.
Mark the segment between row 6, column 5 and row 6, column 6 unused (×). At the junction at row 6, column 5, the loop must use zero or two segments, never one or three. Other segments already contribute 0, with 0 still undecided. The stated choice is the only one that allows the required total.
Mark the segment between row 5, column 3 and row 6, column 3 unused (×). The clue at row 5, column 3 requires exactly 1 of its four borders. The other borders already provide 1, with 0 undecided. Count those first; only this choice reaches the clue without exceeding it.
Step 4: the orange outlines mark the changes explained above.
Frequently asked questions
What is inside-outside logic in Slitherlink?
A present loop edge separates an inside cell from an outside cell. An absent edge leaves adjacent cells on the same side. Propagating these relationships can determine borders far from the nearest useful number.
Is every high-clue pattern always safe to use?
Use its actual proof. Shared edges, endpoint degree, boundaries, and existing paths can change what is available. Reconstructing the count or continuation argument is safer than copying a remembered shape without its conditions.
Can a blank cell help solve a hard puzzle?
Yes. Its borders still affect dot continuity and carry inside-outside relationships. It lacks a number, but it is not excluded from the geometry of the loop.
What proves a temporary edge choice wrong?
A precise rule failure, such as a clue needing more available edges than remain, a dot forced to have an illegal degree, inconsistent side labels, or a closed loop that cannot include required material elsewhere.